Coding Smackdown's Content
There have been 72 items by Coding Smackdown (Search limited from 14-July 24)
#38801 Introducing Netduino Plus 2
 Posted by
on 08 November 2012 - 11:10 PM
in
Netduino Plus 2 (and Netduino Plus 1)
Posted by
on 08 November 2012 - 11:10 PM
in
Netduino Plus 2 (and Netduino Plus 1)
#37982 'AnalogInput' is an ambiguous reference after 4.2 RC1
Posted by
on 26 October 2012 - 01:16 PM
in
Beta Firmware and Drivers
#37924 Multiple Threads v. While Loop
Posted by
on 24 October 2012 - 02:23 PM
in
Netduino Plus 2 (and Netduino Plus 1)
#37744 Internet Printing (IPP) from Netduino
Posted by
on 22 October 2012 - 02:31 AM
in
General Discussion
#37389 OnInterrupt firing multiple times
Posted by
on 18 October 2012 - 01:55 PM
in
Netduino 2 (and Netduino 1)
#37387 OnInterrupt firing multiple times
Posted by
on 18 October 2012 - 01:30 PM
in
Netduino 2 (and Netduino 1)
public static void EngageHeaterButton_OnInterrupt(uint data1, uint data2, DateTime time)
{
  if (engageHeaterButtonLastPushed.AddMilliseconds(200) > time)
    return;
  // button press state received in data2
  // 0 = open, 1 = pressed
  if (data2 == 1)
  {
    PinManagement.heaterEngaged = true;
  }
  _displayHelper.DisplayText("Heater|Engaged");
  engageHeaterButtonLastPushed = time;
}
Hope this helps you out.
#37333 2D navigation using Triliteration
Posted by
on 17 October 2012 - 06:23 PM
in
General Discussion
#37248 Application freezing on Socket creation
Posted by
on 15 October 2012 - 08:42 PM
in
Netduino Plus 2 (and Netduino Plus 1)
#36761 Adafruit 20x2 Character VFD (Vacuum Fluorescent Display) - SPI interface - 20...
Posted by
on 08 October 2012 - 07:50 AM
in
General Discussion
#36594 Converting existing programs from 4.1 to 4.2
Posted by
on 05 October 2012 - 08:53 PM
in
Visual Studio
#36058 Play WAV File
Posted by
on 27 September 2012 - 01:01 PM
in
General Discussion
#35984 Websockets on Netduino Plus
Posted by
on 25 September 2012 - 07:10 PM
in
General Discussion
#35786 Mini Upgrade Woes
Posted by
on 22 September 2012 - 05:31 AM
in
Netduino Mini
#35718 Netduino Plus Built in Sketch
Posted by
on 21 September 2012 - 04:51 PM
in
General Discussion
#35717 Modbus-TCP library
Posted by
on 21 September 2012 - 04:46 PM
in
Project Showcase
#35525 How to install (or upgrade to) .NET Micro Framework v4.2 SDK
Posted by
on 19 September 2012 - 05:42 AM
in
General Discussion
#35514 How to install (or upgrade to) .NET Micro Framework v4.2 SDK
Posted by
on 19 September 2012 - 01:11 AM
in
General Discussion
#35512 Adafruit 20x2 Character VFD (Vacuum Fluorescent Display) - SPI interface - 20...
Posted by
on 19 September 2012 - 12:44 AM
in
General Discussion
http://www.adafruit.com/products/347
I was hoping to use it an one of my controller projects. I based my driver off of the MicroLiquidCrystal Shifter74Hc595LcdTransferProvider and the LCD class. I made changes based on the datasheets, but I'm having to send data and commands twice in order to get the controller to recognize what I'm sending.
I'm thinking maybe my SPI configuration is setup incorrectly, but I haven't been able to find too much about how to configure the SPI port.
I've included the code below, in case anyone can figure it out.
Thanks!
using System;
using System;
using System.Threading;
using Microsoft.SPOT;
using Microsoft.SPOT.Hardware;
using SecretLabs.NETMF.Hardware;
using SecretLabs.NETMF.Hardware.NetduinoPlus;
//
// SPI Vacum Flouresent Display Driver
// Based on the SPI_VFD Arduino Library
// Created by AdaFruit
//
namespace CodingSmackdown.Drivers
{
// When the display powers up, it is configured as follows:
//
// 1. Display clear
// 2. Function set:
// N = 1; 2-line display
// BR1=BR0=0; (100% brightness)
// 3. Display on/off control:
// D = 0; Display off
// C = 0; Cursor off
// B = 0; Blinking off
// 4. Entry mode set:
// I/D = 1; Increment by 1
// S = 0; No shift
//
// Note, however, that resetting the Arduino doesn't reset the LCD, so we
// can't assume that its in that state when a sketch starts (and the
// SPI_VFD constructor is called).
public class SPI_VFDisplay : IDisposable
{
// commands
private const byte VFD_CLEARDISPLAY = 0x01;
private const byte VFD_RETURNHOME = 0x00;
private const byte VFD_ENTRYMODESET = 0x04;
private const byte VFD_DISPLAYCONTROL = 0x08;
private const byte VFD_CURSORSHIFT = 0x10;
private const byte VFD_FUNCTIONSET = 0x30;
private const byte VFD_SETCGRAMADDR = 0x40;
private const byte VFD_SETDDRAMADDR = 0x80;
// flags for display entry mode
private const byte VFD_ENTRYRIGHT = 0x00;
private const byte VFD_ENTRYLEFT = 0x02;
private const byte VFD_ENTRYSHIFTINCREMENT = 0x01;
private const byte VFD_ENTRYSHIFTDECREMENT = 0x00;
// flags for display on/off control
private const byte VFD_DISPLAYON = 0x04;
private const byte VFD_DISPLAYOFF = 0x00;
private const byte VFD_CURSORON = 0x02;
private const byte VFD_CURSOROFF = 0x00;
private const byte VFD_BLINKON = 0x01;
private const byte VFD_BLINKOFF = 0x00;
// flags for display/cursor shift
private const byte VFD_DISPLAYMOVE = 0x08;
private const byte VFD_CURSORMOVE = 0x00;
private const byte VFD_MOVERIGHT = 0x04;
private const byte VFD_MOVELEFT = 0x00;
// flags for function set
private const byte VFD_2LINE = 0x08;
private const byte VFD_1LINE = 0x00;
private const byte VFD_SPICOMMAND = 0xF8;
private const byte VFD_SPIDATA = 0xFA;
private byte _linemode;
private byte _brightness;
private byte _displaycontrol;
private byte _shiftmode;
private byte _incrementmode;
private byte _displaymode;
private byte _cursormode;
private byte _blinkmode;
private byte _initialized;
private byte _numlines;
private byte _currline;
private readonly SPI _spi;
private readonly OutputPort _latchPort;
readonly byte[] _writeBuf = new byte[1];
public enum Brightness
{
VFD_BRIGHTNESS25 = 0x03,
VFD_BRIGHTNESS50 = 0x02,
VFD_BRIGHTNESS75 = 0x01,
VFD_BRIGHTNESS100 = 0x00
}
public SPI_VFDisplay(SPI.SPI_module spiBus, Cpu.Pin latchPin, Brightness brightness)
{
var spiConfig = new SPI.Configuration(
Cpu.Pin.GPIO_NONE, //latchPin,
false, // active state
0, // setup time
0, // hold time
false, // clock idle state
true, // clock edge
1000, // clock rate
spiBus);
_spi = new SPI(spiConfig);
_latchPort = new OutputPort(latchPin, true);
//default to 2x20 display (SAMSUNG 20T202DA2JA)
begin(20, 2, brightness);
}
public void begin(byte columns, byte lines, Brightness brightness)
{
// set number of lines
if (lines > 1)
_linemode = VFD_2LINE;
else
_linemode = VFD_1LINE;
// save off for address translation
_numlines = lines;
// turn the display on with no cursor or blinking default
_displaycontrol = VFD_DISPLAYON;
_cursormode = VFD_CURSORON;
_blinkmode = VFD_BLINKOFF;
_shiftmode = VFD_ENTRYLEFT;
_incrementmode = VFD_ENTRYSHIFTDECREMENT;
// init the display
display();
//catch bad values
if (brightness > Brightness.VFD_BRIGHTNESS25)
_brightness = (byte)Brightness.VFD_BRIGHTNESS100;
else
_brightness = (byte)brightness;
// set the brightness and push the linecount with VFD_SETFUNCTION
setBrightness(brightness);
// set cursor shift for romance lnaguages
leftToRight();
// clear the display
clear();
// set starting address to column 0, row 0
home();
}
public void setBrightness(Brightness brightness)
{
// set the brightness (only if a valid value is passed
if (brightness <= Brightness.VFD_BRIGHTNESS25)
{
_brightness = (byte)brightness;
command((byte)(VFD_FUNCTIONSET | _brightness | _linemode));
}
}
public byte getBrightness()
{
// get the brightness
return (byte)(_brightness);
}
public void clear()
{
command(VFD_CLEARDISPLAY); // clear display, set cursor position to zero
}
public void home()
{
command(VFD_SETDDRAMADDR | 0x00); // set cursor position to zero
}
public void setCursor(byte col, byte row)
{
int[] row_offsets = { 0x00, 0x40, 0x14, 0x54 };
if (row > _numlines)
{
row = (byte)(_numlines - 1); // we count rows starting w/0
}
// we only have 20 columns even though there are 40 cols addressable
if (col > 20)
{
col = 20;
}
int address = col + row_offsets[row];
command((byte)(VFD_SETDDRAMADDR | address));
}
// Turn the display on/off (quickly)
public void noDisplay()
{
_displaycontrol = VFD_DISPLAYOFF;
command((byte)(VFD_DISPLAYCONTROL | _displaycontrol | _cursormode | _blinkmode));
}
public void display()
{
_displaycontrol = VFD_DISPLAYON;
command((byte)(VFD_DISPLAYCONTROL | _displaycontrol | _cursormode | _blinkmode));
}
// Turns the underline cursor on/off
public void noCursor()
{
_cursormode = VFD_CURSOROFF;
command((byte)(VFD_DISPLAYCONTROL | _displaycontrol | _cursormode | _blinkmode));
}
public void cursor()
{
_cursormode = VFD_CURSORON;
command((byte)(VFD_DISPLAYCONTROL | _displaycontrol | _cursormode | _blinkmode));
}
// Turn on and off the blinking cursor
public void noBlink()
{
_blinkmode = VFD_BLINKOFF;
command((byte)(VFD_DISPLAYCONTROL | _displaycontrol | _cursormode | _blinkmode));
}
public void blink()
{
_blinkmode = VFD_BLINKON;
command((byte)(VFD_DISPLAYCONTROL | _displaycontrol | _cursormode | _blinkmode));
}
// These commands scroll the display without changing the RAM
public void scrollDisplayLeft()
{
command((byte)(VFD_CURSORSHIFT | VFD_DISPLAYMOVE | VFD_MOVELEFT));
}
public void scrollDisplayRight()
{
command((byte)(VFD_CURSORSHIFT | VFD_DISPLAYMOVE | VFD_MOVERIGHT));
}
// This is for text that flows Left to Right
public void leftToRight()
{
_shiftmode = VFD_ENTRYLEFT;
command((byte)(VFD_ENTRYMODESET | _shiftmode | _incrementmode));
}
// This is for text that flows Right to Left
public void rightToLeft()
{
_shiftmode = VFD_ENTRYRIGHT;
command((byte)(VFD_ENTRYMODESET | _shiftmode | _incrementmode));
}
// This will 'right justify' text from the cursor
public void autoscroll()
{
_incrementmode = VFD_ENTRYSHIFTINCREMENT;
command((byte)(VFD_ENTRYMODESET | _shiftmode | _incrementmode));
}
// This will 'left justify' text from the cursor
public void noAutoscroll()
{
_incrementmode = VFD_ENTRYSHIFTDECREMENT;
command((byte)(VFD_ENTRYMODESET | _shiftmode | _incrementmode));
}
// Allows us to fill the first 8 CGRAM locations
// with custom characters
public void createChar(byte location, byte[] charmap)
{
location &= 0x7; // we only have 8 locations 0-7
command((byte)(VFD_SETCGRAMADDR | (location << 3)));
for (int i = 0; i < 8; i++)
{
write(charmap[i]);
}
}
// spool string data to the display
public void print(string data)
{
byte[] output = System.Text.Encoding.UTF8.GetBytes(data);
for (int i = 0; i < output.Length; i++)
{
write(output[i]);
}
}
/*********** mid level commands, for sending data/cmds, init */
private void command(byte value)
{
_latchPort.Write(false);
_writeBuf[0] = VFD_SPICOMMAND;
_spi.Write(_writeBuf);
_writeBuf[0] = value;
_spi.Write(_writeBuf);
_latchPort.Write(true);
Thread.Sleep(1);
_latchPort.Write(false);
_writeBuf[0] = VFD_SPICOMMAND;
_spi.Write(_writeBuf);
_writeBuf[0] = value;
_spi.Write(_writeBuf);
_latchPort.Write(true);
Thread.Sleep(1);
}
private void write(byte value)
{
_latchPort.Write(false);
_writeBuf[0] = VFD_SPIDATA;
_spi.Write(_writeBuf);
_writeBuf[0] = value;
_spi.Write(_writeBuf);
_latchPort.Write(true);
Thread.Sleep(1);
_latchPort.Write(false);
_writeBuf[0] = VFD_SPIDATA;
_spi.Write(_writeBuf);
_writeBuf[0] = value;
_spi.Write(_writeBuf);
_latchPort.Write(true);
Thread.Sleep(1);
}
public void Dispose()
{
_spi.Dispose();
_latchPort.Dispose();
}
}
}
#35503 Netduino Mini Firmware v4.2.0
Posted by
on 18 September 2012 - 10:28 PM
in
Netduino Mini
Hi. I successfully updated my netduino, but I've tried twice now to update my mini following the directions, and everything seems to go fine, but at the end I have an unresponsive board. I'm using the 232 firmware and at the end of the process I can't ping it using mfdeploy ("No response from device"). I tried switching to TTL interface and giving it an escape command in a terminal and I also don't get a response. Is there something wrong with the 232 firmware image, or any suggestions on how I might troubleshoot a problem on my end?
Thanks,
MR
Yep, there is an issue with the 232 firmware. The ETA for an update should be coming up within the next day or two. For now, you'll have to use the TTL firmware.
Good Luck!
#35125 Beerbrew Controller
Posted by
on 13 September 2012 - 02:10 PM
in
General Discussion
#35119 Beerbrew Controller
Posted by
on 13 September 2012 - 01:30 PM
in
General Discussion
#35079 Homebrew fermentation temperature controller
Posted by
on 12 September 2012 - 09:47 PM
in
General Discussion
#35076 Documentation
Posted by
on 12 September 2012 - 09:33 PM
in
General Discussion
#34085 Mini Upgrade Woes
Posted by
on 23 August 2012 - 05:35 AM
in
Netduino Mini
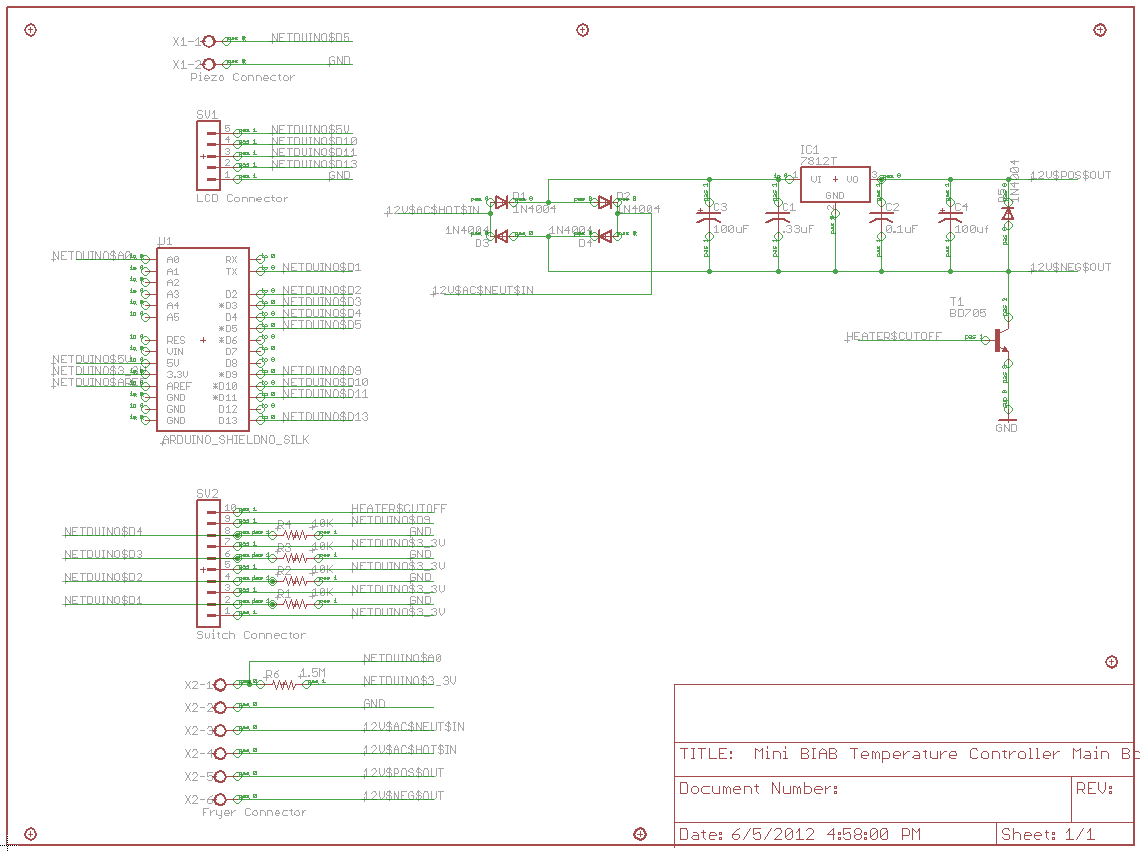
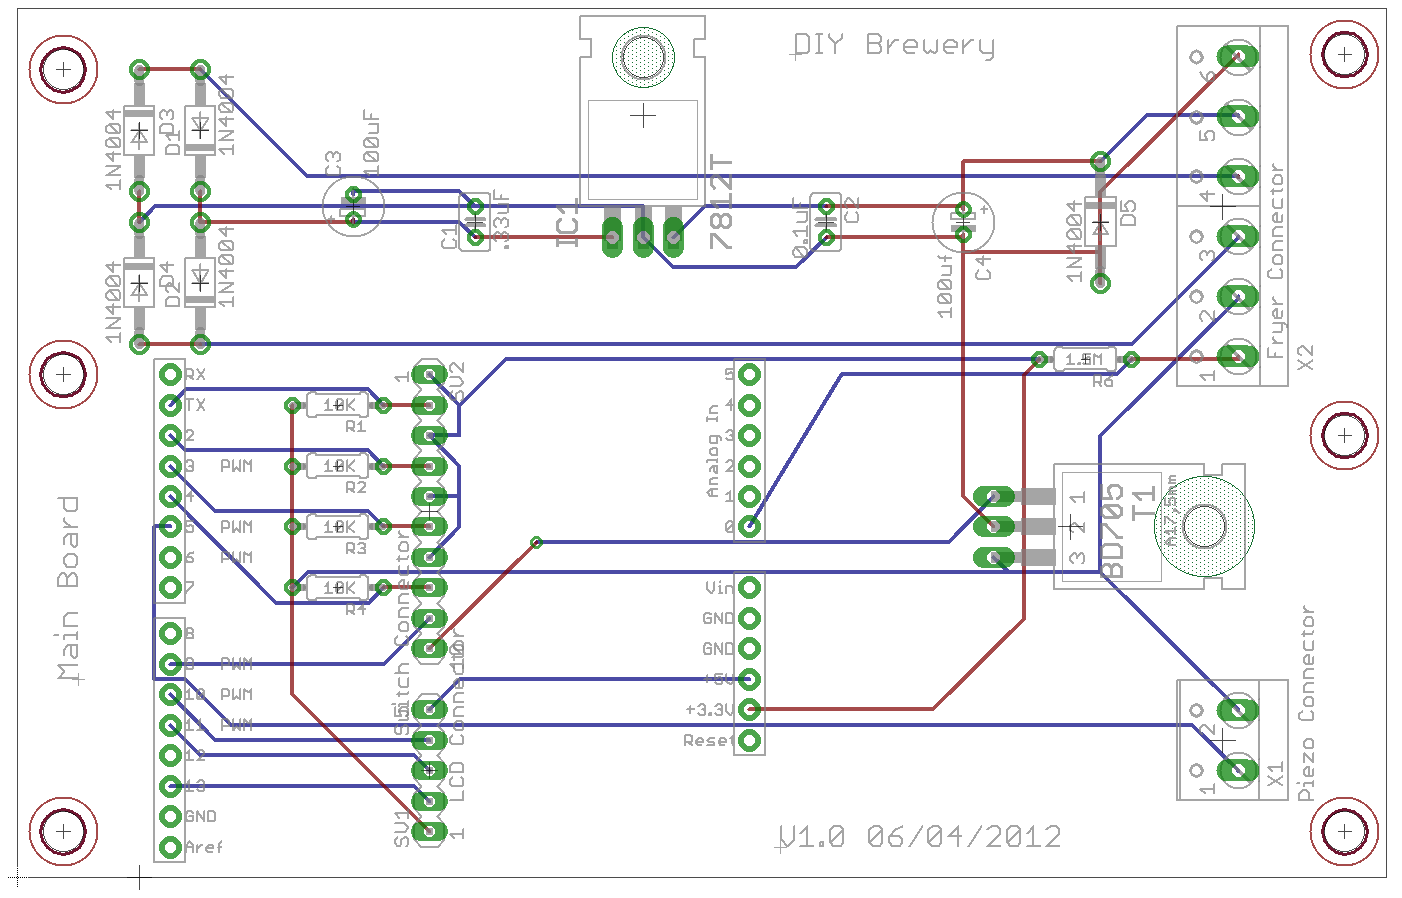
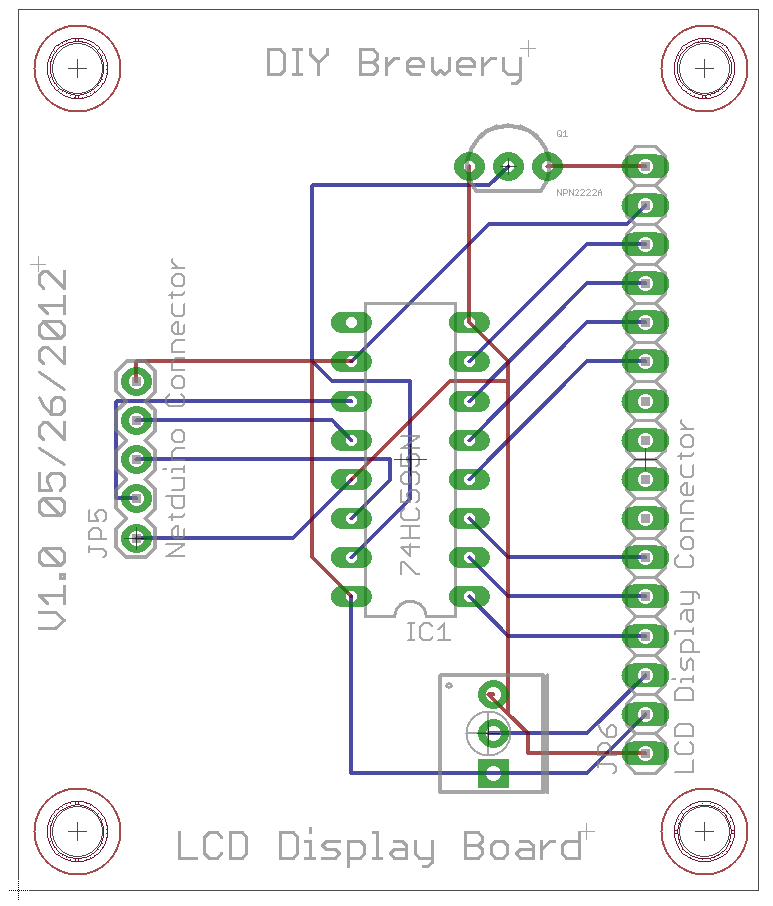
#31097 Need Help with LCD Display Board
Posted by
on 22 June 2012 - 06:07 PM
in
General Discussion