Netduino home hardware projects downloads community

Jump to content


The Netduino forums have been replaced by new forums at community.wildernesslabs.co. This site has been preserved for archival purposes only and the ability to make new accounts or posts has been turned off.

carb's Content

There have been 185 items by carb (Search limited from 26-September 23)


By content type

See this member's


Sort by                Order  

#39578 Mounting Hole Woes Netduino Plus 2

Posted by carb on 17 November 2012 - 11:10 PM in Netduino Plus 2 (and Netduino Plus 1)

Dave,

If you use Nylon 4-40 socket head cap screws say 1/4", it will fit (tite) but it does go through the hole. I tried it with a Nylon 4-40 x 3/8 hex thread standoff which is against the solder joint but being nylon should not be a problem.

Try Amazon Black 4-40 x 3/8" Socket Head Caps Screws from Small Parts, They are a Prime dealer so if you are a Prime member its 2 day shipping free (I joined because of all the Netduino stuff I was buying and shipping 2 -day costs to much). They also have the white Nylon.

The nice thing is it has some give without breaking and is insulated so you don't short anything out. The 3/8" is about $5.00 for 100.

Chuck


#46280 Netduino plus 2 & Serial Communication

Posted by carb on 27 February 2013 - 12:03 AM in Netduino Plus 2 (and Netduino Plus 1)

PapaPep,


Another good source of information is the CodeBlack blog http://blog.codeblac...with-RS232.aspx He has a series of articles on using the Netduino.


Chuck


#42311 RF remote for Hunter light/fan?

Posted by carb on 27 December 2012 - 11:04 PM in General Discussion

I have been thinking of using a set of remote controlled receptacles that are sold by walmart for controlling Christmas lights. A set of 3 cost about $15.


The receivers plug into a receptacle and the lights plug into the receiver. The transmitter is powered by 2 AA batteries. I am planning on using a DIO to control the transmitter buttons through a transistor.


I stopped working on it because you can send an on or off signal but not know if it actually changed the end device.


Your posts gave me the idea to use a standalone xbee to send a confirmation signal back to the netduino.


Thanks

Chuck


#42610 Project PilotFish: Transpacific Autonomous Micro-Vessel

Posted by carb on 03 January 2013 - 03:58 AM in Project Showcase

PilotFish,


This company has a good selection of motor controls that may be of help. I have only used their servo control but have no complaint about their equipment.

http://www.pololu.co...alog/category/9


Chuck


#40977 Netduino driven Christmas tree

Posted by carb on 04 December 2012 - 09:29 PM in Project Showcase

Stefan, I am voting for you as head Elf. Merry Christmas.


#35660 5volt question

Posted by carb on 20 September 2012 - 09:30 PM in Netduino 2 (and Netduino 1)

Perkunas, There are several current limits that you need to watch. The most limiting is the per pin current rating. From the Netduino Hardware Specs on Netduino Hardware Page of Netduino.com: max current: 8 mA per pin digital pins 2, 3, 7: 16 mA per pin analog pins 0-3: 2 mA per pin microcontroller max current: 200 mA total The current draw for the optical isolators will exceed the pin limits unless you use a transistor between the optical isolator and the IO pin. The limit for the onboard regulators is 800 milli-amps, but I personnaly don't like to exceed about 50% of that unless I have good heat sinks or fan to help maintain the temperature of the regulators. Also picking a power source that has a voltage that is close to the 5 vdc output helps (7.5 to 9 vdc) the heat produced by dropping the extra voltage is less the closer you are between the input and outputs (heat or power loss = current x voltage drop regulator for Liner Voltage Regulators). If you want more information on the onboard voltage regulators, go to the hardware page for the Netduino, open the schematic drawing, lookup the part number for the 5 vdc regulator (or 3.3) and google it (MC33269DT-5.0G or MC33269DT-3.3G), you should be able to find a data sheet. I agree with Dave and reccommend a separate power supply to drive the relays, either mechanical or solid state. Hope this helps, Chuck


#40901 Building 2 automated vehicles using the WiFly

Posted by carb on 04 December 2012 - 12:54 AM in Netduino Go

Good day everyone,

I've been having this idea for a while but never got a chance to actually work on it but I was wondering if I can make two automated vehicles using the N Go, N+ or N+2 with ultrasound, IR and tons of other sensors but eventually I would like both vehicles talking to each other, so they don't run into each others path, is that possible with the WiFly module reference below?

https://www.sparkfun.../products/10822

This may be helpful when looking at how to control the WiFly module.
NETMF Toolbox for WiFly

Chuck


#41286 Control Large Led matrix

Posted by carb on 09 December 2012 - 10:25 PM in General Discussion

Hi,

Thank you for this information.
Could you please send me any reference on how to construct the circuit or circuit diagram for netduino plus to control the 10X50 matrix.
Please give complete instructions or details of the shift register or any components used in the circuit.
I have the data for each led whether to be turned on or off in a byte array in code.
based on this data the led should glow.

Thanks in advance.

Srinivas

Govind,

Welcome to the forum.

There are a lot of people on the forum that will try to help you, but I would suggest the following:

  • Almost all help here on the forum is volunteered.
  • Most of what you are looking for is already posted on the forum or in the Wiki pages of this forum.
  • Please search and get what information you can find first, then ask specific questions on what you can't figure out.
  • You google to help find code samples and data sheets of parts you think may work and attach to you requests for help (keeps other from having to repeat searches).
  • Look in some of the toolboxes and blogs of the forum members.

When you get a good idea of what you really want to do provide as much information as you can. That way you will get the answers that you need.

Please be patient when waiting, give at least a full day before trying to repeat the question. Remember our members live literly all over the world and it may 5:00 in the afternoon for you but it is 3:00 in the morning for them.

Good Luck with the project.
Chuck


#36650 Programming Netduino Go using serial

Posted by carb on 06 October 2012 - 08:01 PM in Netduino Go

Hi,

To be able to use the USB port of the Netduino Go, I want to deploy / debug the netduino go using RS232, as suggested in other posts. Does anybody have a schematic for the pin wiring?

Cheers,
Tomas

Tomas,

Don't think that you can do that.

The pinout for the sockets are under the hardware page for the Go.

Chris or some of the others may be able to help more.

Chuck


#37061 simple wiring question

Posted by carb on 11 October 2012 - 11:56 PM in Netduino 2 (and Netduino 1)

No problem, glad I could at least get you on the right path. Most of my programing is actually in VBA (visual basic for applications) I am trying to learn VB & C# still. Chuck


#37063 simple wiring question

Posted by carb on 12 October 2012 - 12:34 AM in Netduino 2 (and Netduino 1)

Since most of your programing is in visual basic.
I got a question for you since I have never tried netduino with VB so here goes.
years ago I wrote a program in vb it was a simple text editor that worked with an arduino program.
All it did was change the variables graphically and with a push of a button uploaded the program.
Was hoping to do something similar with the netduino but C# makes it almost impossible to do, there is no simple up loader.
Nothing graphical built in, maybe the VB netduino version is better.

Stefan may be able to answer that better than I can. From what I have seen VB & C# have similar capabilities. I am not aware of any way to graphically change the variables.

Some are working on a graphical interface that produce a deployable program. Two come to mind, Bender has a project that he is working on that generates a console for controlling servos and the likes. Mario is also working on some things that have great potential to help some of the non programmer types.

The best thing about the 2 projects is it looks like they can maybe be used together.

When I start a project I have been trying to get a working version in both VB & C#, if nothing else I will use a converter to convert from VB to C#.

Chuck


#37055 simple wiring question

Posted by carb on 11 October 2012 - 09:08 PM in Netduino 2 (and Netduino 1)

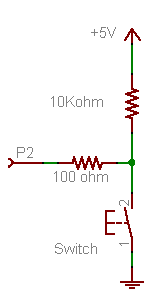
I have wired my digital inputs like this, and I'm using optical relay's as an output.
My question is in regards to, is it going to be on or off,when the switch closes.My thinking is when you close the switch it goes to ground so off
not sure.

Posted Image

Perkunas,

I think I know what your asking.

The digital input that is connected at P2 will see 0 vdc with the switch closed, that is a logic 0 or false for that input when you read it.

Using that in code you can drive a digital output to a optical isolator (relay etc.) anyway that you want. Just write the value from the input to the output pin.

Or you can invert the value from the input.

That way yo can turn the relay either on or off when the switch is closed.

Chuck


#37059 simple wiring question

Posted by carb on 11 October 2012 - 11:16 PM in Netduino 2 (and Netduino 1)

Perkunas,

It may be a simple wiring question, but the code isn't easy. I am better with Visual Basic. Even when I converted it to VB I wasn't used to using that many threads.

Anyway I think the problem could be that you are using an Analog input instead of a digital input (I know yoy are short on DIOs). If you use an Analog input you would want the input to evaluate against a value 0.0 to 1.0

You have
while (anyinputfor6.Read() == true && method_state_6 == true)
Try changing to something like
while (anyinputfor6.Read() <= 0.5 && method_state_6 == true)
In other word if anyinputfor6 is less than or equal to 0.5 it would evaluate as true (ie. the switch is closed).

Hope that helps,
Chuck


#40558 GO! Module - Potentiometer specs

Posted by carb on 30 November 2012 - 10:12 PM in Netduino Go

Thanks for your replies. So that said, if I am planning to use the Potentiometer as an analog potentiometer itself I would have to remove the chip first, right? I am also curious of the resitance of the potentiometer when in full open position. (Sorry no eletronic savvy)

Thanks

Giuliano,

Connecting to just the pot would be difficult and also waste a module why not just buy a potentiometer like the one that likely came with the LCD display (10K ohm) or Radio Shack has some larger ones that you can solder wires onto for a few bucks.

Chuck


#36354 Socket.Accept() does not ork

Posted by carb on 01 October 2012 - 09:59 AM in Netduino Plus 2 (and Netduino Plus 1)

I have a server that usually works fine.
Except today, I would like to change the Netduino IP Address.
Do you know how to do that ?
The server needs to reply to as simple ping before anything.

Regards

Laurentiss,

Mfdeploy.exe configuration section allows for setting the a fixed IP address.

Chuck


#39785 Switch input and output on same pin

Posted by carb on 21 November 2012 - 02:53 AM in Netduino 2 (and Netduino 1)

I need to make a custom SCCB interface,
it requires change data pin's mode, input for reading, and output for writing,
How can I do that in C#?
Since NETMF only has one mode for a pin.

"OutputPort led = new OutputPort(Pins.ONBOARD_LED, false);"

Thanks

Sharethl,

Try searching for Tristate on the forum. Tristateport.

I have not used them before but I think that it what you may be looking for.

Chuck


#37988 Grove-Base Shield and Relay Netduino Plus/Arduino

Posted by carb on 26 October 2012 - 05:16 PM in Netduino Plus 2 (and Netduino Plus 1)

I do not set the initial pin state. The netduino probably does boot with the pin positive and they stay positive. I believe that it is a software issue I probably need to change a setting in the firmware.

Thank you for the suggestion

Aberkley,

Netduinos use the Digital ports in almost every application.

I wrote the following code to test it on my Netduino classic and it worked fine. With a voltmeter I had 3 milli volts when the button was NOT pushed, 3.3 vdc when the Onboard button is pressed.

using System;
using System.Threading;
using Microsoft.SPOT;
using Microsoft.SPOT.Hardware;
using SecretLabs.NETMF.Hardware;
using SecretLabs.NETMF.Hardware.Netduino;

namespace Digital_Pin_Test
{
  public class Program
  {
    static OutputPort D1 = new OutputPort(Pins.GPIO_PIN_D1, false);
    static InputPort Button = new InputPort(Pins.ONBOARD_SW1, false,Port.ResistorMode.Disabled);
   
    public static void Main()
    {
      while (true)
      {
        D1.Write(Button.Read());
      }
    }
  }
}
For Visual Basic use:
Imports System
Imports System.Threading
Imports Microsoft.SPOT
Imports Microsoft.SPOT.Hardware
Imports SecretLabs.NETMF.Hardware
Imports SecretLabs.NETMF.Hardware.Netduino

Namespace Digital_Pin_Test
  Public Class Program
    Shared D1 As New OutputPort(Pins.GPIO_PIN_D1, False)
    Shared Button As New InputPort(Pins.ONBOARD_SW1, False, Port.ResistorMode.Disabled)

    Public Shared Sub Main()
      While True
	D1.Write(Button.Read())
      End While
    End Sub
  End Class
End Namespace
Good Luck,
Chuck


#37975 Grove-Base Shield and Relay Netduino Plus/Arduino

Posted by carb on 25 October 2012 - 10:05 PM in Netduino Plus 2 (and Netduino Plus 1)

Developing relay that is controlled via buttons on website. I notice that relay was ON for Netduino Plus board and it was off for the ardiuno (EtherTen). I am using a Grove Relay that plugs into the Grove-Base shield. Apparently the Netduino Plust I/O pins set to high (3.3V) is there a way to set them to low(turn them off)?

Aberkley,

How do you have the initial pin state? Is it set to false.

Dim led As New OutputPort(Pins.GPIO_PIN_D5, False)

That is for Visual Basic but it similar for C#.

The Netduino may boot with the pin positive but once booted should go to the initial state very quickly. If it doesn't you may be able to add a pull down resistor.

By the way welcome to the forum.

Chuck


#35739 timer question

Posted by carb on 22 September 2012 - 12:33 AM in Netduino 2 (and Netduino 1)

This is a little hard to explain so here go's
I have light on for 16 hours off for 8 forever loop
simple
I have another loop that kills the 1st one in 14 days
Is there a way to track the 1st loop
My problem is that when the main loop happens the light may have already been on 0-16 hours no way of knowing.
Would like to start it at the same time it left off.
My thinking is, I probably need an external clock.

Perkunas,

I may have miss understood your question, but if I didn't I would would pick a loop with a time of say 1 minute. Then on each loop I would increment a counter.

In visual Basic something like this (most likely not correct, meant only to get you started)
dim OnCounter as integer = 0
dim LightOn as boolean = false

OnCounter = OnCounter + 1
LightOn = (OnCounter > 0) and (OnCounter < 961)
if OnCounter > 1440 then
OnCounter = 0
end if

Then use the OnCounter to control a relay for the light.

Also easy to do in C#

Hope this helps.
Chuck


#45550 Hello! Just getting started!

Posted by carb on 15 February 2013 - 02:56 AM in General Discussion

Isomerc,


For some drivers etc. checkout Pololu.com most can be controlled with serial connection. http://www.pololu.com/


Chuck


#37818 Guidance with a cable testing project

Posted by carb on 23 October 2012 - 12:32 AM in General Discussion

Dick,

Have you seen the multiplexor shied here on the forum it provides 32 IOs using 5 DIO on the Netduino. Multiplexor Shied

Just a thought,
Chuck


#44354 Netduino Go and NETMF Toolbox

Posted by carb on 28 January 2013 - 02:36 AM in Netduino Go

Chris,


The Adafruit RGB LCD Shield is I2C. http://www.adafruit.com/products/714


I have a LCD Backpack that can run in I2C or SPI that I will try to get working next weekend.


Or better yet maybe Komodex Labs will release his LCD module.


Thanks,

Chuck


#44329 Netduino Go and NETMF Toolbox

Posted by carb on 27 January 2013 - 10:45 PM in Netduino Go

I have the NETMF Toolbox sample program for the Adafruit RGB LCD Shield working on everything accept for the Netduino Go Shieldbase.


It compiles but throws an exception:

The debugging target runtime is loading the application assemblies and starting execution.

Ready.

A first chance exception of type 'System.NotImplementedException' occurred in NetduinoGo.ShieldBase.dll

An unhandled exception of type 'System.NotImplementedException' occurred in NetduinoGo.ShieldBase.dll


Has anyone gotten the sample to run on the shieldbase?


I am using the sample from the toolbox and have added the shieldbase to the references.


Imports Microsoft.SPOTImports Microsoft.SPOT.HardwareImports SecretLabs.NETMF.HardwareImports SecretLabs.NETMF.Hardware.NetduinoImports Toolbox.NETMF.Hardware


Chuck


#35207 MUX Shield

Posted by carb on 15 September 2012 - 12:12 AM in Netduino Plus 2 (and Netduino Plus 1)

Galibore,

I have not tried that multilexor, but I did buy and put together one that was made by a forum member to work with the Netduino and he has code also. 32 IO multiplexor

I think that I paid $20 for it and it came with the chips and hardware. It works with Stefan's NetMFToolbox which is another plus.

I checked that it worked but haven't got around to playing with it futher.

Chuck


#37348 Powering a Netduino and LPD8806 From Batteries

Posted by carb on 17 October 2012 - 09:25 PM in Netduino 2 (and Netduino 1)

I'm in the planning stages of building a robot costume for my son. The project will use an Adafruit LPD8806 of 1 meter length controlled by a Netduino and probably just utilize the pattern from the tutorial. I have a 4 AA battery pack, but I'm not exactly sure what is the correct way to wire this up so that the strip won't burn out and also won't damage the Netduino. Would the recommendation be to use alkaline or rechargeable AA batteries? Should I hook up the batteries to the DC barrel jack and power the light strip power from the Netduino 5v pin?

Thanks!

Nithins,

Do not try to power a 1 meter strip from the Netduino 5 vdc regulator. Per the specs on Adafruit.com that you linked to the strip pulls 120 ma for every 2.5" of length that you are planning on using (with the LEDs on at full brightness). That would be almost 2 amps of current.

You will need a separted power supply of around 2 amps for the strip. Make sure that it a regulated supply. 6 vdc will start to damage the strip.

If you want to power from a battery you will need a regulator and most likely a gel cell or Sealed Lead Acid battery 6 or 12 vdc 4 amp hour or more depending on how bright, color and duration that the LEDs are going to be on before rechaging the battery.

Edited to add link: Tutorial on using batteries to power RGB LED Strip

Hope this helps,
Chuck


home    hardware    projects    downloads    community    where to buy    contact Copyright © 2016 Wilderness Labs Inc.  |  Legal   |   CC BY-SA
This webpage is licensed under a Creative Commons Attribution-ShareAlike License.