willgeorge's Content
There have been 20 items by willgeorge (Search limited from 28-April 23)
#21765 My Netduino CNC Machine
 Posted by
on 16 December 2011 - 06:41 PM
in
Project Showcase
Posted by
on 16 December 2011 - 06:41 PM
in
Project Showcase
#18338 Getting Started with the Internet of Things by Cuno Pfister
Posted by
on 22 September 2011 - 06:05 PM
in
Visual Studio
Hi,
is /has anyone else worked through this book yet?
Although it is quite well written with good examples, and I have learnt quite a bit about the netduino plus, I can't get past chapter 10 with the 'Hello Web' example. Is there any one else out there with the same issue?
Yours Simon M.
Not sure if this will help but my basic code that worked.
Also: Try this link at Pachube about projects that worked... http://community.pachube.com/forum/58
Simple code that worked for me
using System;
using System.Threading;
using Gsiot.PachubeClient;
using Microsoft.SPOT;
using Microsoft.SPOT.Hardware;
using SecretLabs.NETMF.Hardware;
using SecretLabs.NETMF.Hardware.NetduinoPlus;

//
//// This code worked 9/14/11
//
public class HelloPachube
{
    public static void Main()
    {
        const string apiKey = "YOUR KEY here";
        const string feedId = "YOUR feed number here";
        const int samplingPeriod = 60000;   // 60 seconds

        const double maxVoltage = 3.3;
        const int maxAdcValue = 1023;

        var voltagePort = new AnalogInput(Pins.GPIO_PIN_A1);
        var lowPort = new OutputPort(Pins.GPIO_PIN_A0, false);
        var highPort = new OutputPort(Pins.GPIO_PIN_A2, true);

        while (true)
        {
            WaitUntilNextPeriod(samplingPeriod);
            int rawValue = voltagePort.Read();
            double value = (rawValue * maxVoltage) / maxAdcValue;
            string sample = "voltage," + " Test only";
            //string sample = "Data," + value.ToString("f");
            Debug.Print("new message: " + sample);
            PachubeClient.Send(apiKey, feedId, sample);
        }
    }

    static void WaitUntilNextPeriod(int period)
    {
        long now = DateTime.Now.Ticks / TimeSpan.TicksPerMillisecond;
        var offset = (int)(now % period);
        int delay = period - offset;
        Debug.Print("sleep for " + delay + " ms\r\n");
        Thread.Sleep(delay);
    }
}


// I included the Gsiot.PachubeClient into my project. I used a Netduino Plus and ethernet.
// As a note I did have a initial problem because I was getting an error from Pachube 404 or maybe 402..
// I was using the 'typed name' of my feedID when I should have been using the NUMBER!
Good luck!
#21539 HMC5883L Magnetometer Netduino Code
Posted by
on 10 December 2011 - 11:50 AM
in
Project Showcase
#24960 Delay or getting stuck at deployment "Preparing to deploy assemblies to t...
Posted by
on 02 March 2012 - 11:16 AM
in
Visual Studio
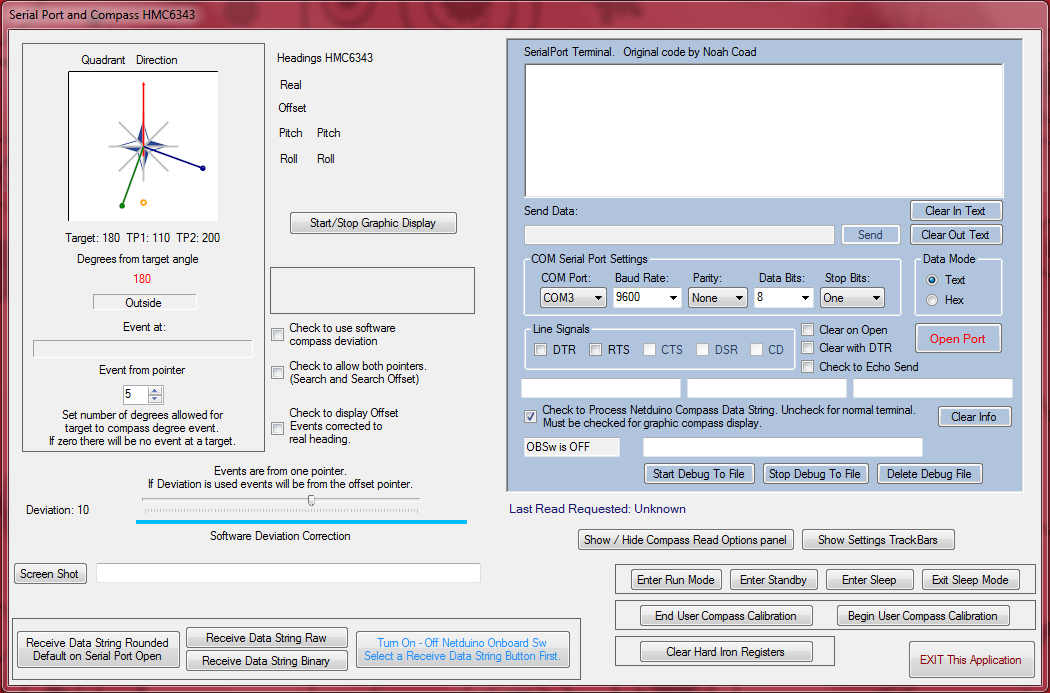
#23428 Netduino and the HMC6343 Compass
Posted by
on 29 January 2012 - 03:15 PM
in
Project Showcase
I got mine at http://www.sparkfun.com/products/8656
CREDITS:
My code started with the HMC6343 driver code I found in here.
The driver was developed by Greg Oberfield and works very well.
See: http://forums.netdui...ch__1#entry1568
I have changed his code so it is not original. Not that there was anything wrong with it in the first place.
(I just change everything?).. Well, not really. I change things so they fit my needs/ideas.
I am also using the SerialPort (RS-232 Serial COM Port) in C# .NET by Noah Coad.
I have made the serial terminal into a Windows Form User Control that you can 'pop' onto a form.
The serial port original code has been modified to 'read' the command structure sent by the Netduino application.
http://msmvps.com/bl...2300_-.NET.aspx
The Form App has a User Control that will display the compass headings along with Pitch and Roll.
Be warned! I am NOT( in any way) an expert about the HMC6343.
In fact I know little about some of the setting that can be used.
As in the proper way to use the Variation Angle, Hard-Iron Calibration Offsets and IIRF filters.
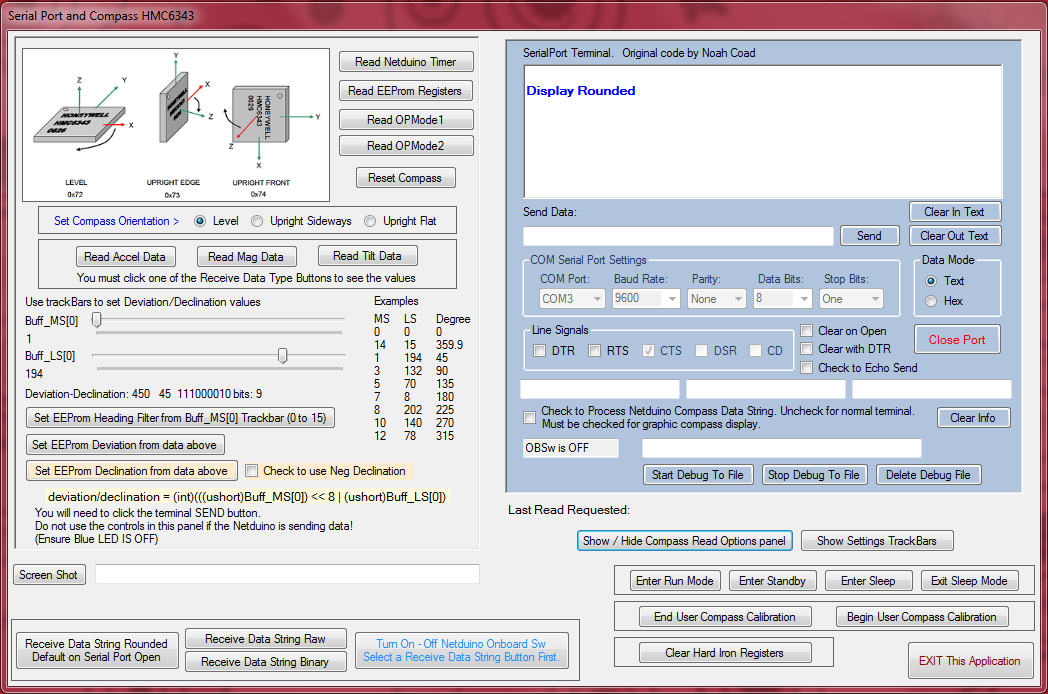
That said, My application is very 'busy' with controls because I have tried to implement reading and writing
all of compass EEProm registers. NOTE: The application will NOT write to the EEProm without the user
sending the write to register commands by clicking the serial terminal SEND button.
I have read and written to my compass EEProm many times without any issues.
However, I cannot be responsible for any damage to your compass.
(As far as I know there is no way to 'factory reset' the compass by the end user.)
If we have an EXPERT out there I sure would like to know more about using the Variation, Hard Iron and filters.
I can write values to change the registers but I have no idea what I am doing. (NOT a math wizzard here).
If the math does not include the 'rules memorized' during school, I'm lost!
The code is written using an XBee serial device at the Netduino.
If you use a different serial device for your Netduino you will need to modify your serial device
code to use and return the commands sent and received by the windows form.
Reading and writing the commands are specific to my code and must have
the correct structure or it will not work.
Update: I have added a non-XBee Netduino application that uses the Netduino serial port pins D0 and D1.
The serial port driver IS NOT A COMPLETE SERIAL PORT TERMINAL PROGRAM.
The code was made for reading and writing unique command strings between the Netduino and
the FormCompassHMC6343_Netduino application.
There is a minor error in the original FormCompassHMC6343_Netduino application. Nothing serious but
I have replaced the zip with corrected code. The error was that a command was sent twice. Caused no
harm but I still wanted to correct the issue.
**************************************************************************************************************************
I have Revised and Updated the applications to include using all of the HMC6343 functions/registers
Items like User Calibration, Magnetometer Offsets, setting the IIR Filter value, Run modes and clearing the Magnetometer registers.
I 'think' I got everything?...
Seems that nobody uses the compass but I will share my code anyway. There is no copyright on any portion of my code. Use as you want to.
I have to state again that I am far from being an expert on this device. My code is based on what I 'think' is correct usage and probably NOT what the manufacturer intended.
HAVE FUN!
Attached Thumbnails
Attached Files
-
 FormHMC6343.zip 1.31MB
19 downloads
FormHMC6343.zip 1.31MB
19 downloads
-
NetduinoHMC6343.zip 472.66KB
19 downloads
#21156 Problems with USB Port in WIndows 7
Posted by
on 30 November 2011 - 01:22 PM
in
Netduino Plus 2 (and Netduino Plus 1)
http://wiki.netduino...ep-by-step.ashx
I had a similar problem but I had to modify my registry to get it working. I have Windows 7 ultimate but it is 32 bit not 64.
I have other PC's so I first made sure my Netduino was working on another PC.
Do you have a friend with a PC you could try yours on? I would doubt the USB port on the Netduino is bad.
I hesitate about posting the following but I got nowhere with my issue until I completely removed the USB driver info from the PC registry.
I could NOT load a new driver until I completely removed the old driver reference from the registry. In fact once the registry Key was removed windows loaded a new driver after plugging the Netduino in.
I will post what I had to do but please DO NOT take messing around in the registry lightly.
Maybe you have a friend that could do it for you if you are not experienced doing this?
I have no idea about what you can do, or not do, with regards to chanding anything in the PC registry.
I take no responsibility if things go wrong.
Anyway.. Here goes..
I 'fixed' mine by removing the KEY/Sub-Keys using regedit.
I removed the Key group, rebooted the PC and then plugged in the Netduino USB. It worked for me.
I found my USB port at: I have no idea if this is true in your case.
Be warned!
You can trash your windows installation if you do the wrong thing in the registry. I know from past experience.
PLEASE NEVER edit your registry unless you know what you are doing. Even if it is backed up.
Backups do not work if you cannot reboot to load it! Been there, did that.
My Netduino USB ports were found at registry key:
HKEY_LOCAL_MACHINE\SYSTEM\CurrentControlSet\Enum\USB\VID_22B1&PID_1000
I assume (without proof) that a 64 bit machine is similar.
Look for something like " MFG @oem28.inf,%secretlabs%;Secret Labs LLC " in the sub-keys under the main key shown above.
You may find several sub-keys depending on what USB ports you have plugged the Netduino USB cable into.
Each USB port you plug into you will find a new subkey listing.
(As far as I know this is true)
Good luck and the registry should be OK if this is the only Key deleated.
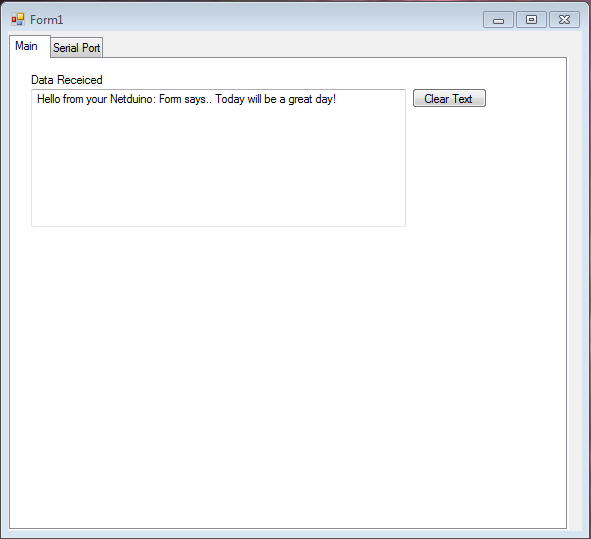
#18255 Windows Form XBee and LCD display
Posted by
on 20 September 2011 - 04:09 PM
in
Project Showcase
Thanks, willgeorge. Do you have a photo or short video of your code in action?
Chris
Chris
No I do not. Sorry. My grandchildren have all of my video equipment. Even my webcam.
And please note that the original zip file was for a older version. Frankly.. I messed up. I have replaced the zip with LCD support code. The first zip was without LCD support.
Maybe a screen shot?
#18321 Windows Form XBee and LCD display
Posted by
on 22 September 2011 - 10:40 AM
in
Project Showcase
That would be great! Anything that helps explain your project and lets Netduino makers understand how they can use your contribution is helpful.
Chris
Sorry for the delay in responding.Very busy the past few days.
You asked about 'Is it possible for the PC to measure the signal strength of the Xbee connected to the Netduino?'. I never thought of that but I found a link that suggests a way to do it. http://log.liminastu...om-the-rssi-pin. I think I will look into it.
As to explaining my project.
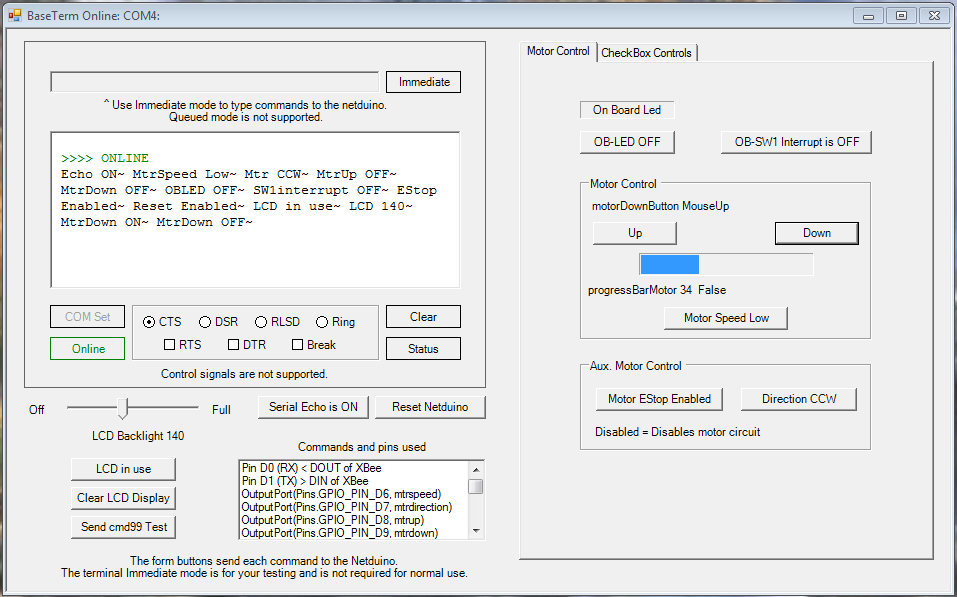
It started when I found the following at Microsoft. NETMF_Return_of_Massage_Chair.pdf http://www.microsoft...s.aspx?id=11666. I find the standard NETMF emulator a bit limiting so I thought of using a windows form to do the job. My project implementsthe signals used to operate the virtual massage chair (a basic motor control circuit).
Then I thought that it would be nice to receive feedback on each operation the Netduino was doing. I had two XBee's so I used them for the communication process between the windows form (PC serial port) and the Netduino serial port. As usual, all of my projects seem to grow and grow. Then I remember I had a serial LCD... So I included that at the Netduino for visual feedback and added code to use some of it's features. All seems to work reasonably well so I thought I would share my ideas (code). I'm a electronics guy. I am NOT a expert programmer, but I somehow seem to get things working. In my code I use a command structure that allows up to 100 basic (command string) and up to 100 extended commands (command string, data string). You would need to change the code for the form and at the Netduino to change/add commands (how many and what they do) but it is a start for the basic flow of operations.
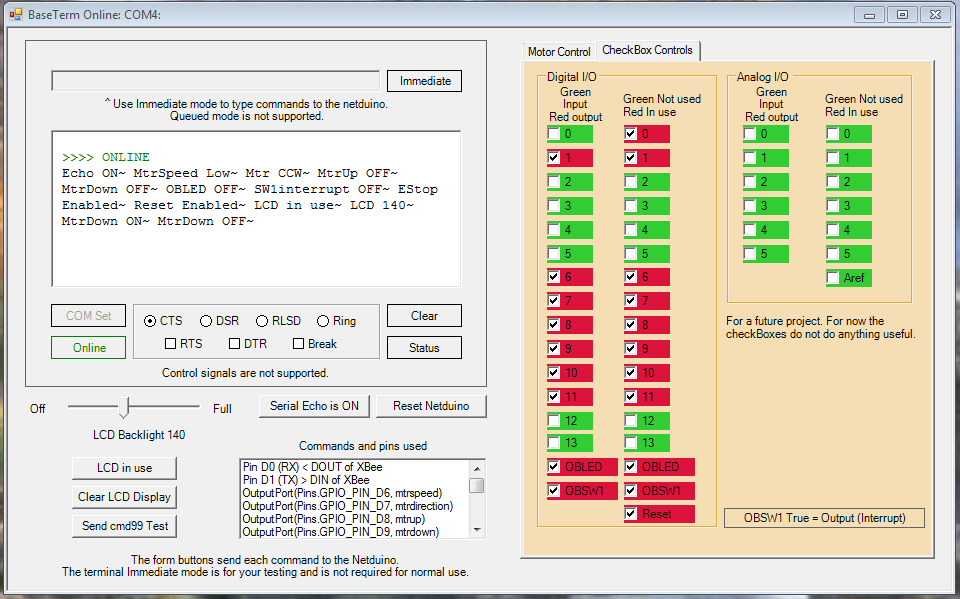
In the pictures I attach you will see a bunch of CheckBox controls that do nothing useful at the moment. I plan to extend the code so as to define ports at the form and Netduino as input/output, used/not used etc. by use of the checkboxes. Just a thought at the moment because I have no idea how much code can be jammed into the Netduino. I guess I will just keep adding things untill I get some 'error'. I use strings at the moment for commands and assume they take up alot of memory at the Netduino. I use strings now because it was my first thought. Not because I should. Maybe store and read from the MicroSD on a Netduino-Plus?
If you use C# I would assume my code would be at least useful as an "experiment for improvement".
Have a great day!
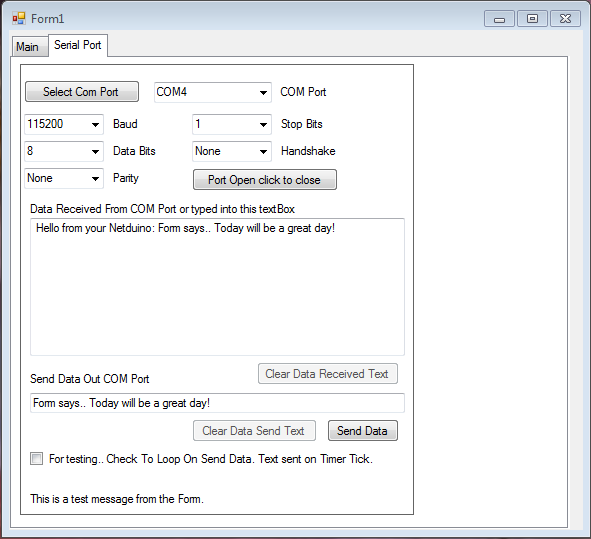
#18251 Windows Form XBee and LCD display
Posted by
on 20 September 2011 - 03:35 PM
in
Project Showcase
The idea for this application came from: Search for NETMF_Return_of_Massage_Chair.pdf.
JH.CommBase is serial code by Synapse Solutions Group. I have modified the original code slightly for my needs/wants. The original code I found at this link http://forums.netdui...no-xbee-sample/. A link to the JH.CommBase used in the windows form is provided in the form notes.
There is no copyright on my part of the code (excluding JH.CommBase). Use however you want and have fun....
The master X-Bee for my PC is using USB COM4. Master and Remote X-Bee communicate on RF COM1. The XBee's communicate a default 9600 baud. I saw no reason for more speed. X-Bee remote uses a Sparkfun XBee Explorer Regulated for the Netduino. The master X-Bee uses a Sparkfun XBee Explorer USB to connect to my PC. The windows form will allow you to select your PC COM port.
I am providing a windows form that communicates with a driver for the netduino. I removed all of the binary for the form/driver and have not include the original source for the JH.CommBase(s) so you must complie the code (due to download size of the complete source). I used C# express 10. I have tested and all seems well at my end. The LCD is a Sparkfun 2X16 serial LCD-09067 3.3 volt.
I messed up! I attached a zip with a windows form without the LCD support! But then again I'm 70 years old and I'm lucky I can type this post!
Have Fun...
Attached Thumbnails
Attached Files
-
XBFormLCD.zip 159.94KB
35 downloads
#25137 Reading & Wriring INI file from SD Micro
Posted by
on 06 March 2012 - 08:00 AM
in
Netduino Plus 2 (and Netduino Plus 1)
Here is a class for reading & writing INI file from/to Micro SD
It is very simple one... but does the work just fine ;-)
Any feedback will be nice to have.
Here is the source code:
using System;
using System.IO;
using System.Collections;
using System.Threading;

namespace NetduinoPlusMonitor
{
  public class CIni
  {
    public CIni()
    {
      _Sections = new Hashtable();
    }

    /// <summary>
    /// Loads the Reads the data in the ini file into the IniFile object
    /// </summary>
    /// <param name="filename"></param>
    public void Load(string FileName, bool append)
    {
      if (!append)
        DeleteSections();

      string Section = "";
      string[] keyvaluepair;

      using (FileStream inFileStream = new FileStream(Path.Combine("\\SD",FileName), FileMode.Open))
      {
        using (StreamReader inStreamReader = new StreamReader(inFileStream))
        {
          string[] lines = inStreamReader.ReadToEnd().ToLower().Split(new char[] { '\n', '\r' });

          foreach(string line in lines)
          {
            if (line == string.Empty)
              continue;
            if (';' == line[0])
              continue;

            if ('[' == line[0] && ']' == line[line.Length - 1])
              Section = line.Substring(1, line.Length - 2);

            else if (-1 != line.IndexOf("="))
            {
              keyvaluepair = line.Split(new char[] { '=' });
              SetValue(Section, keyvaluepair[0], keyvaluepair[1]);
            }
          }
          inStreamReader.Close();
          inFileStream.Close();
        }
      }

    }

    /// <summary>
    /// Used to save the data back to the file or your choice
    /// </summary>
    /// <param name="FileName"></param>
    public void Save(string FileName)
    {
      using (FileStream outFileStream = new FileStream(Path.Combine("\\SD",FileName), FileMode.Create))
      {
        using (StreamWriter outStreamWriter = new StreamWriter(outFileStream))
        {
          foreach (object Sections in _Sections.Keys)
          {
            outStreamWriter.WriteLine("[" + Sections.ToString() + "]");
            Hashtable keyvalpair = (Hashtable)_Sections[Sections];

            foreach (object key in keyvalpair.Keys)
              outStreamWriter.WriteLine(key.ToString() + "=" + keyvalpair[key].ToString());
          }

          outStreamWriter.Close();
          outFileStream.Close();
        }
      }

    }

    public string GetValue(string Section, string key, string defkey = "")
    {
      key = key.ToLower();
      Section = Section.ToLower();

      Hashtable keyvalpair = (Hashtable)_Sections[Section];

      if ((null != keyvalpair) && (keyvalpair.Contains(key)))
        defkey = keyvalpair[key].ToString();

      return defkey;
    }
    public float GetValue(string Section, string key, float defkey)
    {
      try { defkey = (float)double.Parse(GetValue(Section, key, defkey.ToString())); }
      catch (Exception) { }
      return defkey;
    }
    public double GetValue(string Section, string key, double defkey)
    {
      try { defkey = double.Parse(GetValue(Section, key, defkey.ToString())); }
      catch (Exception) { }
      return defkey;
    }
    public UInt64 GetValue(string Section, string key, UInt64 defkey)
    {
      try { defkey = UInt64.Parse(GetValue(Section, key, defkey.ToString())); }
      catch (Exception) { }
      return defkey;
    }
    public UInt32 GetValue(string Section, string key, UInt32 defkey)
    {
      try { defkey = UInt32.Parse(GetValue(Section, key, defkey.ToString())); }
      catch (Exception) { }
      return defkey;
    }
    public UInt16 GetValue(string Section, string key, UInt16 defkey)
    {
      try { defkey = UInt16.Parse(GetValue(Section, key, defkey.ToString())); }
      catch (Exception) { }
      return defkey;
    }
    public byte GetValue(string Section, string key, byte defkey)
    {
      try { defkey = byte.Parse(GetValue(Section, key, defkey.ToString())); }
      catch (Exception) { }
      return defkey;
    }
    public Int64 GetValue(string Section, string key, Int64 defkey)
    {
      try { defkey = Int64.Parse(GetValue(Section, key, defkey.ToString())); }
      catch (Exception) { }
      return defkey;
    }
    public Int32 GetValue(string Section, string key, Int32 defkey)
    {
      try { defkey = Int32.Parse(GetValue(Section, key, defkey.ToString())); }
      catch (Exception) { }
      return defkey;
    }
    public Int16 GetValue(string Section, string key, Int16 defkey)
    {
      try { defkey = Int16.Parse(GetValue(Section, key, defkey.ToString())); }
      catch (Exception) { }
      return defkey;
    }

    public void SetValue(string Section, string key, string value)
    {
      key = key.ToLower();
      Section = Section.ToLower();

      if (!_Sections.Contains(Section))
        _Sections.Add(Section, new Hashtable());

      Hashtable keyvalpair = (Hashtable)_Sections[Section];

      if (keyvalpair.Contains(key))
        keyvalpair[key] = value;
      else
        keyvalpair.Add(key, value);
    }
    public void SetValue(string Section, string key, float value)
    {
      SetValue(Section, key, value.ToString());
    }
    public void SetValue(string Section, string key, double value)
    {
      SetValue(Section, key, value.ToString());
    }
    public void SetValue(string Section, string key, byte value)
    {
      SetValue(Section, key, value.ToString());
    }
    public void SetValue(string Section, string key, Int16 value)
    {
      SetValue(Section, key, value.ToString());
    }
    public void SetValue(string Section, string key, Int32 value)
    {
      SetValue(Section, key, value.ToString());
    }
    public void SetValue(string Section, string key, Int64 value)
    {
      SetValue(Section, key, value.ToString());
    }
    public void SetValue(string Section, string key, char value)
    {
      SetValue(Section, key, value.ToString());
    }
    public void SetValue(string Section, string key, UInt16 value)
    {
      SetValue(Section, key, value.ToString());
    }
    public void SetValue(string Section, string key, UInt32 value)
    {
      SetValue(Section, key, value.ToString());
    }
    public void SetValue(string Section, string key, UInt64 value)
    {
      SetValue(Section, key, value.ToString());
    }

    public void DeleteSection(string Section)
    {
      Section = Section.ToLower();

      if (_Sections.Contains(Section))
        _Sections.Remove(Section);
    }
    public void DeleteSections()
    {
      _Sections.Clear();
    }

    private Hashtable _Sections = null;

  }
}
Thank You..
I was just looking for some of my old code in order to use an ini file.. I will not bother looking further..
Strange.. I was looking for my old code and by chance.. I need to look no further... Yours looks to be more compact than what I remember of mine.
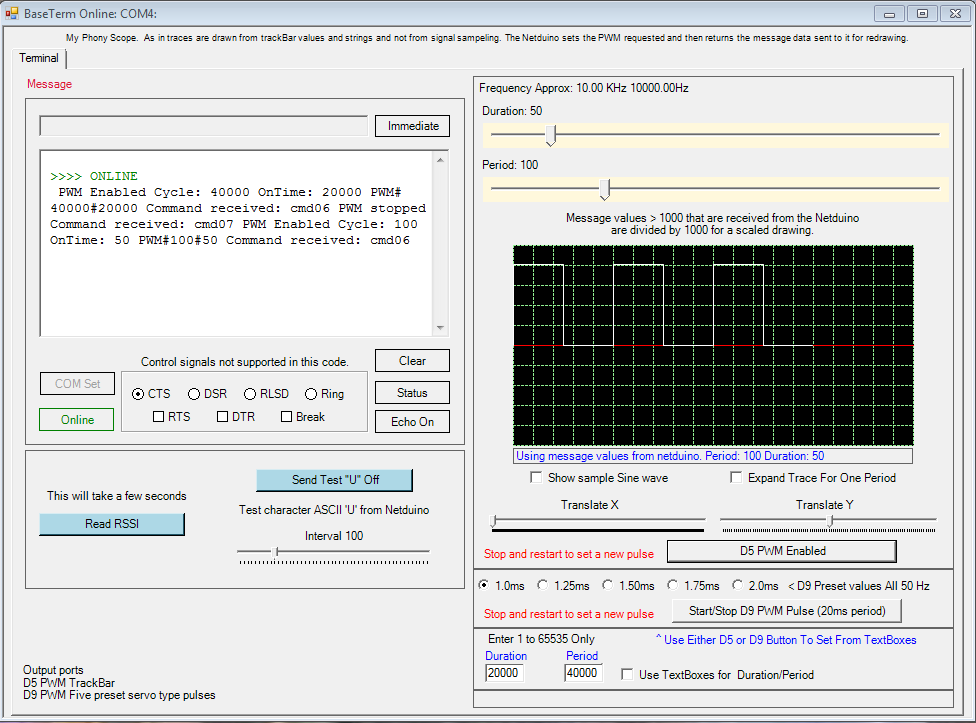
#21154 Phony Scope
Posted by
on 30 November 2011 - 11:23 AM
in
Project Showcase
Attached Thumbnails
Attached Files
-
XXB.zip 309.26KB
9 downloads
-
PhonyScope.zip 75.07KB
6 downloads
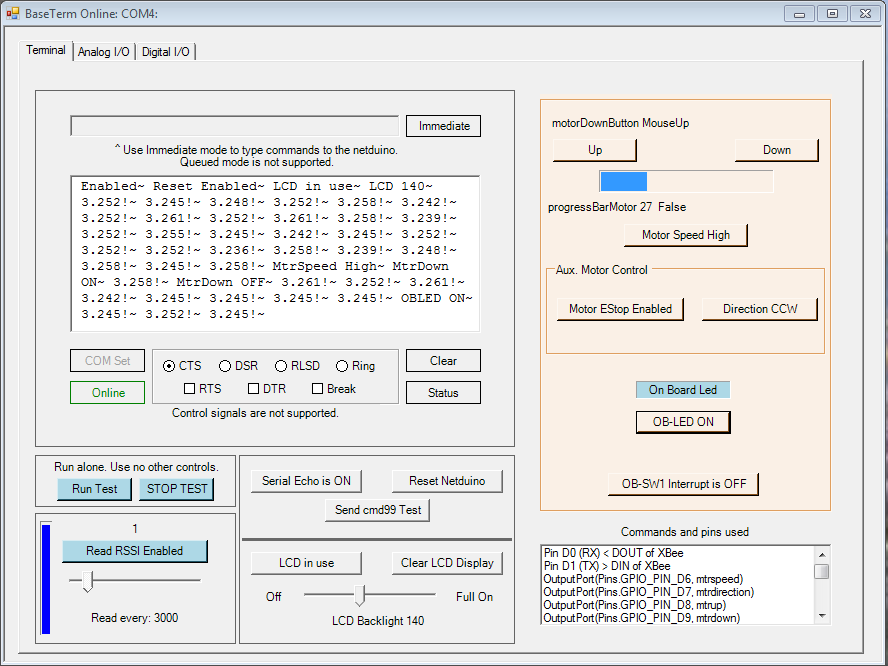
#18519 windows-form-xbee-lcd-RSSI-display
Posted by
on 27 September 2011 - 10:35 PM
in
Project Showcase
ButtonForm.zip 366.49KB
27 downloadsI posted.. windows-form-xbee-and-lcd-display.I have modified the (code/form) to include reading the XBee RSSI signal at intervals of one second and display these voltages at the forms terminal window.
I have added Xmd commands Vmd00 - Xmd99. These can send a data string with the command.
You would have to modify the form AND the netduino code in order to support your commands (Ideas).
The vertical progressbar code is from CodeProject at: http://www.codeproje...rogressbar.aspx
XBee RSSI is based on code I saw at http://log.liminastu...m-the-rssi-pin.
I assume if posted, it is OK to use as long as source is mentioned.Added support for viewing RSSI voltage levels received from the XBee (Pin 6)...
I have checked the readings received using a FLUKE 97 50MHz scopemeter (Old but sill works well).
The data shown at the windows form is reasonably accurate with respect to the scope measurements.
The form also has a TEST signal output that is a square wave sent to the XBee serial port. See this code.
I used it to send the square wave to another XBee receiver as an experiment.
(The continuous square wave is (ASCII upper case 'U' - binary 01010101) Approx. 200Hz square wave at 9600 baud.
-For the netduino 'reset' I use a jumper wire from netduino pin D11 to the RESET pin.
-XBee RSSI Pin 6 goes to netduino Pin A0.
-XBee serial to netduino D0, D1.
-LCD serial data from netduino Pin D3 (Serial Enabled 16x2 LCD - White on Black 3.3V sku:LCD-09067 This application contains Tab pages (Analog I/O and Digital I/O) that use buttons and checkboxes.
This application does NOT use them. They are for a future project.
Attached Thumbnails
#23427 Why Not?
Posted by
on 29 January 2012 - 01:43 PM
in
General Discussion
Hi willgeorge,
Are you looking for the code for various firmware releases--or the binary files to flash onto your Netduino?
If the binary files are scattered about, we can absolutely clean that up on the Downloads page.
Chris
I am not looking for anything specific at this time. Just a thought I had POP into my old brain.
Actually, I had a problem with one of my Netduinos and was looking around for the latest 'official' code
and I was not sure what I really needed for updating. I wanted to make sure I had 'everything' before I started.
(Some time ago I had a problem trying to find the correct SAM-BA bootloader for what I was doing)
The problem with the Netduino turned out to be my code. How could that be?
I hate it when I begin a task and I find out that I am missing something..... Bummer...
And as a side note: How is your book comming along? I have it on order (cash in advance) for what seems like months.
#23391 Why Not?
Posted by
on 28 January 2012 - 05:11 PM
in
General Discussion
#23886 Unique identifier for netduino boards: Is there a serial no burned in?
Posted by
on 07 February 2012 - 08:22 AM
in
General Discussion
#35354 Netduino Run Application from PC (pass parameters to. EXE)
Posted by
on 15 September 2012 - 08:59 PM
in
Netduino 2 (and Netduino 1)
Excuse
Ever have implemented an application to Netduino from a PC, you can?
what happens is that I want to make an application that receives input parameters from the PC (console) and run actions from the Netduino, the Netduino course will always be connected to the PC.
Anyone know, how you could do? because when I create the executable from Visual Studio, not working.
Thank you.
Take a look at this. It may be what you need.
http://forums.netdui...tion-using-usb/
#22087 XbeeUserControl
Posted by
on 26 December 2011 - 01:30 AM
in
Project Showcase
Attached Files
-
UserControlXBeeSerial.zip 167.88KB
47 downloads
-
XBeeNetduino.zip 34.5KB
47 downloads
#22090 XbeeUserControl
Posted by
on 26 December 2011 - 10:48 AM
in
Project Showcase
Attached Thumbnails
Attached Files
-
T_FormTab.zip 167.21KB
32 downloads
#21758 Netduino XBee and SparkFun SEN-10530
Posted by
on 16 December 2011 - 02:48 PM
in
Project Showcase
http://forums.netdui...-netduino-code/
https://www.loveelec...arduino-library
The code does not have tilt compensation at the moment but may be of use to those that want to play with it. I need a ADXL 345 to do the tilt which is on order.
Please see the notes in the application code when using this app. If the onboard switch is pressed too soon.. The netduino will hang in in a state that will require
you to power off - on to reset. The netduino sends compass data over the XBee serial port. (The program could be modified to use any serial port you have).
Included in the code are ( //commented out " data strings of different types " ) that you could send by serial or Debug.Print if you need/want it.
Anyway.. Have fun!
I'm not sure this is allowed in here but I found some really cool stuff I ordered.. Well, I thought it would be fun to play with..
http://www.gabotroni...ll-products.htm // I have nothing to do with this vendor. I only use them for what they are intended for (limits).
I have the AVR XMEGA Development Board and the Xprotolab.. NO... they are NOT $10,000, 8 channel oscilloscopes but are fun to use.
At least they can give you some visual indication of what you are doing.
Attached Files
-
HMC5883L-App.zip 238.68KB
17 downloads
#25099 Building a circuit with the EasyDriver
Posted by
on 05 March 2012 - 09:39 AM
in
General Discussion
Hi,
Does anyone have a schematic or preferrably a graphical instructable on how to build the circuit to connect up to the EasyDriver, and also connect the stepper motor?
I've seen a portugese tutorial (with no circuit help) and some other code-related examples but nothing for the actual connections...
Thanks!
Not sure if it will help but I found this link.. I do not have the easy driver hardware.
http://www.schmalzhaus.com/EasyDriver/


