patduino's Content
There have been 19 items by patduino (Search limited from 01-July 24)
#42421 Projects And Update
 Posted by
on 30 December 2012 - 05:13 AM
in
Project Showcase
Posted by
on 30 December 2012 - 05:13 AM
in
Project Showcase
#42116 Christmas Hand Bells
Posted by
on 25 December 2012 - 06:29 AM
in
Project Showcase
Construction
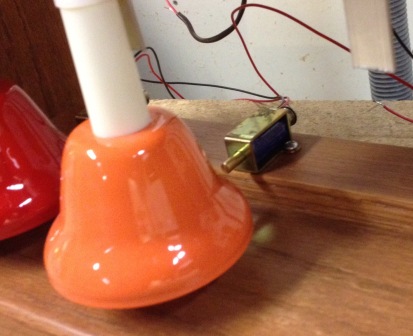
For the bells, I used a Kids Play 8 Note Handbell Set (Rhythm Band RBI08) I bought from Amazon. Although they are children’s bells, they are good quality and sound great. The 8 notes range from Middle C to High C without sharps or flats. It would have been nice to have the extra sharps and flats, but the 13 bell set was too large for my design. The bells are mounted to the underside of the cabinet shelves using aluminum straps and held in place using tie-wraps.

To ring each bell, I used a small 24V push/pull solenoid from Adafruit. I’m only driving them with 12V, but they still work fine. I found that I had to energize the coils for at least 25 ms to get a good “ding” out of the bells. Some weren’t as powerful as others, so I had to pick the best 8 of the 10 I bought. The solenoids are arranged to strike the back lip of the bells.
To add a visual effect along with the sound, I used four 12V low-current incandescent bulbs from Radio Shack to flash with the notes as they play. To give the effect of a brief pause between notes, the light is turned off 100ms early. Since I only had four lights to use, I matched them to pairs of bells: Middle C/D, E/F, G/A, and B/High C.
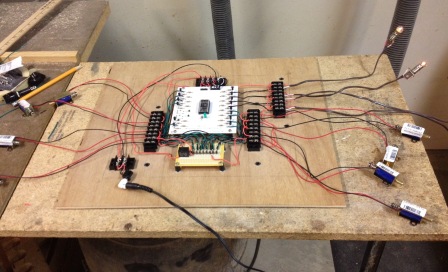
Of course, I used the Netduino Mini; my favorite option for embedded Netduino projects. The Mini is mounted in a specially designed circuit board for this project. I designed the board using the popular Fritzing software and had Fritzing build the board for me in Berlin. This was my first attempt to design and fabricate a circuit board. It was fun and turned out great. It really simplified assembly and my soldering time was cut significantly.
I used toggle switches for power on/off control and to add a 5 second / 5 minute selectable delay between songs. Even I might go crazy hearing these bells non-stop for hours on end!
As a final touch, I wanted to mount the bells in a display cabinet that I could be proud of. I made the cabinet out of Red Oak and stained it to match our décor. I really wanted it to look nice, so I put extra time into it.

I mounted the electronics to the back of the cabinet, with a Plexiglas cover so I can see the electronics – sometimes I forget which side should face outward!

Music
As it turns out, there are a lot of good Christmas songs available in the Middle-C / High-C range. I used a few songs from the song book that came with the bells, and several from a book called “Christmas Carols 110” for keyboards (1975, Hal Leonard Corp.) I have 26 songs in all.
I encoded the notes in a string for each song. Each note in the song is identified by a letter followed by its duration in eighth-note tics; for example, a “B” eighth note is coded as “B1” and an “F” quarter note is code as “F2” and so on. To differentiate between the two different C’s, I used the letter “H” for High C. “R” represents a rest.
Each song is in the format: string Name, integer Tempo in ms, and a string of Notes separated by spaces; such as: "O Come, O Come Emmanuel", 250, "D2 F2 A2 A2 A2 G2 B2 A2 G2 F6 G2 A2 F2 D2 F2 G2 E2 D2 C2 D6 G2 G2 D2 D2 E2 F4 E2 D2 C6 F2 G2 A2 A2 A2 G2 B2 A2 G2 F6 H2 H6 A2 A6 A2 G2 B2 A2 G2 F6 G2 A2 F2 D2 F2 G2 E2 D2 C2 D10 R4"
None of the songs have more than one note playing at the same time, so I could keep the programming simple. I considered several complicated approaches before I realized that I didn’t have to play more than one note at a time.
 HandbellChimes Code Listing.zip 5KB
7 downloads
HandbellChimes Code Listing.zip 5KB
7 downloadsOperation
A simple on/off switch controls power to the set. After powering up, the software plays the scale to verify the operation of the bells and lights, waits 5 seconds, then begins playing songs. The software randomly selects a song from the list of available songs, but doesn’t repeat any of the last 5 songs.
The song is “played” by splitting the song string into an array of individual note strings using the split operation (space delimiter) and then using a foreach statement to sequence through each of the notes in the note array.
Each note is played by energizing the appropriate solenoid for 30 ms then delaying for the remainder the note (Tempo times the duration, minus 30ms). The appropriate light is energized when the note sounds, and turns off 100ms before it is scheduled to end.
Following the song, the software pauses either 5 seconds or 5 minutes (depending on the toggle switch) and then plays another song at random.
Example
http://www.youtube.c...h?v=lB3HUMoOf94
(pardon my thumb…)
#40963 Netduino driven Christmas tree
Posted by
on 04 December 2012 - 08:24 PM
in
Project Showcase
#40416 A Moon Phase Clock
Posted by
on 29 November 2012 - 11:48 AM
in
Project Showcase
...the crystal of the Netduino is not much accurate. Do you have any time-adjust trick?
Cheers
Mario, I ran some tests beforehand to calibrate the uP. I determined that I would be off by about 22 seconds per phase, so I account for that in the code. I assumed that the drift was constant.
...great to hear that kids are talking about it.
Cheers
Mark, you bet. My (not so) secret plan is to stir up an interest in science in these kids. I answered some of their questions, but told them they'd have to wait until later in the year when they learn about the Solar System. Now they can't wait!
#40401 A Moon Phase Clock
Posted by
on 29 November 2012 - 04:02 AM
in
Project Showcase
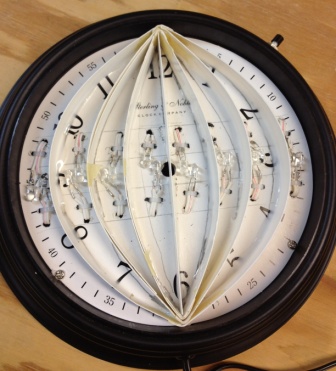
I thought it would be fun to make a clock that showed the current phase of the moon. The project turned out nicely and is currently mounted on the wall of my wife’s first grade classroom. The students are fascinated by it and refer to it often. See Figure 1.
Operation: The shapes of the moon (i.e., the lunar phases) are caused by the light shining on the moon and the position of the Earth relative to the sun and moon throughout the lunar cycle. For my moon, I decided to have 8 lighted segments; which allows me to depict 16 different moon phases, from a New Moon (fully dark), to a Full Moon (fully lit), and back to the New Moon again.
As described in http://www.moonconne...on_phases.phtml the synodic period, or lunation, is exactly 29.5305882 days. It's the time required for the moon to move to the same position (same phase) as seen by an observer on earth.
For my project, the 29.5305882 day synodic period is divided into 16 clock phases, each 1.8456617625 days; or 44 hours 17 minutes and 45.176 seconds; or 159465.2 seconds long. My clock uses a counter to keep track of the time, and advances to the next phase after each 159465 second interval.
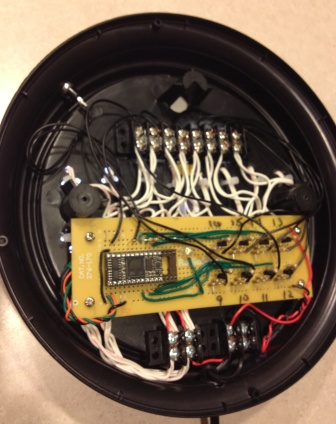
Construction: I used an old wall clock for the chassis and put a picture of the moon under the plastic front as shown in Figure 1. The face of the clock is segmented into 8 sections, each with a pair of bright LEDs, as shown in Figure 2.
For the electronics, I used a Netduino Mini mounted on a Radio Shack circuit card. Each of the 8 LED moon phase segments is powered by a GPIO output pin connected to an NPN transistor. The Phase Advance switch shorts a GPIO input pin to ground to allow me to set the clock. This is shown in Figure 3.
On startup, the software initializes its program variables, performs a simple LED test to verify that the lights work, sets the clock to a New Moon (no lights lit), and starts a counter to keep track of the time. When the time for a phase elapses (159465 seconds, as explained above), the software advances the phase and turns the next LED segment on or off, depending on whether the moon is waxing or waning. The user may also advance the phase by pressing the Phase Advance button. The code is included in Attachment 1.
Attached Thumbnails

Attached Files
-
 Attachment 1 - Moon Phase Clock Code.txt 9.02KB
22 downloads
Attachment 1 - Moon Phase Clock Code.txt 9.02KB
22 downloads
#40282 Netduino + Thermocouple
Posted by
on 27 November 2012 - 04:00 AM
in
Netduino Plus 2 (and Netduino Plus 1)
It depends on what the resistance was. Can you drive it with 3.3v and get a reasonable set of values back?took one of the probes from my grill thermostat and used a meter to see the resistance change on it. Is there a way I can use that in my AI on netduino plus?
#39674 I/O
Posted by
on 20 November 2012 - 12:54 AM
in
Netduino Plus 2 (and Netduino Plus 1)
#39408 Best technical books for Netduino to buy after reading "Getting Started w...
Posted by
on 15 November 2012 - 12:26 PM
in
General Discussion
I was going to recommend the Professional's Guide to .NET Micro Framework Application Development (Malin & Liming), but I see you already have that on your list. You won't be disappointed with that one.
You'll find, however, that the best resources are right here in the forums! There is a LOT of talent and helpful folks in here.
Pat
#38972 Netduino as a [Network] Peer - Morse Code Chat Room !
Posted by
on 11 November 2012 - 05:26 AM
in
Project Showcase
The purpose here was to see how easy it would be to use the Netduino as anetwork peer. I had fun writing the morse code software and creating a "morse code chat room."
Summary: you'll have to read it to see!

Attached Files
-
 Options for Embedded Net-Enabled Software Applications - Device as a Peer.pdf 505.7KB
26 downloads
Options for Embedded Net-Enabled Software Applications - Device as a Peer.pdf 505.7KB
26 downloads
#38971 Device as a [Network] Server
Posted by
on 11 November 2012 - 05:23 AM
in
Project Showcase
The purpose here was to see how easy it would be to use the Netduino as anetwork server. (I especially liked the Magic 8 Ball.)
Summary: you'll have to read it to see!
Attached Files
-
Options for Embedded Net-Enabled Software Applications - Device as a Server.pdf 675.63KB
49 downloads
#38970 Netduino as a [Network] Client
Posted by
on 11 November 2012 - 05:18 AM
in
Project Showcase
The purpose here was to see how easy it would be to use the Netduino as anetwork client.
Summary: you'll have to read it to see!
Attached Files
-
Options for Embedded Net-Enabled Software Applications - Device as a Client.pdf 429.56KB
60 downloads
#38422 Multi-threading in C#, HELP please.
Posted by
on 03 November 2012 - 11:48 AM
in
General Discussion
#38343 internal pullup
Posted by
on 01 November 2012 - 03:17 PM
in
Netduino 2 (and Netduino 1)
#38329 internal pullup
Posted by
on 01 November 2012 - 11:37 AM
in
Netduino 2 (and Netduino 1)
#36557 Powering from 5V power supply
Posted by
on 05 October 2012 - 03:07 AM
in
Netduino Mini
#36431 How to read from a pin that gets a PWM signal
Posted by
on 03 October 2012 - 12:37 AM
in
Visual Studio
#36430 Cheap Sound Modules?
Posted by
on 03 October 2012 - 12:16 AM
in
General Discussion
#36429 So how was Maker Faire NY
Posted by
on 02 October 2012 - 11:48 PM
in
General Discussion
I like your signature line. It took me a few seconds to figure it out, but I did ... I'm one of those who can read binary :-p
Oops. I just realized I wrote it wrong in my signature, it should say 10. Maybe I can't read binary after all :-( ha!
#36396 So how was Maker Faire NY
Posted by
on 02 October 2012 - 12:57 AM
in
General Discussion


