Netduino home hardware projects downloads community

Jump to content


The Netduino forums have been replaced by new forums at community.wildernesslabs.co. This site has been preserved for archival purposes only and the ability to make new accounts or posts has been turned off.

sweetlilmre's Content

There have been 62 items by sweetlilmre (Search limited from 21-June 23)


By content type

See this member's


Sort by                Order  

#14803 Interfacing Gameduino to Netduino - SPI trouble

Posted by sweetlilmre on 28 June 2011 - 05:02 AM in General Discussion

@sweetlilmre:
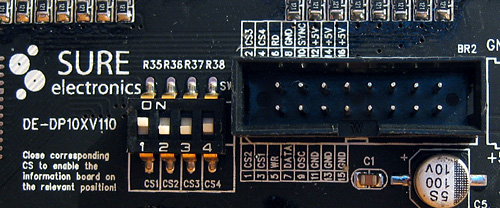
I don't think there's need to implement the chip-select manually. The SPI manages an output automatically without any problem and the result is much faster than the manual solution.

Try yourself and maybe your ball game will run at a satisfying speed.
Cheers


Hi

In my code there are only 2 SPI writes per frame so the independent chip select doesn't make any difference.
I rewrote the code as a test to flush the entire 32KB of data per frame with SPI handling the select.
This also made no difference.

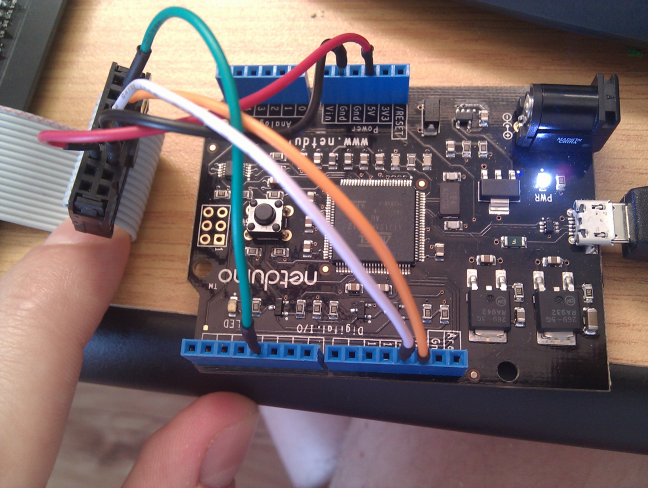
I'll try some more options, but it seems the NetDuino running C# is just not fast enough to handle this :(
-(e)


#14744 Interfacing Gameduino to Netduino - SPI trouble

Posted by sweetlilmre on 26 June 2011 - 07:47 PM in General Discussion

Hi,

Firstly to kerry_h:

You need to independently handle chip select with an OutputPort on Pin9 and make sure that your SPI config does not specify ChipSelect (see my setup code below).
Your code example should look something like:

ChipSelect = new OutputPort( Pins.GPIO_PIN_D9, true );

byte[] addressBuffer = new byte[2];
byte[] oneByteReadBuffer = new byte[1];
byte[] oneByteWriteBuffer = new byte[1];
oneByteWriteBuffer[0] = 0;

ChipSelect.Write( false );
addressBuffer[0] = 0x28;
addressBuffer[1] = 0x00;
mySPI.Write(addressBuffer);
mySPI.WriteRead(oneByteWriteBuffer, oneByteReadBuffer);
ChipSelect.Write( true );

Secondly to Mario Vernari:

The SPI setup for the GameDuino is specified as SPI Mode Zero i.e. CPOL = 0 and CPHA = 0
edit:
  SPI.setClockDivider(SPI_CLOCK_DIV2);
  SPI.setBitOrder(MSBFIRST);
  SPI.setDataMode(SPI_MODE0);

Thirdly:

I've ported the GD library to the NetDuino and got the Ball demo working.
This was a direct C++ -> C# port and very messy but it works.

However performance is abysmal, which is not surprising considering that the Ball demo makes 45 * 2 SPI writes for the sprites and 256 SPI writes for the palette shift.
This in turn results in 346 interop calls...

To increase performance I built an SPIBuffer class that buffers the 90 sprite writes and 256 palette writes and only makes 2 SPI calls per frame.
Performance increased significantly but still results in only about 5 FPS (pure guess work).

The SPI interface is supposed to run at 8Mhz stable for the GameDuino (1/2 Arduino clock).
The RAM size of the GameDuino is 32KB.
Calculating the transfer rate: 8Mhz = 8 000Khz = 8 000 000Hz = 8 000 000 bits per second = 1 000 000 bytes per second = 975KB/s

At the above rate I should be able to write the entire RAM at about 30 times a second.
I do not achieve anything remotely near this even with a significantly smaller write size.

Even taking .NET runtime and interop overhead into account this seems really strange.
Is there an issue with SPI transfer rate that I am not aware of?


My setup code is:

  	bool chipSelect_ActiveState = false;
  	bool clock_IdleState = false;
  	bool clock_Edge = true;
  	uint clockKHz = 8000;

  	SPI.Configuration config = new SPI.Configuration( Pins.GPIO_NONE, chipSelect_ActiveState, 0, 0, clock_IdleState, clock_Edge, clockKHz,
                       									SPI.SPI_module.SPI1 );

I use a separate OutputPort on PIN9 for chip select.

If I can get this working I will publish the library.
-(e)


#14824 Interfacing Gameduino to Netduino - SPI trouble

Posted by sweetlilmre on 28 June 2011 - 10:14 AM in General Discussion

That's really strange, because I've checked a deep difference in performance.
Writing a single frame byte-by-byte is hugely slow than writing a buffer all at once.
The actual byte-rate is around 2-3 KBytes/s: very slow.

Moreover, by adding a little help to the circuit, you may reach very high byte-rates, close to the theoretical SPI speed (around 200 KBytes/s).
Check my fresh post about the SPI perf.

Cheers

PS: after writing that post, I have done some other test and it seems that the speed could be improved enough.


Hi,

I read your post (great article btw!) and I agree... what I am seeing is waay to slow. Thanks for the upper metric of 200 KBps, that gives me something to work with.
I will try some more options and see if I can improve performance.

This is really frustrating... a GameDuino programmed with a C# backend would just be awesome.

I have some other avenues to explore with eLua that I am going to have a look at and see if there is any relative performance difference as well.
-(e)


#5107 Chines scale (caliper) protocol

Posted by sweetlilmre on 20 November 2010 - 09:38 PM in Netduino 2 (and Netduino 1)

Hi,

It sounds like you are running into similar issue I had in trying to interface with a PS2 Keyboard.
I might have a test firmware available soon if you want to try it out?

-(e)


#1570 Netduino firmware with GCC 4.4

Posted by sweetlilmre on 31 August 2010 - 05:38 PM in Netduino 2 (and Netduino 1)

Hi Jeremy, CW2,

I used your patches and all works pretty much as expected. Just to confirm, the target firmware will still be too large and will require the fix mentioned above in the other thread?
I get:

c:\GCC\bin\arm-none-eabi-ld.exe: region `LR_FLASH' overflowed by 576 bytes

Does this match your build? If so, its a pity its such a small difference! :)

edit: CW2:

For clarity (on my part):

// flash page is 8KB
// ranges are inclusive i.e. 0-5 is 6 pages
const BlockRange g_SAM7X_BS_BlockRange[] =
{
	{ BlockRange::BLOCKTYPE_BOOTSTRAP,     	0,  5 }, // 0x00000 - ( 6*8*1024) 0x0C000, length 0x0C000
	{ MEMORY_BLOCKTYPE_GCC_SPECIAL_BOOTSTRAP,  6, 10 }, // 0x0C000 - (11*8*1024) 0x16000, length 0x0A000, Sum = 0x16000 (.bin size = 0x143B0)
	{ BlockRange::BLOCKTYPE_CODE,         	11, 44 }, // 0x16000 - (45*8*1024) 0x5A000, length 0x44000
	{ MEMORY_BLOCKTYPE_GCC_SPECIAL_CODE,  	45, 53 }, // 0x5A000 - (54*8*1024) 0x6C000, length 0x12000, Sum = 0x56000, Flash size = 0x542C0
	{ BlockRange::BLOCKTYPE_DEPLOYMENT,   	54, 60 }, // 0x6C000 - (61*8*1024) 0x7A000, length 0x0E000 -> 56 KiBi for application code
	{ BlockRange::BLOCKTYPE_STORAGE_A,    	61, 61 }, // 0x7A000 - (62*8*1024) 0x7C000, length 0x02000
	{ BlockRange::BLOCKTYPE_STORAGE_B,    	62, 62 }, // 0x7C000 - (63*8*1024) 0x7E000, length 0x02000
	{ BlockRange::BLOCKTYPE_CONFIG,       	63, 63 }  // 0x7E000 - (64*8*1024) 0x80000, length 0x02000
};

So therefore:

<Set Name="Code_BaseAddress"	Value="0x00116000"/>
<Set Name="Deploy_BaseAddress"  Value="0x0016C000"/>

And once I have this correct I should be able to flash?

also:

However, during my numerous experiments, I have found out that bootloader compiled with RVDS actually works with firmware compiled with GCC 4.4 (!), so it appears to be a better choice, as there is more memory left for the application code, because GCC bootloader is twice as big as RVDS one (~40 KiBi vs. ~80 KiBi). I will probably stick with this for now...


This would be nice :) any hints on how to accomplish it?
-(e)


#4984 FPGA shield alpha

Posted by sweetlilmre on 16 November 2010 - 08:16 PM in Project Showcase

Hi Ward,

This is exactly what I am after for a number of ideas / projects.
I will take 2 if available.

Do you accept PayPal?
-(e)

edit: only problem is that I might need a XC3S200


#5327 BitBanger Driver

Posted by sweetlilmre on 26 November 2010 - 08:09 AM in Netduino 2 (and Netduino 1)

Hi Sweetlilmre,

If you have the time can you please explain to me how I can get this bitbanger driver to work with the Dot Matrices from Sure Electronics? or can you update your example of the Led Matrices with this driver?

Thanks,

Ramon


Hi Ramon,

I will try to get to this as soon as possible, unfortunately life is a little crazy at the moment :)
-(e)


#4807 BitBanger Driver

Posted by sweetlilmre on 10 November 2010 - 07:54 PM in Netduino 2 (and Netduino 1)

No Joy :(

I can add the code in and that all seems well but I cannot get the LCD to play nice. It's all a bit beyond me on how to talk LCD..

Cheers,
Crispin


Hi,

Do you have any specifics on the issue? What LCD, wiring etc?
Maybe we can figure this out.
-(e)


#5549 BitBanger Driver

Posted by sweetlilmre on 30 November 2010 - 08:53 PM in Netduino 2 (and Netduino 1)

I have updated the first post with a much more rounded driver and related firmware. To test the efficiency of this new firmware I have put the Matrix code through its paces and it performs well. Hopefully soon I will try this out on some LCD displays to test the latching effect. Also I have found some interesting bugs in the matrix code and will be updating it as soon as possible. Thanks -(e)


#7124 BitBanger Driver

Posted by sweetlilmre on 06 January 2011 - 06:39 AM in Netduino 2 (and Netduino 1)

Does this BitBanger project have a home page and more information ?


Hi,

No it doesn't but should :) I'll try and generate some SandCastle or similar docco at some point.
-(e)


#7123 BitBanger Driver

Posted by sweetlilmre on 06 January 2011 - 06:38 AM in Netduino 2 (and Netduino 1)

Hi

Does the Bitbanger need an external clock signal to work (that is what i beleive)?
How is the performans, how long from a clock until output, how fast can the next output bee, and so on ?
Does it sit in a tight loop doing the work, or is it interupt driven? I have seen an issue with Interupt latency but perhaps that is only for managed code.

Would it be possible to have it internally clocked, something like the OutputCompare, were you have an array of delays and the bit values.

/Jan Olof


Hi,

The BitBang will toggle the clock line for each bit of data output, in a tight loop, as fast as possible.
This is handled by the interop layer and is written in raw C code (well a C++ function, but effectively raw C) and should have a very low latency i.e. this is about as fast as it is possible to toggle pins without offloading to something like SPI.

Internal clock could be possible but is probably somewhat out of scope for the BitBang code. Perhaps there could be an extra parameter to introduce a fixed per bit delay if this was a valid use-case? i.e. delay X microseconds after each clock pulse.

-(e)


#4410 BitBanger Driver

Posted by sweetlilmre on 01 November 2010 - 10:16 AM in Netduino 2 (and Netduino 1)

Folks,

After much frustration I've found out (think) my LCD won't work because of how I am talking to it. It would appear this is my solution.

Any chance of a nice step by step walkthrough on how to get this working? I've flashed the new bootloader and flashed the firmware with sweetlilmre copy but am non the wiser as to how to proceed.
after much searching on my machine for anything that resembled "C:\MicroFrameworkPK_v4_1\Solutions\Netduino\ManagedCode" I worked out I actually had to install the Porting kit from MS. From there, I am still lost.

Any help for a total noob at this? Any hint as to when it would be in the native firmware, even as an alpha? I would be happy to use that.


Thanks
CP


Hi,

If you have flashed the firmware I provided then in the zip file should be an assembly that you can reference.
Once you've referenced the assembly in your project you can call the bitbanger driver (you don't need the porting kit etc. unless you want to compile your own firmware).

You are looking for "NetDuino.Hardware.BitBang.dll" in the zip file. Reference that and then instantiate the class and call appropriate methods to setup the gpios etc.
-(e)


#5328 BitBanger Driver

Posted by sweetlilmre on 26 November 2010 - 08:16 AM in Netduino 2 (and Netduino 1)

Hi Ramon, I just remembered that I had made this change already. Here is a totally untested code drop of the matrix code built against the BitBang class. You are totally on your own with this: I am releasing purely for you to look at and am not going to support it in any way :) I will update the matrix thread when I release it properly. -(e)

Attached Files


#4041 BitBanger Driver

Posted by sweetlilmre on 20 October 2010 - 06:12 PM in Netduino 2 (and Netduino 1)

Hi,

Chris:

I have taken the liberty of moving the code into the SecretLabs.NETMF.Hardware namespace.

Attached is a zip that should be extracted into the Solutions\Netduino\ folder and will:

  • update the Solutions\Netduino\DeviceCode\SecretLabs_NETMF_Hardware folder with the bitbang code
  • add the managed project source code into the C:\MicroFrameworkPK_v4_1\Solutions\Netduino\ManagedCode\SecretLabs_NETMF_Hardware folder
I discovered that the "SecretLabs.NETMF.Hardware.featureproj" file was pointing to the debug assembly, so I changed that to point to release and made the reference endian independent. You will obviously need to compile the managed code in release mode before building the firmware in order to generate this reference.

I tested the firmware against the LED matrix code and it all seems to work nicely.


Hookedup:

I hope this works for you, let me know how it goes.

Thanks
-(e)

Attached Files


#3994 BitBanger Driver

Posted by sweetlilmre on 19 October 2010 - 06:01 AM in Netduino 2 (and Netduino 1)

Hi all, I've attached the latest code which I got a chance to test last night. It seems to perform well (and work!) :) Hookedup: if you want to flash this you will need to reflash your bootloader (tinybooterdecompressor.bin is included) and then flash the hex files included. Source is in the archive as well. Chris, now I just need to rename / whatever to make this an appropriate fit for the firmware. Thanks -(e)

Attached Files


#1834 BitBanger Driver

Posted by sweetlilmre on 06 September 2010 - 05:03 AM in Netduino 2 (and Netduino 1)

Oh hey, that is really cool. If a few community members have feedback on uses for this, maybe we could integrate something like this into the stock firmware in a future update?

Chris


Thanks! Maybe this could be built into a namespace with CW2's OneWire stuff? A kind of bitbanger toolkit?

Is there anyway to ship a driver without including it in a matching kernel i.e. have the native and managed portions separate and loadable or is built-in the only possibility?

Also I can trim down the code more, and put it in a better more generic namespace. Do you have a namespace suggestion?

edit: any news on a GIT source share or something similar for the firmware? It would make community generated patches so much nicer and easier :)

-(e)


#1778 BitBanger Driver

Posted by sweetlilmre on 05 September 2010 - 05:07 PM in Netduino 2 (and Netduino 1)

Hi,


UPDATE: this post has been updated with a newer version and firmware: 11/29/2010. This newer version provides SoftSPI like capabilities.

In my quest to make my HT1632 display useable I have developed a generic bit banger driver.

The attached archive unzips into the "MicroFrameworkPK_v4_1\Solutions\Netduino" dir.
If you want to build this yourselves you will have to build the managed solution and generate the client assemblies and then build the firmware as usual.

The speed increase in amazing when driving the HT1632 and I know that variable SPI is around the corner, but I thought this might be useful in a more generic context (the code should be device neutral).

The bit banger is constructed with a configuration class that describes two pins, one clock and one data.
Ownership of the pins then belongs to the BitBanger class.

public class Config
{
public Config( Cpu.Pin clockPin,
             		bool clockEdgeRising,
             		Cpu.Pin dataPin,
             		Cpu.Pin latchPin,
             		bool latchActiveState )
}

BitBang.Config config = new BitBang.Config( clkPin, true, dataPin );
// set data & clock pin modes
BitBang bb = new BitBang( config );


Additionally the latchPin and latchActiveState Config members allow for additional flexible latching behaviour.

public enum LatchBehaviour
{
	PerTransfer,
	Per8Bits,
	Per16Bits,
	Per32Bits,
	Never
}

LatchBehaviour is passed to the block blitting function and will toggle a latch line (or CS possibly) in a certain manner.
This is very useful for writing to shift registers in a continuous mode.


The BitBang class interface has some basic functionality:

These two methods bang out a stream of bytes, with each byte written from the MSb (bigEndian) or LSb and with optional latch behaviour.

public void Write( byte[] writeBuffer, int writeOffset, int writeCount, bool bigEndian)
public void Write( byte[] writeBuffer, int writeOffset, int writeCount, bool bigEndian, LatchBehaviour latchBehaviour )


And these two methods bang out up to 32 bits with the same endian functionality as above.

public void Write32( UInt32 data, byte numBits, bool bigEndian )
public void Write32AndLatch( UInt32 data, byte numBits, bool bigEndian )


I have attached 2 files containing the compiled firmare (tinyclr.hex.zip) and the source code (bitbang.zip).
Included in the source code is the compiled client assembly which you will find under the MicroFrameworkPK_v4_1\Solutions\Netduino\ManagedCode\SecretLabs_NETMF_Hardware\bin\Release dir.
You will need to reference this assembly or replace the one provided with the NetDuino SDK in order to use the BitBang class.

:D :D :D

Hope this is interesting / useful
-(e)

Attached Files


#3946 BitBanger Driver

Posted by sweetlilmre on 17 October 2010 - 01:29 PM in Netduino 2 (and Netduino 1)

Those links are pretty daunting for someone coming new into this technology. After reading those links am pretty sure I have no desire to go native for some time. That said, the current method of direct pin control is too slow. I tried FEZ Panda and it has the same slow pin speed, I guess it is the .NET layer. This seems very similar to standard pin control in the arduino being too slow, in which direct port access helps at the cost of portability.

This bit banger driver seems to be a great solution for this problem.

Is there is a way to put up a test firmware with big banger included? That would help see if bit banging will do the trick.

I would think having bit banger built in would be best case. Is there a case to not include bit banger in the base outside firmware size?

Thanks for building and posting bit banger, good to know there is a way to have fast pin access like direct port access in arduino.


Hi,

Yep the interop is well scary the first time around. I had to bang my head hard to get it to work as there was some obscure bug in my code (a naming issue with a lib and an incorrect .proj file).

Its probably worth getting to know though. As far as posting a firmware image I can do that, but as I have had no luck in compiling with RVCS I can only give you a GCC based image which will require flashing your boot loader via SAM-BA as well. Are you comfortable with this?

I have been playing with the code and have managed to slim the size down significantly and keep the functionality. Perhaps I can convince Chris to add it to the main source tree.

-(e)


#3966 BitBanger Driver

Posted by sweetlilmre on 17 October 2010 - 09:01 PM in Netduino 2 (and Netduino 1)

Hi sweetlilmre,

Very cool.

A few questions:
1. What do (or others) see as the typical use cases for this feature? By including it in the core firmware, we'd like to make sure that we communicate its use and value clearly to users.

2. What limits are you putting on length of data? My only concern would be that the code might send out enough bits that it would tie up the processor and not let other managed code run... In .NET MF, native code should use timers, continuations, or completions for long-running tasks.

3. Are you willing to include this in the core codebase (Apache 2.0 licensed)? Attribution to original authors (internal or external) doesn't appear in any of the source--but we'd like to find a way to give you credit. At minimum we can give you a big public "thank you" in the online release notes... Hmm, have to think about that...

Chris


1. Typical use case is to handle hardware like the HT1632, shift registers etc. Of course you CAN do this in managed, its just slow. Basically any hardware that can be bitbanged can now be used 'speedily' from a NetDuino without custom drivers.

2. There is no limit on the length of data atm. typical usages look to be small arrays (16-32 bytes?) but I am willing to look into friendlier options to allow 'unlimited' data or even cap it at some reasonable value.

3. Sure no problem. Any license is pretty much fine with me. I am no GPL zealot :)

Something things to think about:
  • variable SPI might perform a similar function, although that obviously dictates the usage of the SPI pins. How is this going btw?
  • the 1-wire interface CW2 wrote also could use some firmware love :) It is different enough that it needs its own impl though.
-(e)


#3961 BitBanger Driver

Posted by sweetlilmre on 17 October 2010 - 07:29 PM in Netduino 2 (and Netduino 1)

Hi sweetlilmre,

We'd love to look at putting this (or something like it) into a firmware update.

Chris


Awesome :)

The code is yours to do with what you will. I have made some improvements though so perhaps I should get you the new version.
I would appreciate your thoughts on this:

The basic functionality is now wrapped into a class that provides two native methods:

  [MethodImpl( MethodImplOptions.InternalCall )]
  private extern void NativeWrite( Cpu.Pin clockPin, Cpu.Pin dataPin, byte[] data, int writeOffset, int writeCount,
 									bool risingClock, bool bigEndian );

  [MethodImpl( MethodImplOptions.InternalCall )]
  private extern void NativeWrite32( Cpu.Pin clockPin, Cpu.Pin dataPin, UInt32 data, byte numBits, bool risingClock,
   									bool bigEndian );

risingClock
allows for a rising edge clock signal (true) or falling edge (false)
bigEndian
indicates the bit order i.e. true = most significant bit first, false = least significant bit first. This applies on a per-byte basis for the Write() method and across the 32 bits for the Write32() method.
numBits
number of bits to process for Write32(). In bigEndian mode this indicates the start bit i.e. numBits = 9 would bitbang bits 8 to 0 in that order

Public methods wrap the internal methods to prevent passing a Cpu Pin that has not been assigned to an OutputPort (I could have passed the port to the native method but the marshalling is more complex and slower that way). Also resource management is handled by the containing class.

This seems to be the best compromise I could come up with in terms of speed and efficiency.
Unfortunately I left my NetDuino at work so I will only be able to test these changes tomorrow.

In terms of naming conventions / namespace, I would like to build this so that it is a drop in with the least amount of work for you. How would you like me to do this? Should I extend code inside the SecretLabs namespace? I am happy to assign all rights etc. over to you in this case?

-(e)

[edit: for numBits clarification]


#1627 HT1632 interface (alpha)

Posted by sweetlilmre on 01 September 2010 - 09:53 AM in Netduino 2 (and Netduino 1)

Hi,

Attached is some code to drive the HT1632 LED Matrix chip as found in the Sure Electronics DE-DP13212 and similar boards (Sure Electronics).
The code is horribly slow at the moment as a raw bit-bang approach is used to communicate with the HT1632 (and I am sure my horribly un-optimsed code does not help :))
I will migrate this to SPI once variable SPI is available. At any rate here it is to look at.

This code was ported from Miles Burton's Arduino code and is released under the same GPL license.

Any pointers on optimisation would be great as C# on an embedded device is very new to me!

Connection is 5 wires:
Power and ground to 5V and GND pins.
ChipSelect to digital pin 4
Clock to digital pin 13
Data (WR) to digital pin 12

Hope this helps someone. I will attempt to optimise this to make it useful and to support the 2416 boards as well.
-(e)

Attached Files


#1634 HT1632 interface (alpha)

Posted by sweetlilmre on 01 September 2010 - 04:36 PM in Netduino 2 (and Netduino 1)

Very cool! You've implemented "bit banged" variable-bit SPI using managed...doubly cool.


I really can't take too much of the credit, its mostly Miles Burton's code, but thanks :)
I think that is definitely part of the speed issue as is the memory access on the buffer arrays.

I need to have a look at that...
-(e)


#2669 HT1632 interface (alpha)

Posted by sweetlilmre on 23 September 2010 - 01:18 PM in Netduino 2 (and Netduino 1)

Very strange, I did connect GND to pin 11 and 5V to 12 on the matrix, I also checked the CS selection switch and only 1 is on.. I have also some 2416 boards I tried one of those still no luck! Do you have a picture or something on how you wired yours? Or do you have any other ideas?

Thanks!


Does this help at all?

Posted Image

I just rewired it and tested it out. It all seems to work OK?
On the ribbon side, the pins are:

Green: Chip Select, pin3
Orange: Clock, pin5
White: Data, pin 7
Black: GND, pin 11
Red: 5V, pin 12

The 2416 will not work as the addressing mode is different. (well it might display something, but certainly not what is intended, I must get one of those to play with though...)

HTH

-(e)


#2699 HT1632 interface (alpha)

Posted by sweetlilmre on 23 September 2010 - 09:56 PM in Netduino 2 (and Netduino 1)

Thanks for the picture! My configuration is exactly the same! So it can't be the wiring, you said the 2416 won't work because of a different pixel mapping.. I have read somewhere that the pixel mapping of the green 0832 is different from the red 0832 too just like the green 2416 pixel mapping is different from the red one.

The code runs just fine I have checked if the matrices are getting power. I really have no idea what is going wrong.

This is what is on the back of my 0832: Posted Image

Is that the same as yours?

Thanks again for your help! I really hope I can get it to work!


I can't imagine the mapping is different if they are using the same display driver... I have the Yellow one btw.
Here is a close up (sorry about the washed out look, but the lighting in my study is terrible at night)

Posted Image
The only other thing I can suggest is that you have a bad connection. My clock line was dodgy initially and nothing would display.

HTH
-(e)


#2659 HT1632 interface (alpha)

Posted by sweetlilmre on 23 September 2010 - 10:00 AM in Netduino 2 (and Netduino 1)

Cool stuff Sweetlilmre!

I'm trying your sample with some of my 0832 boards here but I can't seem to get anything displayed on it. I have to say it are the green 0832's from SureElectronics and not the red ones don't know if that makes any difference. Just to be sure this is how I mapped the pins

NetDuino -------------- Matrix
Pin4 -------------- Pin3
Pin13 -------------- Pin5
Pin12 -------------- Pin7

Is that correct? or did I screw up :)


Hi,

Checking the 0832 Datasheet, your connections look good.
I assume you have also wired:

NetDuino GND to Matrix 11
NetDuino 5V to Matrix 12

Also that you have set the dip switches on the back of the matrix to 1=ON, 2=OFF, 3=OFF, 4=OFF?

Make sure you have the matrix connector orientation correct (I got it upside down the first time and wired 5V to GND... :))
-(e)


home    hardware    projects    downloads    community    where to buy    contact Copyright © 2016 Wilderness Labs Inc.  |  Legal   |   CC BY-SA
This webpage is licensed under a Creative Commons Attribution-ShareAlike License.