Greg Zimmers's Content
There have been 11 items by Greg Zimmers (Search limited from 14-July 24)
#23145 Neduino & IN13 Nixie Bargraph
 Posted by
on 22 January 2012 - 06:04 PM
in
Project Showcase
Posted by
on 22 January 2012 - 06:04 PM
in
Project Showcase
#23088 Monitor & Control your Garage Door with Android App
Posted by
on 21 January 2012 - 02:55 AM
in
Project Showcase
Great job! I have implemented this and added email notifications. My next goal is to add some sort of authentication to prevent unauthorized access to my garage. I know the public IP and custom port are a deterrent, but I would feel better with some sort of password entry. I will let you know if/when I come up with something.
I actually built a two server solution for my house. I have the Netduino only visible inside the network without any authentication. Then on my IIS server (exposed externally) I built a RESTful webservice with authentication. My Android app talks to the webservice which talks to the Netduino.
My main purpose for the app was to provide peace of mind that the door was closed while away and to be able to close it remotely. It also comes in handy to be able to open the door for someone who needs entry while your away.
#23087 Netduino plus hello world web server
Posted by
on 21 January 2012 - 02:48 AM
in
Netduino Plus 2 (and Netduino Plus 1)
anyone reading this post might be able to help me. I am using Greg's code and would like to modify to spit out the analog data every 50 or 100msec to ethernet. How to do that?.. Any help is greatly appreciated and thanks in advance.
Lou
This is more challenging. HTTP is inherently stateless. So "Pushing" information down to the client is not as straightforward as you might think. Your best bet would be to ping the server back at set interval. You can use Jquery or many other technologies to make these calls without refreshing the page.
#20228 Monitor & Control your Garage Door with Android App
Posted by
on 04 November 2011 - 02:43 PM
in
Project Showcase
First of all, thank you for documenting your work -- I've never done anything like this before and it's been extremely easy to follow and duplicate thus far... with one exception.
I've set up the IR sensor as instructed, and my output when debugging indeed shows that the ir sensor is... well... sensing objects. However, it's only sensing an object when it is extremely close to the sensor (like literally 1/8th to 1/16th of an inch). I get readings of 1024 up until i'm that close, then they drop off to ~10-20.
At first I thought I possibly had a defunct sensor (fortunately i bought two), but I'm having the same results with both. I'm using two 100ohm resistors in series in place of the 200ohm, but I assume that wouldn't make any difference.
Any light you could shed on this would be greatly appreciated as i'm so close to a finished project.
Thanks!
-jeremy
Yes your results from the IR sensor seem accurate. The one disadvantage of the IR sensor is that is must be mounted very close (sensor only reads very close objects). I was worried about it as well, but my tests showed I could get reliable results and it is a cheaper sensor than a proximity sensor (around $10+). To get reliable results I mounted my IR sensor on the side rail. It faced the broad support plate on the door providing a good reading. Be creative where you mount the IR sensor. Any location that will give you different readings when the door is open versus closed will work.

If you need I can post more pictures how I mounted the IR sensor. If you can't find a reliable location for the IR sensor that will place it within an 1/8th of inch of your door (doesn't matter if it's when it's closed or open) you could switch to a proximity sensor. A proximity sensor can be located much farther away and give you a significantly more accurate distance reading.
I think its great your duplicating the project. If you run into any other issues, feel free to post your questions, I would be glad to help if I can. Please post an update after you have completed it!
#19985 Monitor & Control your Garage Door with Android App
Posted by
on 30 October 2011 - 12:03 AM
in
Project Showcase
Hi, I've tried your application with some modification (I turn on/off a relay instead of open a garage door), but while connecting from a browser all works fine, from the Android application and also from the Android browser I can't connect to the netduino (in my case http://192.168.0.7/relay_on is the command). I exclude a problem in my LAN because if I browse the ip of the router (192.168.0.1) from android, I have no problem. The strange thing is that from any other pc on my lan, all works fine... the problem is only from my android smartphone. Any suggest?
If I put a breakpoint in the netduino application (in the ListenForRequest() method) the execution never reach this point.
Thanks in advance for any suggestion.
I have noticed some issues communicating between Android and the Netduino. It actually took me a long time to discover you can't step through your Android code and watch the HTTP client execute a call to the Netduino. Whenever I did step through my code it failed 100% of the time. Since this is just a demo app and my actual app involves a second IIS web server, that sits between the Android and the Netduino, I solved the issue by making up to 5 HTTP calls. That seems to work reliably for me.
#19364 Monitor & Control your Garage Door with Android App
Posted by
on 18 October 2011 - 03:02 PM
in
Project Showcase
Greg, what is the Android App you created? I'd like to check it out.
Just finished documenting the Android app. I have provided a link to the my blog post which goes through the app source code step by step. I also provide a link to download the complete project to use as is or as a starting point for your own app.
I didn't want to post the entire tutorial here since its a bit off topic and I am sure not everyone is interested in Android programming. But if you are here is the link.
http://androidcodemo...e-door-app.html
#18128 Netduino to windows phone 7 ? Can it work ?
Posted by
on 17 September 2011 - 09:57 PM
in
General Discussion
Do I understand correctly, the phone through Silverlight, can talk wifi to a wifi webserver (on the netduino equiped with a wifi shield and driver) ?
I have built WP7 client app to monitor and control my garage door. I also built an Android client and I am documenting the whole process under project showcase section. The only difference is the introduction of a WiFi shield. I have not tried to use a WiFi shield with a Netduino so I am not sure how much work it will take to get it to work.
#18088 Monitor & Control your Garage Door with Android App
Posted by
on 16 September 2011 - 03:25 PM
in
Project Showcase
Nice. I've got a similar project with a Netduino plus controlling the lighting and door in my garage. Link here. It sounds like you're going a similar route so give me a shout if I can be any help.
I used an optoisolator for reading the state of the garage door. Door control is done via a relay that goes in parallel with the door's push button.
Control is via URLs like /garage/door/open. It's wrapped in a UI that is a simple web page served from the Netduino . (You can see that on the link above.) I've now added a basic Android app the looks a little nicer but calls the same URLs, switches on WiFi as it starts up and stuff like that.
Actually the entire project is complete, I am now documenting it to share with others. Thanks for sharing your project I am very interested in how you detect the door state. I was not as brave as you; opening up the garage door unit and mixing high and low voltage. I was attracted to the infrared sensor because it was cheap and not intrusive. Have you posted any schematics? I would be interested in learning from what you have done.
#18066 Monitor & Control your Garage Door with Android App
Posted by
on 16 September 2011 - 06:39 AM
in
Project Showcase
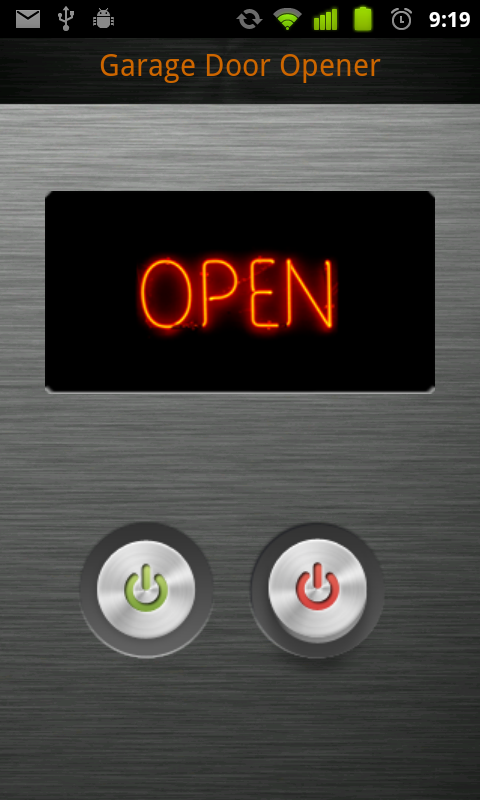
I have created an Android garage door monitor and opener. It connects to the Netdiuno plus over HTTP. I am now in the process of documenting the whole project. I am done with the whole project and now I am going back and documenting each step of the process. Here is the first step: Building and programming the infrared sensor. I chose infrared sensor because it's cheap ($1.13!) and I don't have to make physical contact with the door.
Android App
I am not going to post the entire step by step tutorial here since it's a little off topic for these forums.
If you are interested in Android programming, I posted step by step instructions for the android app that will control your garage door, on my blog. All source code is available for download, so you can use it as is or a starting point for you own project.
Read more about here. http://androidcodemo...e-door-app.html
Garage Door Opener
1a. Supplies
There are many ways to control your garage door with your Netduino. I decided to hack a spare garage door opener (since I wasn't using it) with an Optoisolator. My total cost $1.25. If I didn't have a spare garage door opener I would have run two wires off the Optoisolator pin 3 & 4 to the control panel in the garage. To send commands to the Netduino I am going to use HTTP commands.
- Garage door opener
- Optoisolator with Darlington Driver - 1 Channel. I purchased mine from Sparkfun.
- 100 ohm resistor
- 33 ohm resistor
- Netduino plus (of course)
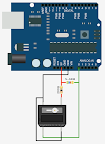
Here is the schematic for interfacing with the garage door opener. Excuse my unsophisticated schematic as I don't own any electrical CAD software.

- Connect the Optoisolator pin 1 (Anode) to the Netduino plus digital pin 13
- Connect the Optoisolator pin 2 (Cathode) to a ground pin on the Netduino plus with a 33 ohm resistor in-line.
- Connect the Optoisolator pin 3 (Emitter) to one side of the garage door opener push-button with a 100 ohm resistor in-line.
- Connect the Optoisolator pin 4 (Collector) to the other side of the garge door opener push-button.

1c. Code it
For the code, I am going to start with a stubbed out web server code from my previous blog tutorial of mine. To get more information on the basic code for a web server see my previous blog post. After you download the code, open the project. Let's modify the code so we can send an HTTP request to the Netduino to activate the garage door opener. We are going to send a command to push the button on the garage door opener. We don't know if we are opening it or closing it since we are not yet monitoring the garage door status. We will combine this project to activate the garage door with the monitor code in a later post. Then we will be able to send the specific command "Open" or "Close".
The code is pretty straightforward, but if you want a more in-depth explanation you can visit blog post.
public class WebServer : IDisposable
    {
        private Socket socket = null;
        //open connection to onbaord led so we can blink it with every request
        private OutputPort led = new OutputPort(Pins.ONBOARD_LED, false);
        private OutputPort Garage2CarOpener = new OutputPort(Pins.GPIO_PIN_D13, false);

        public WebServer()
        {
            //Initialize Socket class
            socket = new Socket(AddressFamily.InterNetwork, SocketType.Stream, ProtocolType.Tcp);
            //Request and bind to an IP from DHCP server
            socket.Bind(new IPEndPoint(IPAddress.Any, 80));
            //Debug print our IP address
            Debug.Print(Microsoft.SPOT.Net.NetworkInformation.NetworkInterface.GetAllNetworkInterfaces()[0].IPAddress);
            //Start listen for web requests
            socket.Listen(10);
            ListenForRequest();
        }

        public void ListenForRequest()
        {
            while (true)
            {
                using (Socket clientSocket = socket.Accept())
                {
                    //Get clients IP
                    IPEndPoint clientIP = clientSocket.RemoteEndPoint as IPEndPoint;
                    EndPoint clientEndPoint = clientSocket.RemoteEndPoint;
                    //int byteCount = cSocket.Available;
                    int bytesReceived = clientSocket.Available;
                    if (bytesReceived > 0)
                    {
                        //Get request
                        byte[] buffer = new byte[bytesReceived];
                        int byteCount = clientSocket.Receive(buffer, bytesReceived, SocketFlags.None);
                        string request = new string(Encoding.UTF8.GetChars(buffer));
                        string firstLine = request.Substring(0, request.IndexOf('\n')); //Example "GET /activatedoor HTTP/1.1"
                        string[] words = firstLine.Split(' ');  //Split line into words
                        string command = string.Empty;
                        if( words.Length > 2)
                        {
                            string method = words[0]; //First word should be GET
                            command = words[1].TrimStart('/'); //Second word is our command - remove the forward slash
                        }
                        switch (command.ToLower())
                        {
                            case "activatedoor":
                                ActivateGarageDoor();
                                //Compose a response
                                string response = "I just opened or closed the garage!";
                                string header = "HTTP/1.0 200 OK\r\nContent-Type: text; charset=utf-8\r\nContent-Length: "
         		+ response.Length.ToString() + "\r\nConnection: close\r\n\r\n";
                                clientSocket.Send(Encoding.UTF8.GetBytes(header), header.Length, SocketFlags.None);
                                clientSocket.Send(Encoding.UTF8.GetBytes(response), response.Length, SocketFlags.None);
                                break;
                            default:
                                //Did not recognize command
                                response = "Bad command";
                                header = "HTTP/1.0 200 OK\r\nContent-Type: text; charset=utf-8\r\nContent-Length: "
				+ response.Length.ToString() + "\r\nConnection: close\r\n\r\n";
                                clientSocket.Send(Encoding.UTF8.GetBytes(header), header.Length, SocketFlags.None);
                                clientSocket.Send(Encoding.UTF8.GetBytes(response), response.Length, SocketFlags.None);
                                break;
                        }
                    }
                }
            }
        }
        private void ActivateGarageDoor()
        {
            led.Write(true);                //Light on-board LED for visual cue
            Garage2CarOpener.Write(true);   //"Push" garage door button
            Thread.Sleep(1000); 			//For 1 second
            led.Write(false);   			//Turn off on-board LED
            Garage2CarOpener.Write(false);  //Turn off garage door button
        }
        #region IDisposable Members
        ~WebServer()
        {
            Dispose();
        }
        public void Dispose()
        {
            if (socket != null)
                socket.Close();
        }
        #endregion
    }
1.d Run it
Now run the code in debug mode (F5).
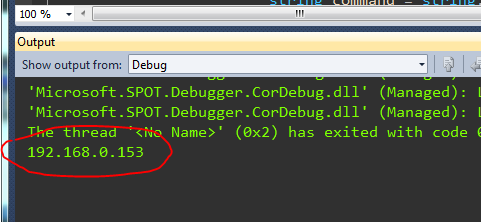
Open another a web browser and enter the IP address that the Netdiuno board displayed in the output window. For me its "http://192.168.0.153...3/activatedoor"
You should see the LED on the Netduino plus light and the door should open or close.
The complete code is attached to this post "NetduinoGarageDoorOpener.zip"
Garage Door Sensor
2a. Supplies
- Optical Detector / Phototransistor $1.13 ( bought mine from Sparkfun)
- 200 ohm resistor (under a buck from any almost anywhere)
- 5.6K ohm resistor (under a buck from any almost anywhere)
- (Optional) (2) Screw Terminals 3.5mm Pitch $1.25 ea.
- (Optional) PC Board $2.19 for two.
2b. Build Garage Door Sensor
Here is the schematic for building the sensor.
view larger
Here it is built
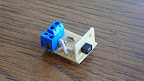
view larger
Here it is installed
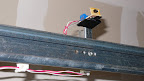
view larger
2c. Code the Garage Door Sensor
//Set the analog pin to monitor Pin 0
AnalogInput garageSensor = new AnalogInput(Pins.GPIO_PIN_A0);
//Set sensor range
garageSensor.SetRange(0, 1024);
//Program loop
while (true)
{
    Debug.Print(garageSensor.Read().ToString());
    Thread.Sleep(1000);
}
I will be adding the rest of the project to this posting as I finish documenting it. Here is what will be coming.
- [Coming soon!] Program the Netduino webserver
- [Coming soon!] Writing an android app to talk to the Netdiuno plus over HTTP
Attached Files
-
 NetduinoInfraredSensor.zip 132.65KB
99 downloads
NetduinoInfraredSensor.zip 132.65KB
99 downloads
-
NetduinoGarageDoorOpener.zip 798.43KB
140 downloads
#10700 Netduino plus hello world web server
Posted by
on 09 March 2011 - 05:54 AM
in
Netduino Plus 2 (and Netduino Plus 1)
I also wanted to have a static IP address so I did the following.
- Connect to your router
- Depending on the model get to your DHCP settings
- You should be able to add a reserved IP for a device with a specific Mac Address
- You can obtain the Mac Address on the back on (white sticky label)
- Enter the Mac Address and the IP you want to reserve
- You then can run my project as is and the IP will always be the same (as I do)
#10614 Netduino plus hello world web server
Posted by
on 06 March 2011 - 04:10 PM
in
Netduino Plus 2 (and Netduino Plus 1)
Netduino Plus Web Server Hello World
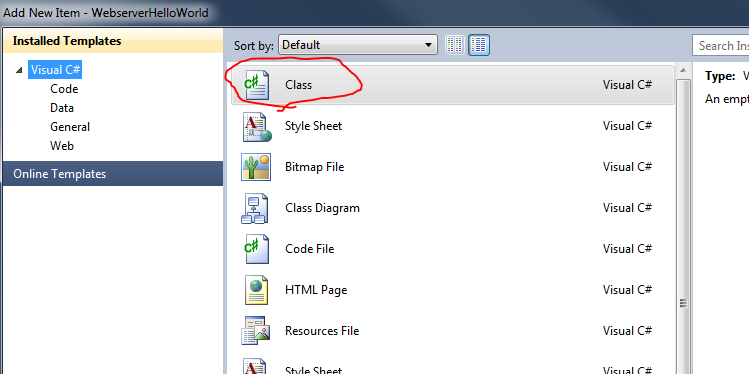
- Let's start by creating a new project. Name it "WebserverHelloWorld"

- Right click on project name and choose to "Add" > "Add new item"

- Add new "Class" and name is "WebServer.cs"
- Here is a very simple version of a web server. It will listen for requests and respond with "Hello World". It will also blink the on-board LED when a web request comes into the Netduino plus.
    public class WebServer : IDisposable
    {
        private Socket socket = null;
        //open connection to onbaord led so we can blink it with every request
        private OutputPort led = new OutputPort(Pins.ONBOARD_LED, false);
        public WebServer()
        {
            //Initialize Socket class
            socket = new Socket(AddressFamily.InterNetwork, SocketType.Stream, ProtocolType.Tcp);
            //Request and bind to an IP from DHCP server
            socket.Bind(new IPEndPoint(IPAddress.Any, 80));
            //Debug print our IP address
            Debug.Print(Microsoft.SPOT.Net.NetworkInformation.NetworkInterface.GetAllNetworkInterfaces()[0].IPAddress);
            //Start listen for web requests
            socket.Listen(10);
            ListenForRequest();
        }

        public void ListenForRequest()
        {
            while (true)
            {
                using (Socket clientSocket = socket.Accept())
                {
                    //Get clients IP
                    IPEndPoint clientIP = clientSocket.RemoteEndPoint as IPEndPoint;
                    EndPoint clientEndPoint = clientSocket.RemoteEndPoint;
                    //int byteCount = cSocket.Available;
                    int bytesReceived = clientSocket.Available;
                    if (bytesReceived > 0)
                    {
                        //Get request
                        byte[] buffer = new byte[bytesReceived];
                        int byteCount = clientSocket.Receive(buffer, bytesReceived, SocketFlags.None);
                        string request = new string(Encoding.UTF8.GetChars(buffer));
                        Debug.Print(request);
                        //Compose a response
                        string response = "Hello World";
                        string header = "HTTP/1.0 200 OK\r\nContent-Type: text; charset=utf-8\r\nContent-Length: " + response.Length.ToString() + "\r\nConnection: close\r\n\r\n";
                        clientSocket.Send(Encoding.UTF8.GetBytes(header), header.Length, SocketFlags.None);
                        clientSocket.Send(Encoding.UTF8.GetBytes(response), response.Length, SocketFlags.None);
                        //Blink the onboard LED
                        led.Write(true);
                        Thread.Sleep(150);
                        led.Write(false);
                    }
                }
            }
        }
        #region IDisposable Members
        ~WebServer()
        {
            Dispose();
        }
        public void Dispose()
        {
            if (socket != null)
                socket.Close();
        }
        #endregion
    }
- Now add the following code to Program.cs.
public static void Main()
{
Microsoft.SPOT.Net.NetworkInformation.NetworkInterface.GetAllNetworkInterfaces()[0].EnableDhcp();
WebServer webServer = new WebServer();
webServer.ListenForRequest();
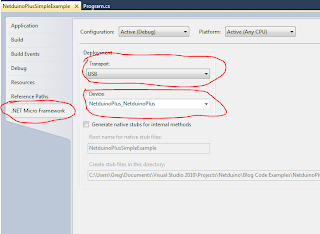
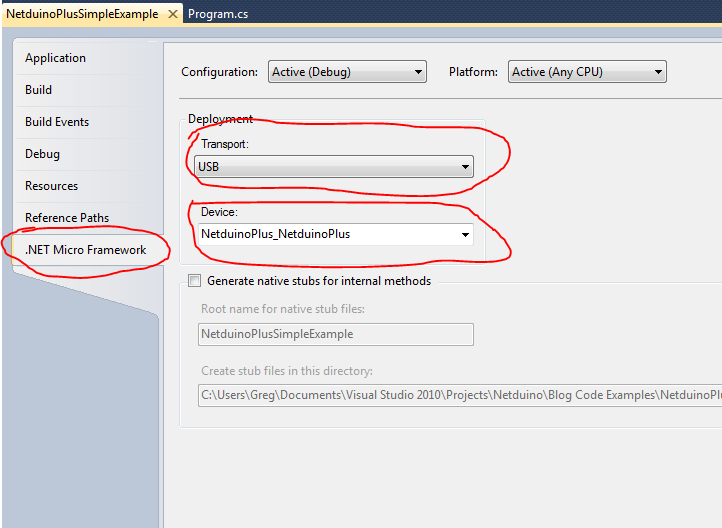
}- Make your program run on the Netduino and not the emulator by right clicking on your project > "Properties"
- Select the ".Net Micro Framework" tab and change the following settings.
- Transport: USB
- Device: NetduinoPlus_NetduinoPlus
- Now run the program by pressing F5 or "Debug" > "Start Debugging".
- In the "Output" the program will write the Netduino plus IP address. If you don't have the "Output" window open, select "View" > "Output" to open it.
- Now open a web browser and type the Netduino plus IP in the address bar.
- You should receive back "Hello World" from the Netduino plus.
http://www.youtube.com/watch?v=2E7ruAYdfQU
Complete source code attached.
Attached Files
-
WebserverHelloWorld.zip 145.27KB
623 downloads


