Netduino home hardware projects downloads community

Jump to content


The Netduino forums have been replaced by new forums at community.wildernesslabs.co. This site has been preserved for archival purposes only and the ability to make new accounts or posts has been turned off.
Photo

Netduino plus hello world web server


  • Please log in to reply
6 replies to this topic

#1 Greg Zimmers

Greg Zimmers

    Member

  • Members
  • PipPip
  • 11 posts
  • LocationBroomfield CO

Posted 06 March 2011 - 04:10 PM


Netduino Plus Web Server Hello World


A simple Netduino plus web server. The Netduino plus will respond with "Hello World" when we make a HTTP request over it's Ethernet port. This is a step by step how to with all of the code for the project available for download at the end of this post.
  • Let's start by creating a new project. Name it "WebserverHelloWorld"

Posted Image

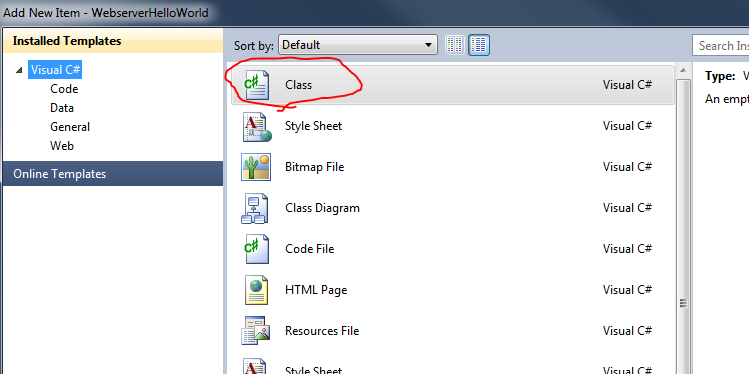
  • Right click on project name and choose to "Add" > "Add new item"

Posted Image


  • Add new "Class" and name is "WebServer.cs"

Posted Image

  • Here is a very simple version of a web server. It will listen for requests and respond with "Hello World". It will also blink the on-board LED when a web request comes into the Netduino plus.
    public class WebServer : IDisposable
    {
        private Socket socket = null;   
        //open connection to onbaord led so we can blink it with every request
        private OutputPort led = new OutputPort(Pins.ONBOARD_LED, false);
        public WebServer()
        {
            //Initialize Socket class
            socket = new Socket(AddressFamily.InterNetwork, SocketType.Stream, ProtocolType.Tcp);
            //Request and bind to an IP from DHCP server
            socket.Bind(new IPEndPoint(IPAddress.Any, 80));
            //Debug print our IP address
            Debug.Print(Microsoft.SPOT.Net.NetworkInformation.NetworkInterface.GetAllNetworkInterfaces()[0].IPAddress);
            //Start listen for web requests
            socket.Listen(10);
            ListenForRequest();
        }

        public void ListenForRequest()
        {
            while (true)
            {
                using (Socket clientSocket = socket.Accept())
                {
                    //Get clients IP
                    IPEndPoint clientIP = clientSocket.RemoteEndPoint as IPEndPoint;
                    EndPoint clientEndPoint = clientSocket.RemoteEndPoint;
                    //int byteCount = cSocket.Available;
                    int bytesReceived = clientSocket.Available;
                    if (bytesReceived > 0)
                    {
                        //Get request
                        byte[] buffer = new byte[bytesReceived];
                        int byteCount = clientSocket.Receive(buffer, bytesReceived, SocketFlags.None);
                        string request = new string(Encoding.UTF8.GetChars(buffer));
                        Debug.Print(request);
                        //Compose a response
                        string response = "Hello World";
                        string header = "HTTP/1.0 200 OK\r\nContent-Type: text; charset=utf-8\r\nContent-Length: " + response.Length.ToString() + "\r\nConnection: close\r\n\r\n";
                        clientSocket.Send(Encoding.UTF8.GetBytes(header), header.Length, SocketFlags.None);
                        clientSocket.Send(Encoding.UTF8.GetBytes(response), response.Length, SocketFlags.None);
                        //Blink the onboard LED
                        led.Write(true);
                        Thread.Sleep(150);
                        led.Write(false);
                    }
                }
            }
        }
        #region IDisposable Members
        ~WebServer()
        {
            Dispose();
        }
        public void Dispose()
        {
            if (socket != null)
                socket.Close();
        }
        #endregion
    }
  • Now add the following code to Program.cs.
public static void Main()
        {
            Microsoft.SPOT.Net.NetworkInformation.NetworkInterface.GetAllNetworkInterfaces()[0].EnableDhcp();
            WebServer webServer = new WebServer();
            webServer.ListenForRequest();
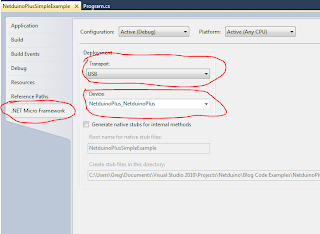
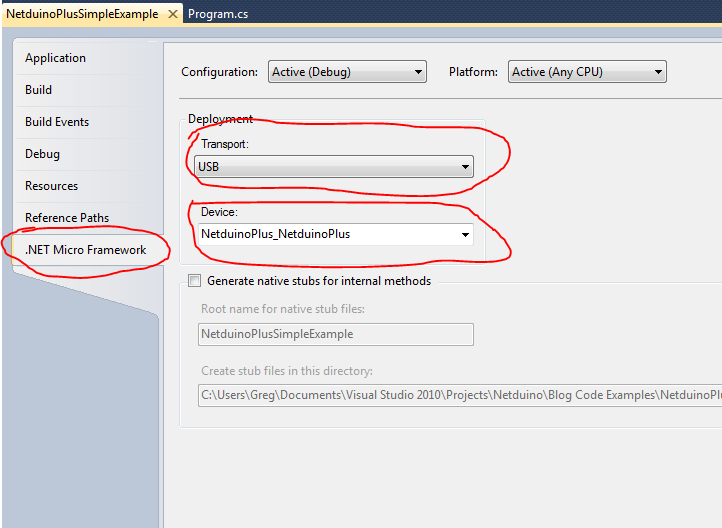
        }
  • Make your program run on the Netduino and not the emulator by right clicking on your project > "Properties"
  • Select the ".Net Micro Framework" tab and change the following settings.
    • Transport: USB
    • Device: NetduinoPlus_NetduinoPlus

    Posted Image

  • Now run the program by pressing F5 or "Debug" > "Start Debugging".
  • In the "Output" the program will write the Netduino plus IP address. If you don't have the "Output" window open, select "View" > "Output" to open it.
  • Now open a web browser and type the Netduino plus IP in the address bar.
  • You should receive back "Hello World" from the Netduino plus.
Here is a video demo of the web server running on the Netduino plus.

http://www.youtube.com/watch?v=2E7ruAYdfQU


Complete source code attached.

Attached Files


#2 ILikeInternets

ILikeInternets

    New Member

  • Members
  • Pip
  • 2 posts

Posted 08 March 2011 - 02:12 AM

Great tutorial, thanks for posting. As a C#/N+ newbie, this was very helpful. Just two comments for anyone in the same boat as me: - Visual C# Express did not have an "output" option in the view menu. I found out with a quick google search you need to enable expert settings to have that option Tools -> Setting -> Expert Settings - For some reason, the IP address that gets spit out is not the actual one my N+ grabbed. It spit out 192.168.5.100 (which I don't think is a valid address in my network), but after some ping'ing I found somebody responding at 192.168.1.5 (an address more likely on my network). Pointing my browser to that address gave me the "hello world" webpage. I'm going to play around and try to figure out why the second thing happened. I also want to modify this to give me a static IP address, and after that I hope to get it to watch only a certain port. It's probably easy, but baby steps for me :)

#3 Greg Zimmers

Greg Zimmers

    Member

  • Members
  • PipPip
  • 11 posts
  • LocationBroomfield CO

Posted 09 March 2011 - 05:54 AM

Thanks for the info about Visual C# Express as I am using Visual Studio Pro.


I also wanted to have a static IP address so I did the following.
  • Connect to your router
  • Depending on the model get to your DHCP settings
  • You should be able to add a reserved IP for a device with a specific Mac Address
  • You can obtain the Mac Address on the back on (white sticky label)
  • Enter the Mac Address and the IP you want to reserve
  • You then can run my project as is and the IP will always be the same (as I do)


#4 Lou

Lou

    New Member

  • Members
  • Pip
  • 2 posts

Posted 07 December 2011 - 04:13 AM

noob to netdunios and your program helped alot to get down to biz with networking... great work.

#5 Lou

Lou

    New Member

  • Members
  • Pip
  • 2 posts

Posted 12 December 2011 - 04:51 AM

anyone reading this post might be able to help me. I am using Greg's code and would like to modify to spit out the analog data every 50 or 100msec to ethernet. How to do that?.. Any help is greatly appreciated and thanks in advance. Lou

#6 ColinR

ColinR

    Advanced Member

  • Members
  • PipPipPip
  • 142 posts
  • LocationCape Town, South Africa

Posted 12 December 2011 - 05:30 AM

spit out the analog data every 50 or 100msec to ethernet.


Are you consuming the data from a web page? You would normally poll the data from the client side; jquery would be your best bet.

#7 Greg Zimmers

Greg Zimmers

    Member

  • Members
  • PipPip
  • 11 posts
  • LocationBroomfield CO

Posted 21 January 2012 - 02:48 AM

anyone reading this post might be able to help me. I am using Greg's code and would like to modify to spit out the analog data every 50 or 100msec to ethernet. How to do that?.. Any help is greatly appreciated and thanks in advance.
Lou


This is more challenging. HTTP is inherently stateless. So "Pushing" information down to the client is not as straightforward as you might think. Your best bet would be to ping the server back at set interval. You can use Jquery or many other technologies to make these calls without refreshing the page.


0 user(s) are reading this topic

0 members, 0 guests, 0 anonymous users

home    hardware    projects    downloads    community    where to buy    contact Copyright © 2016 Wilderness Labs Inc.  |  Legal   |   CC BY-SA
This webpage is licensed under a Creative Commons Attribution-ShareAlike License.