

 Find content
 Male
Male
Posts I've Made
In Topic: Keypad driver and scheme
09 March 2011 - 11:50 PM
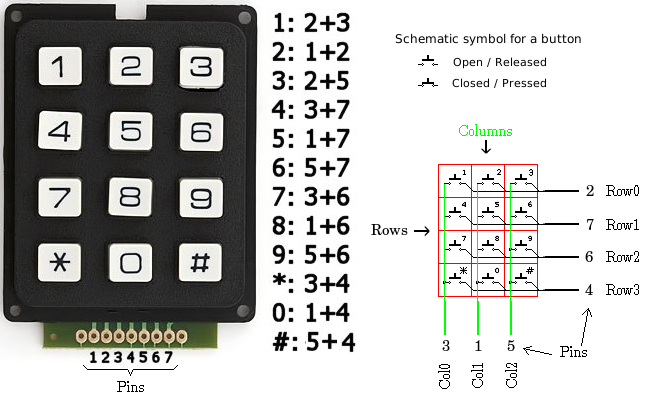
I'm using Sparkfun 12 Buttons Keypad and I had to make some changes to get it to work.
First, I reassigned the rows and cols pins to match the Sparkfun model as following:
Second, I matched the values I got from the event handler with the corresponding key:
Great work, Thanks for sharing (:
First, I reassigned the rows and cols pins to match the Sparkfun model as following:
// Row pins. The keypad exists out of 4 rows.
Cpu.Pin[] RowPins = { Pins.GPIO_PIN_D2, Pins.GPIO_PIN_D7, Pins.GPIO_PIN_D6, Pins.GPIO_PIN_D4 };
// Col pins. The keypad exists out of 3 columns.
Cpu.Pin[] ColPins = { Pins.GPIO_PIN_D3, Pins.GPIO_PIN_D1, Pins.GPIO_PIN_D5 };
Second, I matched the values I got from the event handler with the corresponding key:
        public enum Sparkfun12ButtonsKeypad : uint
        {
            One = 0x00, // Button 1 on the keypad
            Two = 0x01, // Button 2 on the keypad
            Three = 0x02, // Button 3 on the keypad
            Four = 0x03, // Button 4 on the keypad
            Five = 0x04, // Button 5 on the keypad
            Six = 0x05, // Button 6 on the keypad
            Seven = 0x06, // Button 7 on the keypad
            Eight = 0x07, // Button 8 on the keypad
            Nine = 0x08, // Button 9 on the keypad
            Star = 0x09, // Button * on the keypad
            Zero = 0x0A, // Button 0 on the keypad
            Hash = 0x0B, // Button # on the keypad
        };

        // Too bad that .NET MF don't have Enum.GetName() Method ):
        public static string GetKeyName(uint value)
        {
            Sparkfun12ButtonsKeypad pressedKey = (Sparkfun12ButtonsKeypad)value;
            switch (pressedKey)
            {
                case Sparkfun12ButtonsKeypad.One:
                    return "1";
                case Sparkfun12ButtonsKeypad.Two:
                    return "2";
                case Sparkfun12ButtonsKeypad.Three:
                    return "3";
                case Sparkfun12ButtonsKeypad.Four:
                    return "4";
                case Sparkfun12ButtonsKeypad.Five:
                    return "5";
                case Sparkfun12ButtonsKeypad.Six:
                    return "6";
                case Sparkfun12ButtonsKeypad.Seven:
                    return "7";
                case Sparkfun12ButtonsKeypad.Eight:
                    return "8";
                case Sparkfun12ButtonsKeypad.Nine:
                    return "9";
                case Sparkfun12ButtonsKeypad.Star:
                    return "*";
                case Sparkfun12ButtonsKeypad.Zero:
                    return "0";
                case Sparkfun12ButtonsKeypad.Hash:
                    return "#";
                default:
                    throw new System.ArgumentOutOfRangeException("value", "There is no such key.");
            }
        }

        static void kb_OnKeyUp(uint data1, uint data2, DateTime time)
        {
            Debug.Print("Key released: " + GetKeyName(data1));
        }

        static void kb_OnKeyDown(uint data1, uint data2, DateTime time)
        {
            Debug.Print("Key pressed: " + GetKeyName(data1));
        }
Great work, Thanks for sharing (:
In Topic: EMF Detector
14 February 2011 - 11:06 PM
Can't check the hardware and code together as I've not got access to the N+ at the moment, but looking at the code made me wonder about the following lines:
I was wondering if you could remove the need for the these two lines (and the methods) by changing the range of the A/D conversion by adding the following line to your code just after you create the analog port:
analogInput.SetRange(0, 255);Unless I've misunderstood the method, this should make sure that your average value is always in the range you wanted. It would however change the meaning of the application slightly. The code as it stands is converting 90% of the range into one value (i.e. all values between 100 and 1023 inclusive) are converted to 100 by the constrain method.
Hope this helps,
Mark
I wasn't sure of what SetRange() function do exactly that's way I didn't use it.
Hopefully, I'll get my N+ soon and have a chance to test both of them on an actual device.
Thank you very much


