

 Find content
 Male
Male

 Posted by
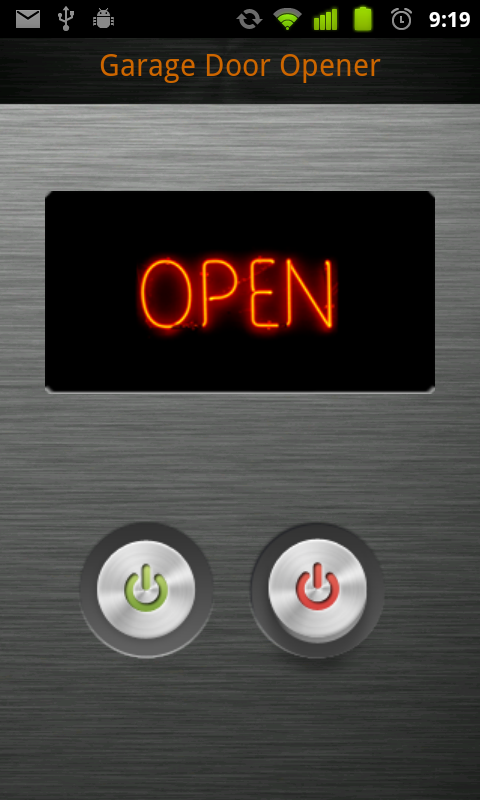
 I have created an Android garage door monitor and opener. It connects to the Netdiuno plus over HTTP. I am now in the process of documenting the whole project. I am done with the whole project and now I am going back and documenting each step of the process. Here is the first step: Building and programming the infrared sensor. I chose infrared sensor because it's cheap ($1.13!) and I don't have to make physical contact with the door.
Android App
I am not going to post the entire step by step tutorial here since it's a little off topic for these forums.
If you are interested in Android programming, I posted step by step instructions for the android app that will control your garage door, on my blog. All source code is available for download, so you can use it as is or a starting point for you own project.
Read more about here. http://androidcodemo...e-door-app.html
Garage Door Opener
1a. Supplies
There are many ways to control your garage door with your Netduino. I decided to hack a spare garage door opener (since I wasn't using it) with an Optoisolator. My total cost $1.25. If I didn't have a spare garage door opener I would have run two wires off the Optoisolator pin 3 & 4 to the control panel in the garage. To send commands to the Netduino I am going to use HTTP commands.
- Garage door opener
- Optoisolator with Darlington Driver - 1 Channel. I purchased mine from Sparkfun.
- 100 ohm resistor
- 33 ohm resistor
- Netduino plus (of course)
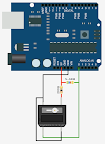
Here is the schematic for interfacing with the garage door opener. Excuse my unsophisticated schematic as I don't own any electrical CAD software.

- Connect the Optoisolator pin 1 (Anode) to the Netduino plus digital pin 13
- Connect the Optoisolator pin 2 (Cathode) to a ground pin on the Netduino plus with a 33 ohm resistor in-line.
- Connect the Optoisolator pin 3 (Emitter) to one side of the garage door opener push-button with a 100 ohm resistor in-line.
- Connect the Optoisolator pin 4 (Collector) to the other side of the garge door opener push-button.

1c. Code it
For the code, I am going to start with a stubbed out web server code from my previous blog tutorial of mine. To get more information on the basic code for a web server see my previous blog post. After you download the code, open the project. Let's modify the code so we can send an HTTP request to the Netduino to activate the garage door opener. We are going to send a command to push the button on the garage door opener. We don't know if we are opening it or closing it since we are not yet monitoring the garage door status. We will combine this project to activate the garage door with the monitor code in a later post. Then we will be able to send the specific command "Open" or "Close".
The code is pretty straightforward, but if you want a more in-depth explanation you can visit blog post.
public class WebServer : IDisposable
    {
        private Socket socket = null;
        //open connection to onbaord led so we can blink it with every request
        private OutputPort led = new OutputPort(Pins.ONBOARD_LED, false);
        private OutputPort Garage2CarOpener = new OutputPort(Pins.GPIO_PIN_D13, false);

        public WebServer()
        {
            //Initialize Socket class
            socket = new Socket(AddressFamily.InterNetwork, SocketType.Stream, ProtocolType.Tcp);
            //Request and bind to an IP from DHCP server
            socket.Bind(new IPEndPoint(IPAddress.Any, 80));
            //Debug print our IP address
            Debug.Print(Microsoft.SPOT.Net.NetworkInformation.NetworkInterface.GetAllNetworkInterfaces()[0].IPAddress);
            //Start listen for web requests
            socket.Listen(10);
            ListenForRequest();
        }

        public void ListenForRequest()
        {
            while (true)
            {
                using (Socket clientSocket = socket.Accept())
                {
                    //Get clients IP
                    IPEndPoint clientIP = clientSocket.RemoteEndPoint as IPEndPoint;
                    EndPoint clientEndPoint = clientSocket.RemoteEndPoint;
                    //int byteCount = cSocket.Available;
                    int bytesReceived = clientSocket.Available;
                    if (bytesReceived > 0)
                    {
                        //Get request
                        byte[] buffer = new byte[bytesReceived];
                        int byteCount = clientSocket.Receive(buffer, bytesReceived, SocketFlags.None);
                        string request = new string(Encoding.UTF8.GetChars(buffer));
                        string firstLine = request.Substring(0, request.IndexOf('\n')); //Example "GET /activatedoor HTTP/1.1"
                        string[] words = firstLine.Split(' ');  //Split line into words
                        string command = string.Empty;
                        if( words.Length > 2)
                        {
                            string method = words[0]; //First word should be GET
                            command = words[1].TrimStart('/'); //Second word is our command - remove the forward slash
                        }
                        switch (command.ToLower())
                        {
                            case "activatedoor":
                                ActivateGarageDoor();
                                //Compose a response
                                string response = "I just opened or closed the garage!";
                                string header = "HTTP/1.0 200 OK\r\nContent-Type: text; charset=utf-8\r\nContent-Length: "
         		+ response.Length.ToString() + "\r\nConnection: close\r\n\r\n";
                                clientSocket.Send(Encoding.UTF8.GetBytes(header), header.Length, SocketFlags.None);
                                clientSocket.Send(Encoding.UTF8.GetBytes(response), response.Length, SocketFlags.None);
                                break;
                            default:
                                //Did not recognize command
                                response = "Bad command";
                                header = "HTTP/1.0 200 OK\r\nContent-Type: text; charset=utf-8\r\nContent-Length: "
				+ response.Length.ToString() + "\r\nConnection: close\r\n\r\n";
                                clientSocket.Send(Encoding.UTF8.GetBytes(header), header.Length, SocketFlags.None);
                                clientSocket.Send(Encoding.UTF8.GetBytes(response), response.Length, SocketFlags.None);
                                break;
                        }
                    }
                }
            }
        }
        private void ActivateGarageDoor()
        {
            led.Write(true);                //Light on-board LED for visual cue
            Garage2CarOpener.Write(true);   //"Push" garage door button
            Thread.Sleep(1000); 			//For 1 second
            led.Write(false);   			//Turn off on-board LED
            Garage2CarOpener.Write(false);  //Turn off garage door button
        }
        #region IDisposable Members
        ~WebServer()
        {
            Dispose();
        }
        public void Dispose()
        {
            if (socket != null)
                socket.Close();
        }
        #endregion
    }
1.d Run it
Now run the code in debug mode (F5).
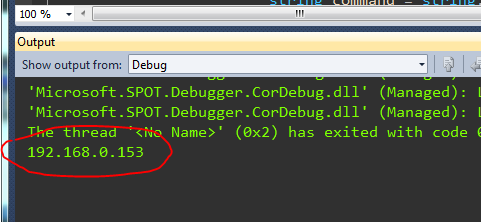
Open another a web browser and enter the IP address that the Netdiuno board displayed in the output window. For me its "http://192.168.0.153...3/activatedoor"
You should see the LED on the Netduino plus light and the door should open or close.
The complete code is attached to this post "NetduinoGarageDoorOpener.zip"
Garage Door Sensor
2a. Supplies
- Optical Detector / Phototransistor $1.13 ( bought mine from Sparkfun)
- 200 ohm resistor (under a buck from any almost anywhere)
- 5.6K ohm resistor (under a buck from any almost anywhere)
- (Optional) (2) Screw Terminals 3.5mm Pitch $1.25 ea.
- (Optional) PC Board $2.19 for two.
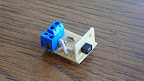
2b. Build Garage Door Sensor
Here is the schematic for building the sensor.
view larger
Here it is built
view larger
Here it is installed
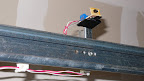
view larger
2c. Code the Garage Door Sensor
//Set the analog pin to monitor Pin 0
AnalogInput garageSensor = new AnalogInput(Pins.GPIO_PIN_A0);
//Set sensor range
garageSensor.SetRange(0, 1024);
//Program loop
while (true)
{
    Debug.Print(garageSensor.Read().ToString());
    Thread.Sleep(1000);
}
I will be adding the rest of the project to this posting as I finish documenting it. Here is what will be coming.
- [Coming soon!] Program the Netduino webserver
- [Coming soon!] Writing an android app to talk to the Netdiuno plus over HTTP
Attached Files
-
 NetduinoInfraredSensor.zip 132.65KB
99 downloads
NetduinoInfraredSensor.zip 132.65KB
99 downloads
-
NetduinoGarageDoorOpener.zip 798.43KB
140 downloads


