GeorgeA - Viewing Profile: Topics - Netduino Forums
   
Netduino home hardware projects downloads community

Jump to content


The Netduino forums have been replaced by new forums at community.wildernesslabs.co. This site has been preserved for archival purposes only and the ability to make new accounts or posts has been turned off.

GeorgeA

Member Since 07 Aug 2013
Offline Last Active Aug 27 2015 07:18 PM
-----

Topics I've Started

cncBuddy: Netduino Plus2 CNC Machine

15 August 2015 - 03:00 AM

A couple of winters ago while working on "Mowboto: Robot Lawn Mower" in my unheated outdoor workshop, I realized I needed an indoor project with some heat.  Phase 1 (Radio Controlled) was completed. Phase 2 was suppose to be a micro controller enhanced version to replace the RC communication adding GPS and sensor detection. I know..I've heard it before...A normal person would have simply bought a couple of heaters. But everybody in this forum knows all too well...

If (iOldFartEngineer * iCNerdYears <= Int64.MaxValue){

   new Thread(new ThreadStart(DIYwithNetduinoPlus2)).Start();

   }
else
   throw new NeverGetToThisPointInLife();
 

Always fascinated with CNC's, I rationalized it was the perfect Proof-In-Concept platform for designing my Phase 2 hardware and software.  Of course buying a ready made CNC kit was out of the acceptable realm of reason.


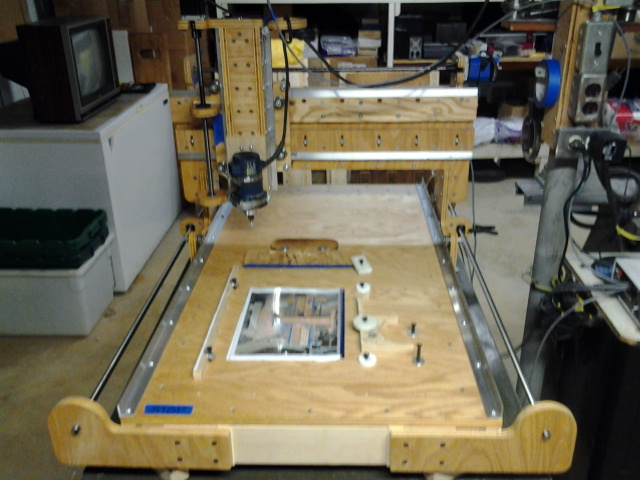
I spent a couple of weeks bouncing between Inkscape & SketchUp until I had a design which fit perfectly on top of my 3'x5' steel desk in the basement workshop. Power tools in hand, plenty of glue and plywood from Home Depot, and McMaster-Carr website, another CNC is born.


20150814_202602.jpg


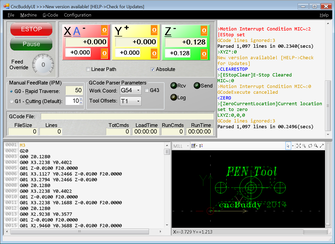
The NetduinoPlus2 running my "cncBuddyCAM" is attached to a wireless router. I make extensive use of multi-threading, binary command protocol, and SDCard as a local cache to minimize network traffic while cutting.


During cutting, continuous throttled location messages are sent back to the PC "cncBuddyUI" keeping the 3DViewer current. GCode cut jobs are stored and processed from the SDCard provided excellent caching performance. cncBuddyCAM is driving a 4 axis drive controller setup for 6400 steps/inch.  2 steppers are software slaved for XAxis, 1 for YAxis, and 1 for ZAxis. It's in 1/16” step/full step mode (microstepping), while the motors are 200 steps per rev. 3200 steps per rev. 2 turns per inch screws. NetduinoPlus2 drives this beast at 80-100ipm without breaking a sweat.


 cncbuddyui_small.png


You can download the software and give it a spin....

https://osstekz.github.io/cncBuddy/


I've even added functionality for using a Nintendo game controller for use as an analog jogging device.


Enjoy!


Controlling my CNC via parallel cable

08 March 2015 - 06:54 PM

Hello All,

I am building a Netduino+2 controller for my CNC machine.  The 4 axis CNC is currently controlled by LinuxCNC via a PC parallel cable. It has a LVC541 chip from Texas Instruments to interface to the outside signals.  This accepts standard low voltage (3.3V) signals (but up to 5V can be applied).  Only pins 2-9 and the GND pins of the parallel port (DB25 connector) are used. The signal pins are pulled up with 10K resistors to 3.3V. I created a DB25 connector cable with pins 2-9 (Data Out 0-7) attached to Netduino D0-D7. My code uses OutputPort to signal ON/OFF on each pin. Now to my question:


Above Netduino+2's D13 pin is the GND pin. Do I have to connect GND to each of my parallel port pins 18-25?


200px-25_Pin_D-sub_pinout.svg.png


The code snippet in main() to instantiate the OutputPorts....

//REFER:http://forums.netduino.com/index.php?/topic/5755-netduino-pins-aways-in-high-voltage///Warning: When Netduino first boots, all of its pins are in "input, pullup" state. This will provide a weak current (at 3.3V)
axisX = new Axis(cncBuddyShared.sAXISNAME_X, Pins.GPIO_PIN_D0, Pins.GPIO_PIN_D1, Cpu.Pin.GPIO_NONE);
axisX.OnAxisLimitReached += OnAxisLimitReached;

axisY = new Axis(cncBuddyShared.sAXISNAME_Y, Pins.GPIO_PIN_D2, Pins.GPIO_PIN_D3, Cpu.Pin.GPIO_NONE);
axisY.OnAxisLimitReached += OnAxisLimitReached;

axisZ = new Axis(cncBuddyShared.sAXISNAME_Z, Pins.GPIO_PIN_D4, Pins.GPIO_PIN_D5, Cpu.Pin.GPIO_NONE);
axisZ.OnAxisLimitReached += OnAxisLimitReached;

The code snippet in Axis class constructor....

public Axis(string axisID,  Cpu.Pin cpupinStep, Cpu.Pin cpupinDirection, Cpu.Pin cpupinLimitSwitch) {this.sAxisID = axisID;
outpStep = new OutputPort(cpupinStep, false);
outpDirection = new OutputPort(cpupinDirection, false);
limitswLimitReached = eLimitSwitch.None;
.....
}

home    hardware    projects    downloads    community    where to buy    contact Copyright © 2016 Wilderness Labs Inc.  |  Legal   |   CC BY-SA
This webpage is licensed under a Creative Commons Attribution-ShareAlike License.