

 of controlling a motor with the Netduino(Project 1). The motor and on board LED turn on when the on board button is pressed.
Here is a video of it, and the code which follows.
http://youtu.be/wneXYjR5GEY?hd=1
using System;
using System.Threading;
using Microsoft.SPOT;
using Microsoft.SPOT.Hardware;
using SecretLabs.NETMF.Hardware;
using SecretLabs.NETMF.Hardware.Netduino;

namespace NetduinoApplication1
{
    public class Program
    {
        static InterruptPort button;
        static PWM motor = new PWM(Pins.GPIO_PIN_D6);
        static OutputPort led = new OutputPort(Pins.ONBOARD_LED, false);

        public static void Main()
        {
            // write your code here
            button = new InterruptPort(Pins.ONBOARD_SW1, true, Port.ResistorMode.Disabled, Port.InterruptMode.InterruptEdgeBoth);

            button.OnInterrupt += new NativeEventHandler(button_OnInterrupt);

            Thread.Sleep(Timeout.Infinite);

        }

        static void button_OnInterrupt(uint data1, uint data2, DateTime time)
        {
            led.Write(data2 == 0);
            if (data2 == 0)
            {
                motor.SetDutyCycle(100);
            }
            else
            {
                motor.SetDutyCycle(0);
            }

        }

    }
}
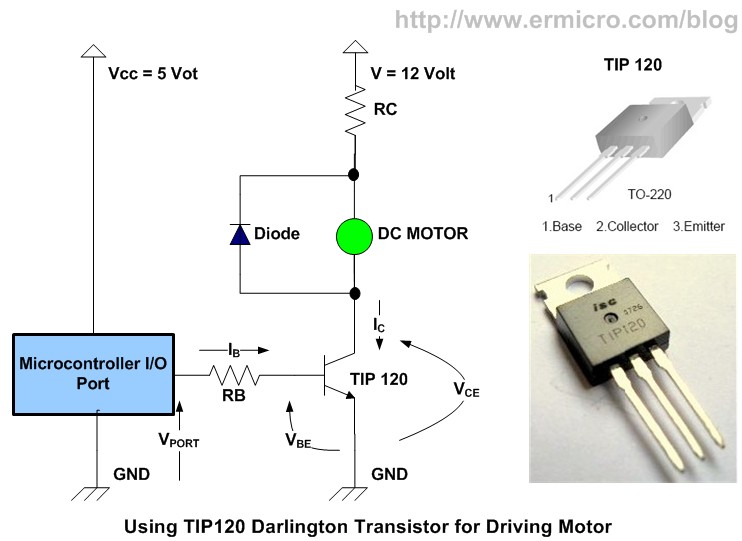
Here is the diagram
I would also like to thanks Chris, Oz, CW2, Denver(Not a member), and Bill.French.
Sincerely,
Cwbh
EDIT: Schematic (Sorry, my first time?):


 Have a good night
-Cwbh
Have a good night
-Cwbh


