Netduino home hardware projects downloads community

Jump to content


The Netduino forums have been replaced by new forums at community.wildernesslabs.co. This site has been preserved for archival purposes only and the ability to make new accounts or posts has been turned off.
Photo

EMF Detector


  • Please log in to reply
2 replies to this topic

#1 Black Rose

Black Rose

    New Member

  • Members
  • Pip
  • 6 posts

Posted 14 February 2011 - 12:28 AM

Hi Everyone,

This is my first topic and project for Netduino platform. I still don't have mine yet, UPS bastards missed-up the shipment ):

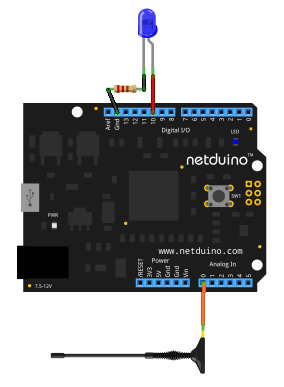
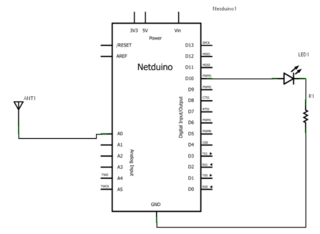
I thought I could start programming and I tried to make EMF Detector similar to the one for Arduino by: Aaron ALAI’s EMF detector project.

I'm not sure if it's working correctly and I hope if anyone kindly could check it.

Posted Image

Posted Image

using System;
using System.Threading;
using Microsoft.SPOT;
using Microsoft.SPOT.Hardware;
using SecretLabs.NETMF.Hardware;
using SecretLabs.NETMF.Hardware.NetduinoPlus;

namespace NetduinoPlus_EMF_Detector
{
    /// <summary>Original Project: Aaron ALAI’s EMF detector project for the Arduino.</summary>
    /// <remarks> http://www.aaronalai.com/emf-detector </remarks>
    public class Program
    {
        public static void Main()
        {
            const uint SAMPLES = 300; // No. of samples the device takes per reading.
            
            AnalogInput analogInput = new AnalogInput(Pins.GPIO_PIN_A0); // Assign analog PIN A0 as input port.
            PWM led = new PWM(Pins.GPIO_PIN_D10); // Assign GPIO PIN D10 as LED output port.

            uint dutyCycle = 0; // LED 8-bits output value: 0-255 (always off)-(always on). Default OFF.
            float avarage = 0.00f; // var holding the avarage of all samples.
            ulong sum = 0L; // var holding the sum of all samples.
            int[] readings = new int[SAMPLES]; // array holding actual samples.

            while (true) // loop infinitely
            {
                for (uint i = 0; i < SAMPLES; i++)
                {
                    readings[i] = analogInput.Read(); // read data from the antenna wire.
                    Thread.Sleep(10); // allow system to complete proccessing.
                    sum += (ulong)readings[i]; // calculate sum.
                }

                avarage = sum / SAMPLES; // calculate the avarage of all samples.

                dutyCycle = (uint)constrain((long)avarage, 0, 100); // constrains the avarage value to between two numbers 0 and 100
                dutyCycle = (uint)map((long)avarage, 0, 100, 0, 255); // maps out 0-100 to 0-255, 255 is the threshold of analog to digital conversion.
                
                led.SetDutyCycle(dutyCycle); // set the duty cycle value of LED.
                Thread.Sleep(10); // allow system to complete proccessing.

                // clean-up
                dutyCycle = 0;
                avarage = 0.00f;
                sum = 0L;
            }
        }

        /// <summary>
        /// Constrains a number to be within a range.
        /// </summary>
        /// <param name="value">the number to constrain, long data types.</param>
        /// <param name="low">the lower end of the range, long data types.</param>
        /// <param name="high">the upper end of the range, long data types.</param>
        /// <returns>
        /// <para>value: if value is between low and high.</para>
        /// <para>low:   if value is less than low.</para>
        /// <para>high:  if value is greater than high.</para>
        /// </returns>
        /// <example>
        /// <para>val = constrain(val, 0, 100);</para>
        /// <para>// limits range of val to between 0 and 100.</para>
        /// </example>
        /// <remarks>
        /// See: http://arduino.cc/en/Reference/Constrain
        /// </remarks>
        public static long constrain(long value, long low, long high)
        {
            return value >= high ? high : value <= low ? low : value;
        }

        /// <summary>
        /// Re-maps a number from one range to another.
        /// </summary>
        /// <param name="value">x: the number to map, long data types.</param>
        /// <param name="fromLow">the lower bound of the value's current range, long data types.</param>
        /// <param name="fromHigh">the upper bound of the value's current range, long data types.</param>
        /// <param name="toLow">the lower bound of the value's target range, long data types.</param>
        /// <param name="toHigh">the upper bound of the value's target range, long data types.</param>
        /// <returns>
        /// The mapped value.
        /// </returns>
        /// <remarks>
        /// See: http://arduino.cc/en/Reference/map
        /// </remarks>
        public static long map(long value, long fromLow, long fromHigh, long toLow, long toHigh)
        {
            try
            {
                return (value - fromLow) * (toHigh - toLow) / (fromHigh - fromLow) + toLow;
            }
            catch (Exception ex)
            {
                throw ex;
            }
        }
    }
}

Attached Files


#2 Nevyn

Nevyn

    Advanced Member

  • Members
  • PipPipPip
  • 1072 posts
  • LocationNorth Yorkshire, UK

Posted 14 February 2011 - 08:15 AM

Can't check the hardware and code together as I've not got access to the N+ at the moment, but looking at the code made me wonder about the following lines:

dutyCycle = (uint)constrain((long)avarage, 0, 100); // constrains the avarage value to between two numbers 0 and 100
dutyCycle = (uint)map((long)avarage, 0, 100, 0, 255); // maps out 0-100 to 0-255, 255 is the threshold of analog to digital conversion.

I was wondering if you could remove the need for the these two lines (and the methods) by changing the range of the A/D conversion by adding the following line to your code just after you create the analog port:

analogInput.SetRange(0, 255);
Unless I've misunderstood the method, this should make sure that your average value is always in the range you wanted. It would however change the meaning of the application slightly. The code as it stands is converting 90% of the range into one value (i.e. all values between 100 and 1023 inclusive) are converted to 100 by the constrain method.

Hope this helps,
Mark

To be or not to be = 0xFF


Blogging about Netduino, .NET, STM8S and STM32 and generally waffling on about life

Follow @nevynuk on Twitter


#3 Black Rose

Black Rose

    New Member

  • Members
  • Pip
  • 6 posts

Posted 14 February 2011 - 11:06 PM

Can't check the hardware and code together as I've not got access to the N+ at the moment, but looking at the code made me wonder about the following lines:


I was wondering if you could remove the need for the these two lines (and the methods) by changing the range of the A/D conversion by adding the following line to your code just after you create the analog port:

analogInput.SetRange(0, 255);
Unless I've misunderstood the method, this should make sure that your average value is always in the range you wanted. It would however change the meaning of the application slightly. The code as it stands is converting 90% of the range into one value (i.e. all values between 100 and 1023 inclusive) are converted to 100 by the constrain method.

Hope this helps,
Mark


I wasn't sure of what SetRange() function do exactly that's way I didn't use it.

Hopefully, I'll get my N+ soon and have a chance to test both of them on an actual device.

Thank you very much ^_^


0 user(s) are reading this topic

0 members, 0 guests, 0 anonymous users

home    hardware    projects    downloads    community    where to buy    contact Copyright © 2016 Wilderness Labs Inc.  |  Legal   |   CC BY-SA
This webpage is licensed under a Creative Commons Attribution-ShareAlike License.