waxie's Content
There have been 13 items by waxie (Search limited from 25-April 23)
#17181 Beginner needs Help with Netduino & PIR Motion Detection!
 Posted by
on 28 August 2011 - 08:36 AM
in
General Discussion
Posted by
on 28 August 2011 - 08:36 AM
in
General Discussion
Hello All,
I am hoping someone will be able to help me with my problem here. I am a beginner and am trying to wire up a PIR Motion sensor but am not having any luck at all..
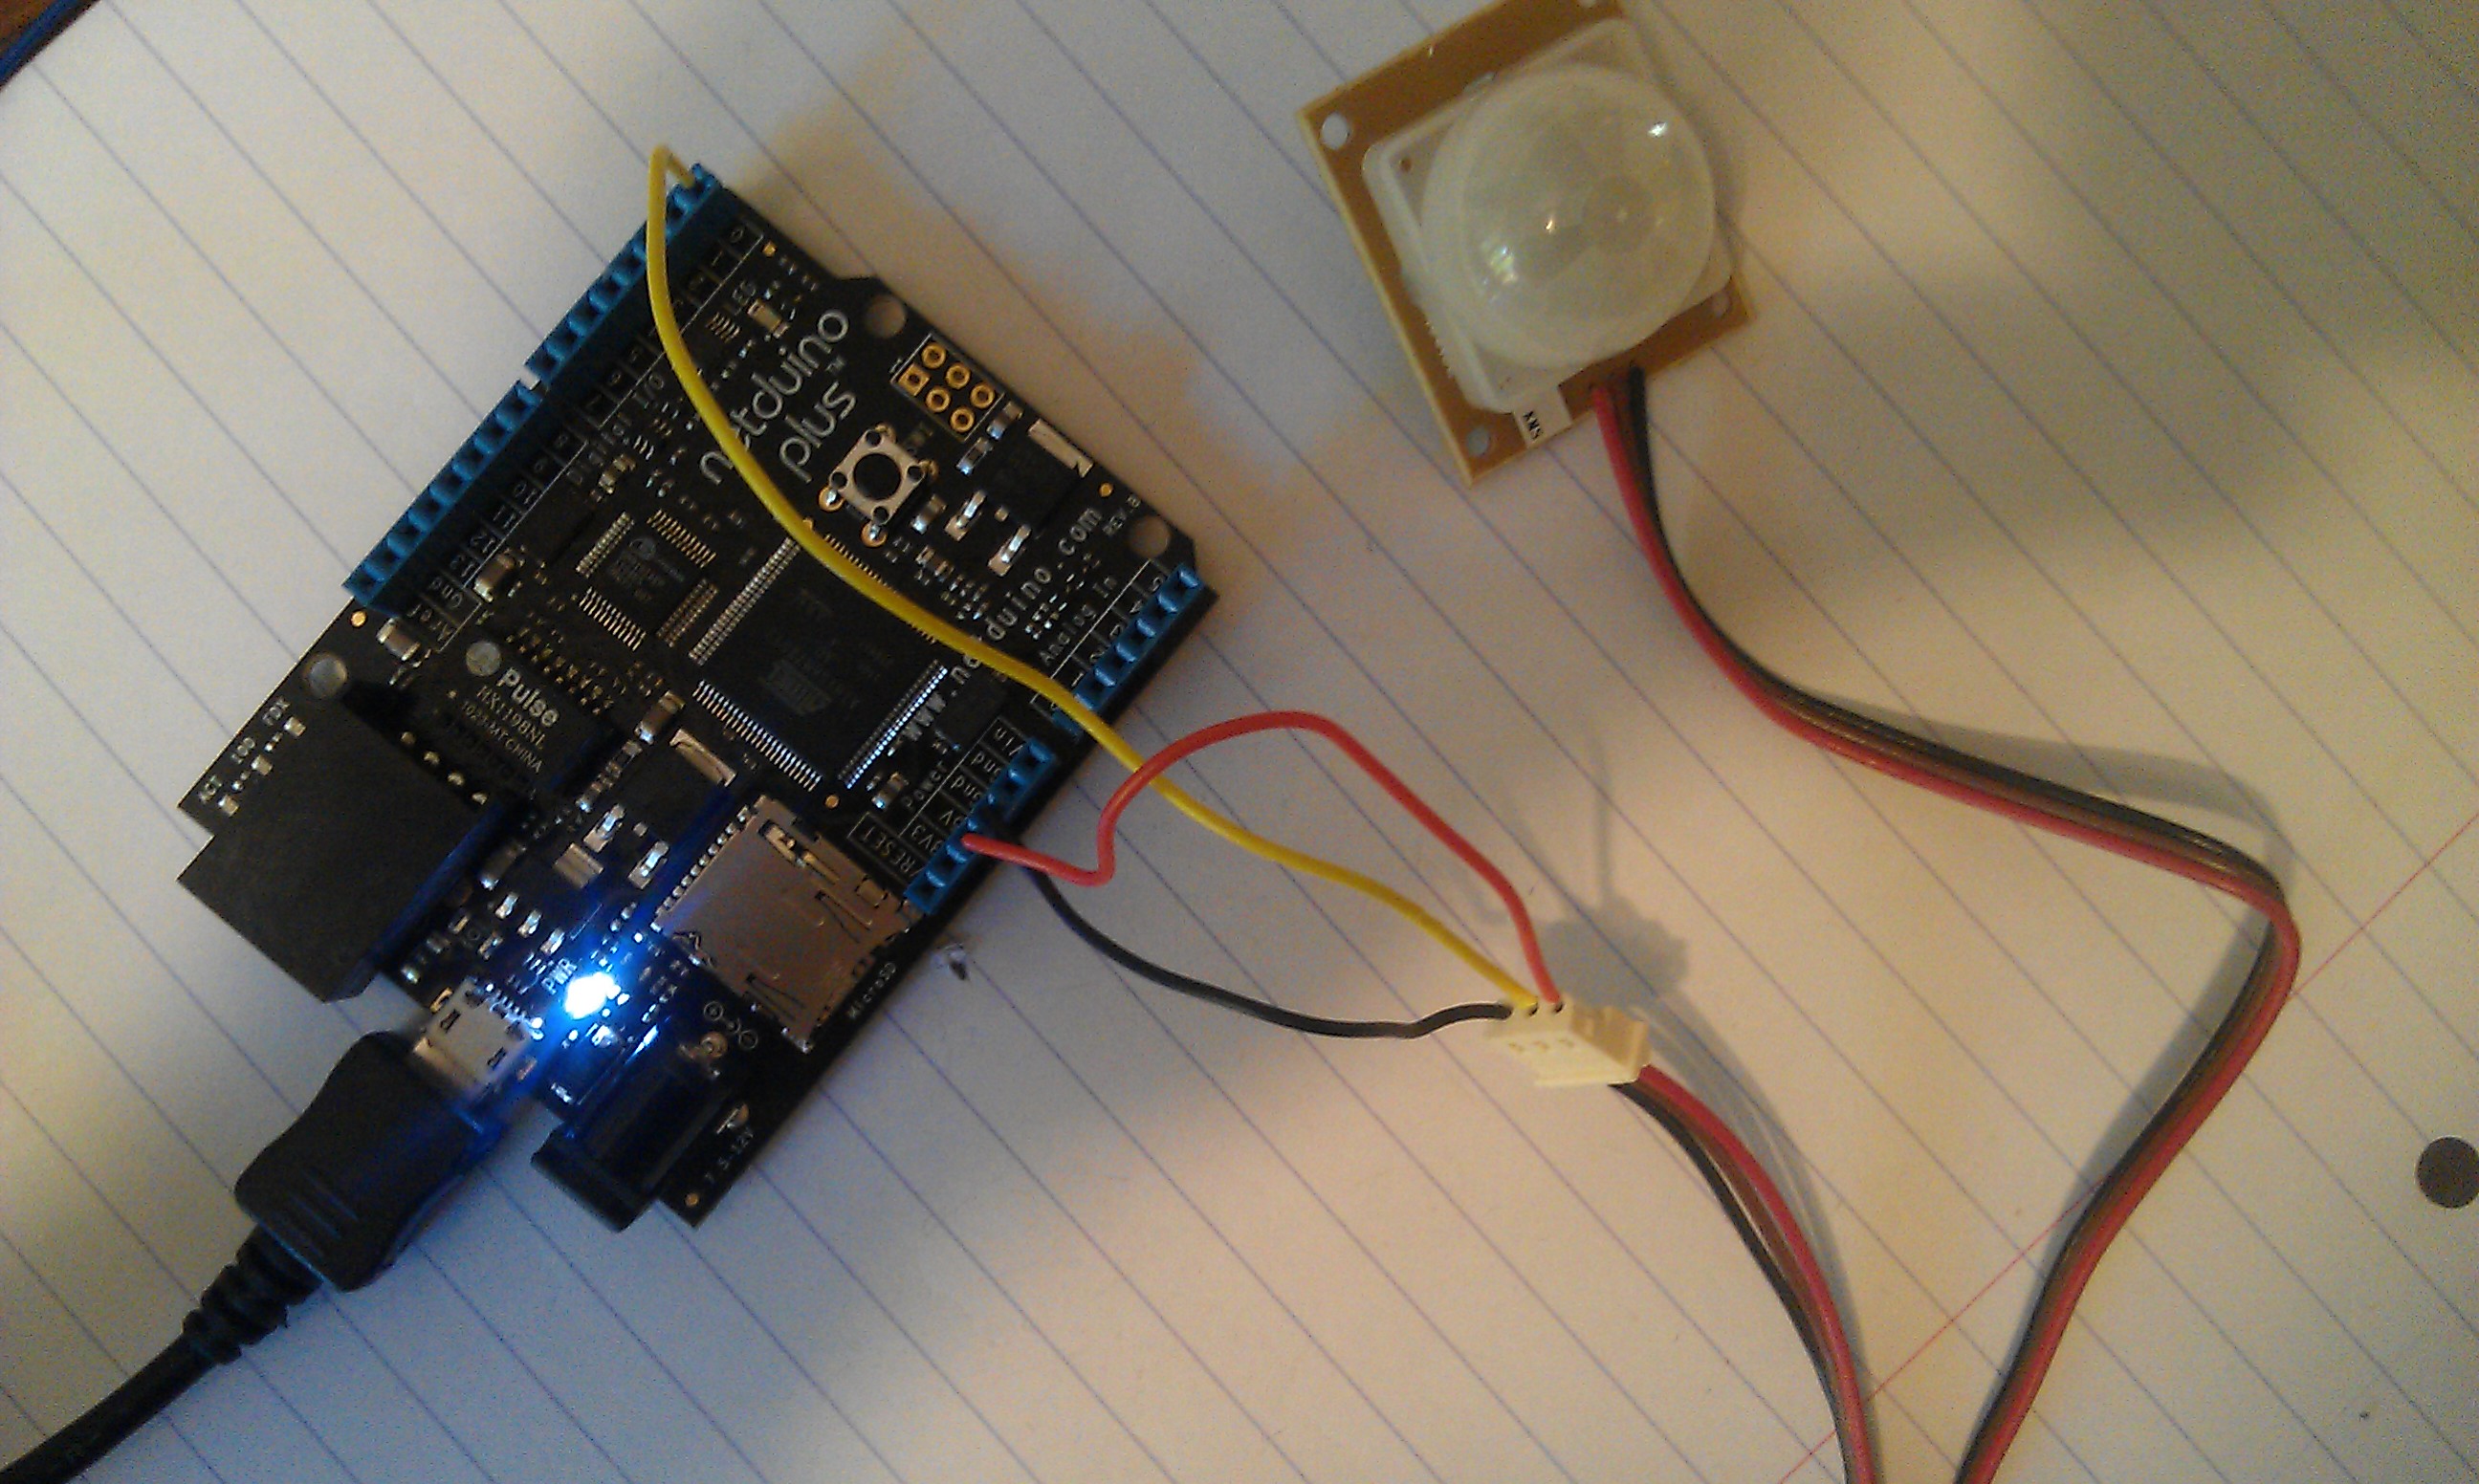
I have attached pictures of my code and my wiring setup of the Netduino and PIR sensor for info.
Here is my problem:
In my code I have set up an interupt port so that it tells me when the voltage changes and I have set it up to digital input port 0.
When it detects movement I was expecting the "port_OnInterrupt" function to be called but I am getting nothing!!!! I have even tried putting a breakpoint in there but am getting nothing!
I have absolutly no experience with electrics so I am wondering if I have wired the sensor up wrong in some way.
I have wired the red wire of the PIR to the 5V pin on the netduino.
I have wired the black wire of the PIR to the Gnd pin on the netduino
I have wired the brown wire of the PIR to the Digital Input port 0 pin on the netduino.
As I understand it when it detects movement it sends a signal down the brown wire which is why I was expecting a change of signal in my code on the Digital Input port 0.
Any help with this would be greatly appreciated.
Thanks
#17183 Beginner needs Help with Netduino & PIR Motion Detection!
Posted by
on 28 August 2011 - 10:41 AM
in
General Discussion
Hi waxie,
Could you please post your code?
What seting are you using when you set up your interrupt -- high edge, low edge, or both? Also, have you enabled the interrupt (using port.EnableInterrupt)?
Welcome to the Netduino community,
Chris
Thank you Chris. Its nice to be here.
For the interrupt I didnt know which setting to use so I have used both (InterruptMode.InterruptEdgeBoth). You mentioned enabling the interrupt. I didnt know you needed to do that. Perhaps that is where I am going wrong because I dont think I have done that.
Here is my full code:
using System;
using System.Net;
using System.Net.Sockets;
using System.Threading;
using Microsoft.SPOT;
using Microsoft.SPOT.Hardware;
using SecretLabs.NETMF.Hardware;
using SecretLabs.NETMF.Hardware.NetduinoPlus;

namespace NetduinoPlusApplication_MotionDetection
{
    public class Program
    {
        static OutputPort led = new OutputPort(Pins.ONBOARD_LED, false);

        static InterruptPort port = new InterruptPort(Pins.GPIO_PIN_D0, false, Port.ResistorMode.Disabled, Port.InterruptMode.InterruptEdgeBoth);

        public static void Main()
        {
            // write your code here

            port.OnInterrupt += new NativeEventHandler(port_OnInterrupt);

            Thread.Sleep(Timeout.Infinite);
        }

        static void port_OnInterrupt(uint data1, uint data2, DateTime time)
        {
            bool val = port.Read();

            if (val == true)
            {
                led.Write(true);
            }
            else
            {
                led.Write(false);
            }

            Thread.Sleep(1000);
        }

    }
}
Thanks in advance.
Adrian.
#17184 Beginner needs Help with Netduino & PIR Motion Detection!
Posted by
on 28 August 2011 - 10:54 AM
in
General Discussion
Hi there,
I have just added the code:
after I setup the Interupt event handler but it still doesnt seem to be working!
I have just added the code:
port.EnableInterrupt();
after I setup the Interupt event handler but it still doesnt seem to be working!
#17188 Beginner needs Help with Netduino & PIR Motion Detection!
Posted by
on 28 August 2011 - 11:59 AM
in
General Discussion
Is the sensor same as the one sold by Sparkfun? If yes, it requires a pull-up resistor on its alarm pin - so you can either try enabling the internal pull-up resistor by passing Port.ResistorMode.PullUp to the interrupt port constructor, or use an external one (connect 4k7 ~ 10kΩ resistor between the alarm pin and power supply). Alarm is active low, so InterruptMode.InterruptEdgeLow should work fine.
Technical note: EnableInterrupt() is called automatically when a handler is being added to OnInterrupt event, in your case it really does nothing. You'd need to call DisableInterrupt() method first for it to take effect.
Hi there.. I have just looked at the sparkfun one and yes I believe it is. Im in the UK and brought mine from www.coolcomponents.co.uk. This is the one I brought: this one
Wow, I have learnt so much from this post. I didnt know about the pull up resistor on the Netduino. Also I will try to change my interrupt mode to InterruptEdgeLow. Also thanks about for explaining about the EnableInterrupt call too.
I'll make these changes and let you know how I get on.
#17189 Beginner needs Help with Netduino & PIR Motion Detection!
Posted by
on 28 August 2011 - 12:02 PM
in
General Discussion
The above code has a small issue - if you are interested in the port state at the time the interrupt happened, use the value of data2 parameter (the handler prototype is in fact ...(uint portId, unit state, DateTime time)). I am not familiar with the sensor, so I don't know the duration of the alarm pulse, but if it is only several microseconds long, the Read() method call may miss it and return incorrect value, because in .NET Micro framework the interrupts are queued and it may take a while (tens of microseconds) before handlers are executed.
Again thank you for this valuable information. Im a complete newbie here and I only got the Netduino board yesterday in the post and this is my first project!
Im loving it though!
Thanks again.
#17201 Beginner needs Help with Netduino & PIR Motion Detection!
Posted by
on 28 August 2011 - 04:47 PM
in
General Discussion
Hi there guys. Hmmm, Im still not getting what I would expect from my mini project here. I have made the changes to my code suggested by CW2 but im still scracthing my head over this simple app! - My problem is that when I deploy my code the interrupt never fires. If I wiggle and take out the middle brown wire to the PIR then the interrupt fires lots of times but not when I wave my hand across the sensor! I am thinking I must be doing something stupid with regards to the wiring setup of the PIR sensor but I have not got a clue what I am doing wrong. Here is my current code I am using:
Can anyone offer any suggestions for me as im stuck with this one?
Thanks in advance.
using System;
using System.Net;
using System.Net.Sockets;
using System.Threading;
using Microsoft.SPOT;
using Microsoft.SPOT.Hardware;
using SecretLabs.NETMF.Hardware;
using SecretLabs.NETMF.Hardware.NetduinoPlus;

namespace NetduinoPlusApplication_MotionDetection
{
    public class Program
    {
        static OutputPort led = new OutputPort(Pins.ONBOARD_LED, false);

        static InterruptPort port = new InterruptPort(Pins.GPIO_PIN_D0, false, Port.ResistorMode.PullUp, Port.InterruptMode.InterruptEdgeLow);

        public static void Main()
        {
            // write your code here
            Debug.Print("Application Start!");

            port.OnInterrupt += new NativeEventHandler(port_OnInterrupt);

            port.EnableInterrupt();

            Thread.Sleep(Timeout.Infinite);
        }

        static void port_OnInterrupt(uint portId, uint state, DateTime time)
        {
            Debug.Print("Interrupt fired");

            led.Write(true);

            Thread.Sleep(1000);

            led.Write(false);

            Thread.Sleep(1000);

            port.ClearInterrupt();
        }

    }
}
Can anyone offer any suggestions for me as im stuck with this one?
Thanks in advance.
#17208 Beginner needs Help with Netduino & PIR Motion Detection!
Posted by
on 28 August 2011 - 07:00 PM
in
General Discussion
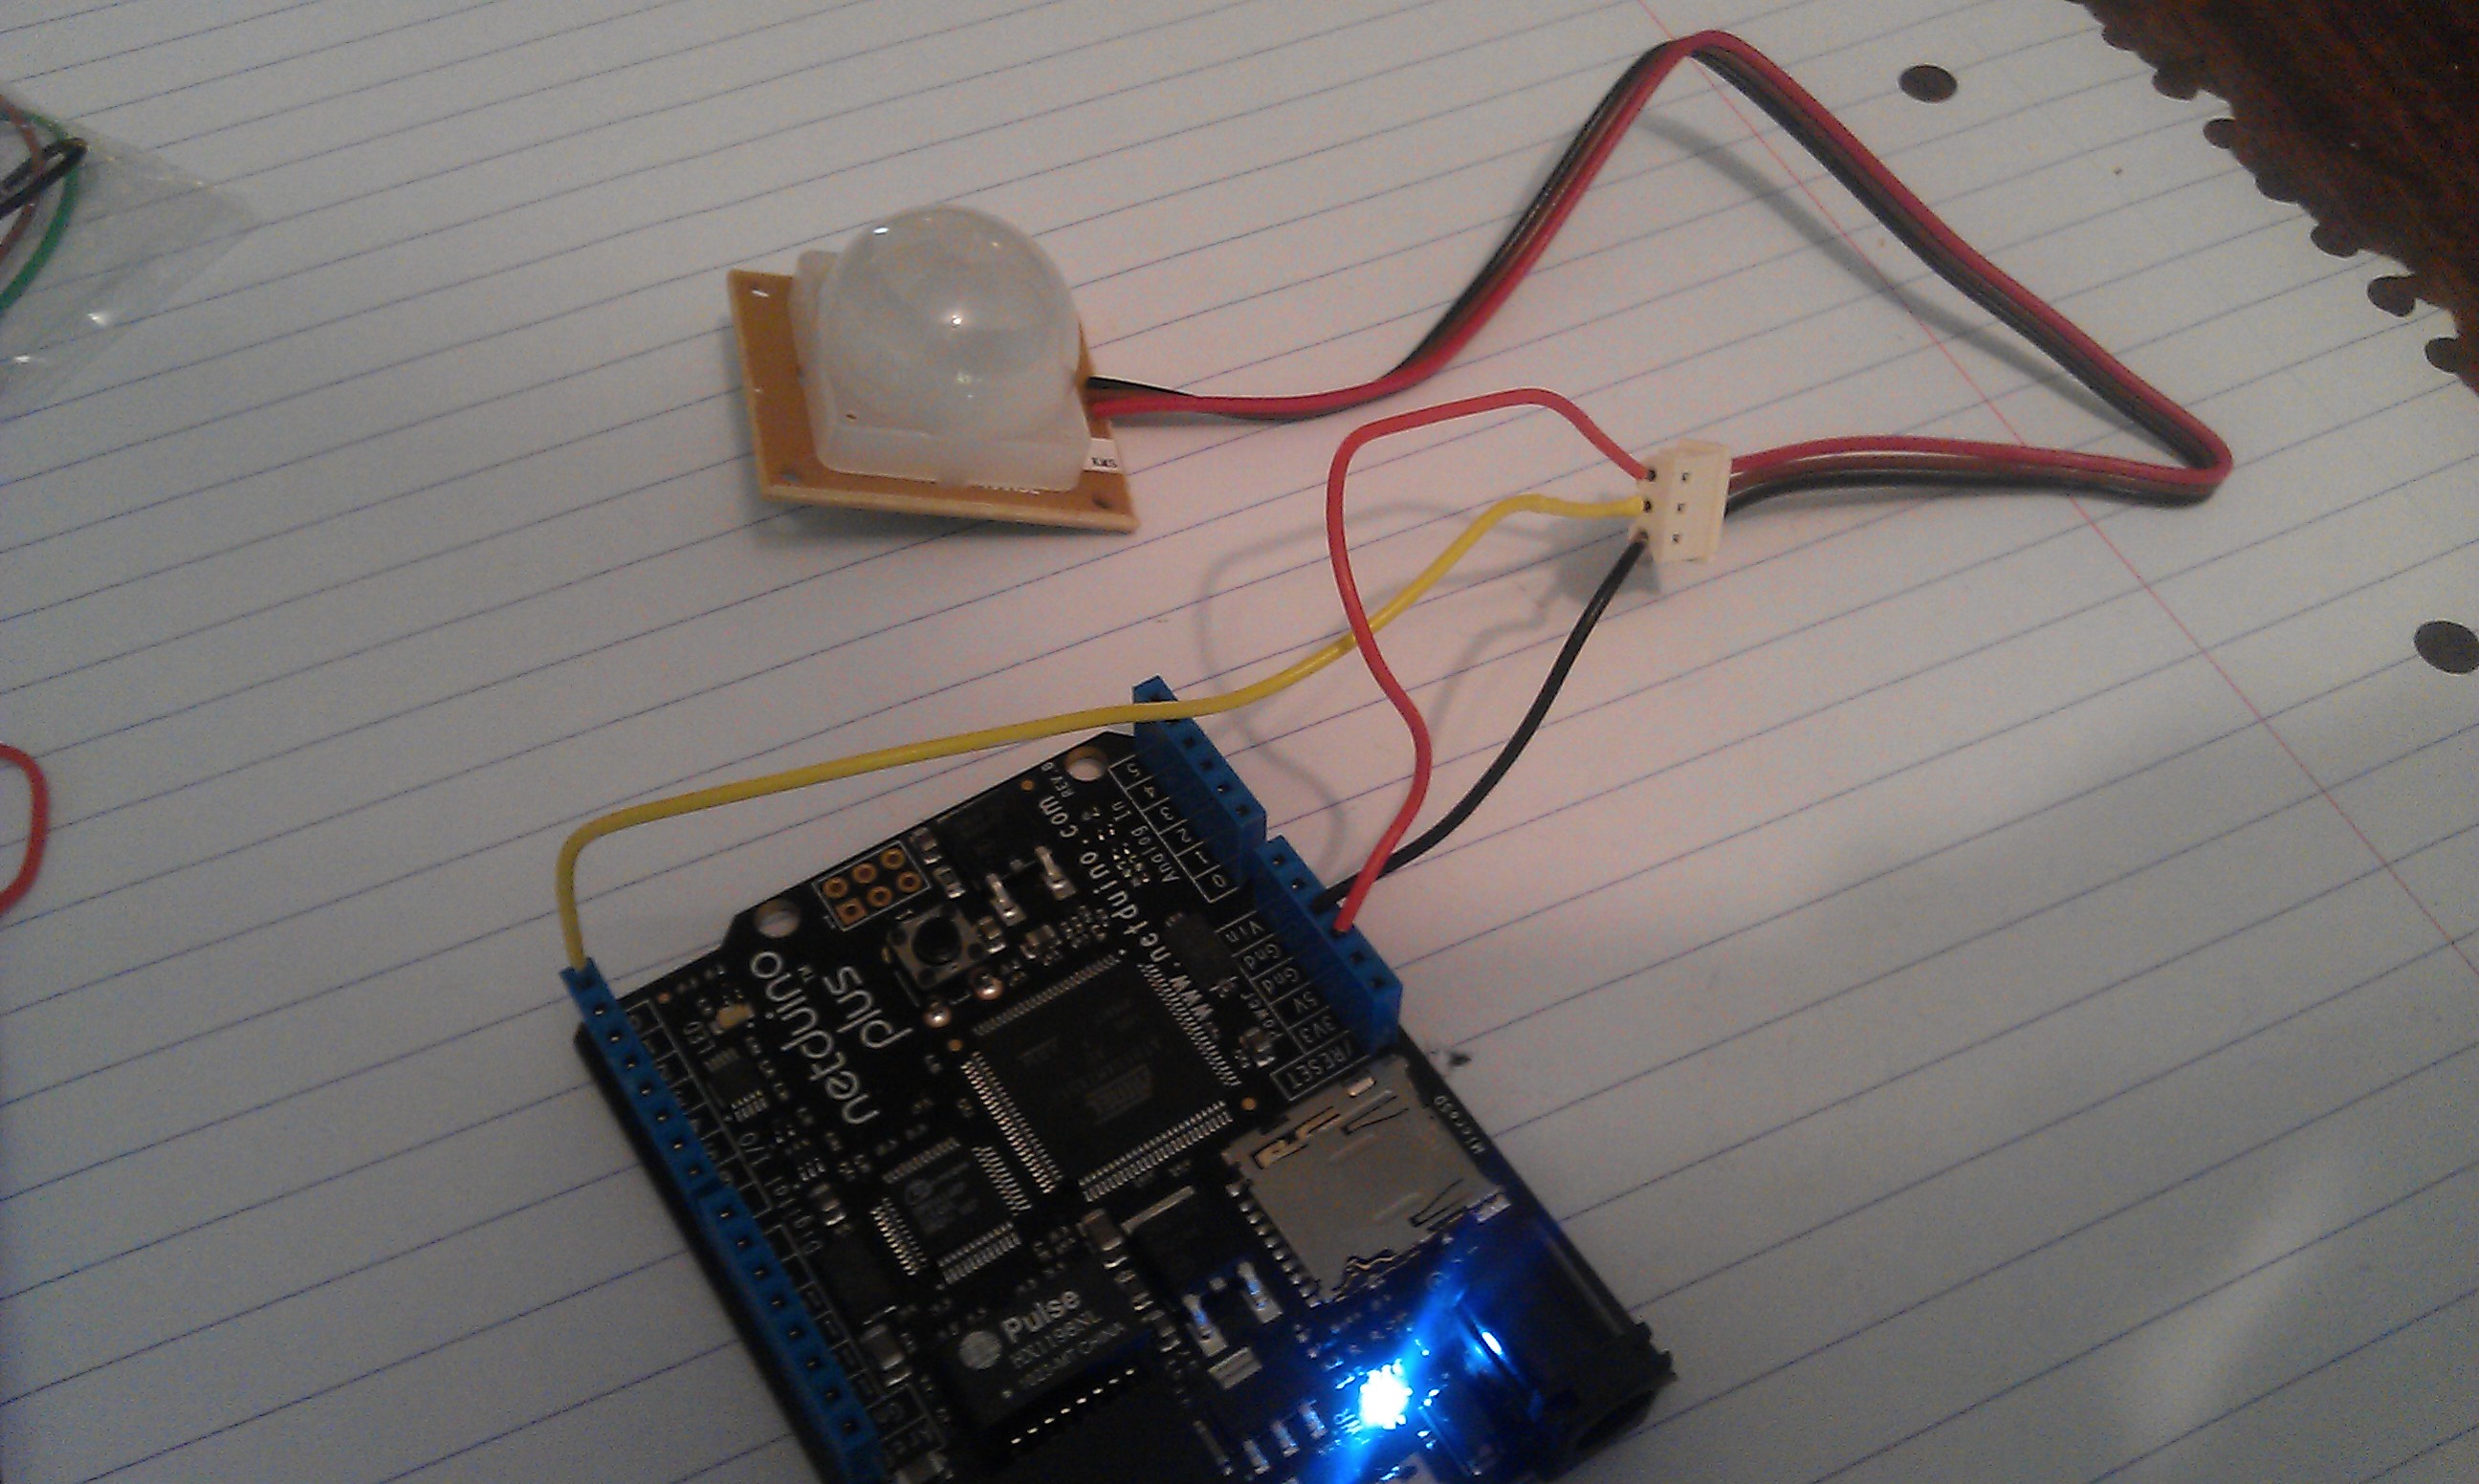
I missed it in the first post, but IMHO your wiring is not correct: brown is GND and black is Alarm.
Note: You don't need neither EnableInterrupt() (as per my previous post), nor ClearInterrupt() calls (it has effect only for level interrupts, not edge).
Doh!!! - I assumed the black was the ground wire but you are right! It now works.. Thanks alot for your info. Excellent stuff.
I have also cleaned up the code and removed references to EnableInterrupt() and ClearInterrupt()
#17374 Help with Serial LCD displaying gobbly-de-gop!
Posted by
on 01 September 2011 - 06:08 AM
in
General Discussion
Hi there,
I was wondering if someone could help me with my Serial LCD display. I am a newbie using the Netduino and I have brought this Serial LCD display and have followed the instructions here but for some reason when I run my sample application i just get rubbish sent to the display.
I have wired the display into the 5V and ground pins and for the data port I have wired it to digital Input 0.
I have not touched the sample code provided but here it is for full clarity.
using System;
using System.Net;
using System.Net.Sockets;
using System.Threading;
using Microsoft.SPOT;
using Microsoft.SPOT.Hardware;
using SecretLabs.NETMF.Hardware;
using SecretLabs.NETMF.Hardware.NetduinoPlus;
using Bansky.SPOT.LCD;

namespace NetduinoPlusApplicationLCDDisplay
{
    public class Program
    {
        public static void Main()
        {
            // Create instance of shift register
            HC4094 shifter = new HC4094(Pins.GPIO_PIN_D0, 	// Data pin
                                          Pins.GPIO_PIN_A5, 	// Clock pin
                                          Pins.GPIO_PIN_A4,	// Strobe pin
                                          true);               // Little Endian

            // Create new LCD instance and use shift register as a transport layer
            LCD4Bit lcd = new LCD4Bit(shifter);

            // Creating custom characters (Smiley face and gimp)
            byte[] buffer = new byte[] {    0x07, 0x08, 0x10, 0x10, 0x13, 0x13, 0x10, 0x10,
                                            0x1F, 0x00, 0x00, 0x00, 0x00, 0x00, 0x04, 0x04,
                                            0x1C, 0x02, 0x01, 0x01, 0x19, 0x19, 0x01, 0x01,
                                            0x10, 0x10, 0x12, 0x11, 0x10, 0x10, 0x08, 0x07,
                                            0x00, 0x00, 0x00, 0x1F, 0x00, 0x00, 0x00, 0x1F,
                                            0x01, 0x01, 0x09, 0x11, 0x01, 0x01, 0x02, 0x1C,

                                            0x15, 0x15, 0x0E, 0x04, 0x04, 0x0A, 0x11, 0x11,
                                            0x04, 0x04, 0x0E, 0x15, 0x04, 0x0A, 0x11, 0x11
                                       };

            // Load custom characters to display CGRAM
            lcd.WriteToCGRAM(0x00, buffer);

            // Turn displat on, turn back light on, hide small cursor, show big blinking cursor
            lcd.Display(true, true, false, true);

            lcd.Clear();
            lcd.Write("Start me up!");
            Thread.Sleep(3000);

            lcd.Clear();
            lcd.Display(true, true, false, false);

            // Print the special characters with the face
            lcd.Write(new byte[] { 0x00, 0x01, 0x02 }, 0, 3);
            lcd.Write(" .NET Micro");

            // Move to second line
            lcd.SetPosition(40);

            // Print the special characters with the face
            lcd.Write(new byte[] { 0x03, 0x04, 0x05 }, 0, 3);
            lcd.Write("  Framework");
            Thread.Sleep(2000);

            // Blink with back light
            for (int i = 0; i < 4; i++)
            {
                lcd.Display(true, ((i % 2) != 0), false, false);
                Thread.Sleep(400);
            }

            lcd.Clear();
            string message = "* Hello World! *";
            // Let gimp write the message
            for (int i = 0; i < message.Length; i++)
            {
                lcd.SetPosition(i + 40);
                lcd.WriteByte((byte)(((i % 2) == 0) ? 0x06 : 0x07));

                lcd.SetPosition(i);
                lcd.Write(message[i].ToString());

                Thread.Sleep(200);

                lcd.SetPosition(i + 40);
                lcd.Write(" ");
            }
            Thread.Sleep(1500);

            lcd.Clear();
            lcd.SetPosition(16);

            lcd.Write("http://bansky.net/blog");
            // Scroll the page url
            while (true)
            {
                lcd.ShiftDisplay(false);
                Thread.Sleep(400);
            }


        }

    }
}
#17382 Help with Serial LCD displaying gobbly-de-gop!
Posted by
on 01 September 2011 - 09:17 AM
in
General Discussion
You totally messed up the hardware, the tutorial and the software. Sorry, waxie!
Your module is "smarter" than the depicted one in the tutorial. It embeds a tiny microcontroller acting as interface serial UART --> parallel LCD.
The tutorial assumes you're having a normal parallel LCD, and instructs how to interface it directly to the Nteduino using a shift-register and the SPI.
Your case is dramatically simpler.
According with the module specs, you should connect only three wires: ground, +5V and "signal". This "signal" can be connected to the Netduino's I/O #3, which is the UART transmit line (TXD).
That's all about the hardware.
For the software side, you should only configure the serial UART as the specs say: 9600,N,8,1 as default.
Try this:
public static void Main()
{
       SerialPort sPort = new SerialPort(SerialPorts.COM1, 9600, Parity.None, 8, StopBits.One);
       sPort.Open();

       byte[] buffer = //set-up the byte stream to be sent (see module specs)
       sPort.Write(buffer, 0, buffer.Length);
       Thread.Sleep(Timeout.Infinite);
}
Cheers.
Oh fiddlesticks!! Ive spent ages rubbing my noggin on this and your code looks ever so simple! Thank you for pointing me in the right direction. Like I say I am new to all of this and so its all one big learning curve. I will have to check this out when I get home tonight.
While I have got your ear can I ask you a question about the digital ports. I thought that these ports could only be used to send/recieve a 1 or a 0. (true/false) but in this example you are able to use Digital Input port 0 and write characters to it. Is this because you are using the SerialPort class instead of the OutputPort/InputPort classes?
#17385 Help with Serial LCD displaying gobbly-de-gop!
Posted by
on 01 September 2011 - 10:38 AM
in
General Discussion
The term/suffix "port" is abstract: it would mean "a point where the data flows".
With that term the designers of software uses to describe a variety of different forms to exchange data. Now, even a "data" is an abstract term.
An InputPort is a "port" that allows input (only) of data of type "Boolean", thus false or true.
Similarly, the OutputPort is the symmetric form for the same kind of data (Boolean).
A SerialPort is a "port" which allows the exchange of "stream" of byte, or -if you like- byte array.
When you design a class/component which gives the user a "door" to something else (typically hardware), it is a best practice to add the suffix "Port". At a first glance anyone may understand what's the basic purpose of that class/component.
To tell the truth, I would have named the SPI class differently, just because it is another kind of port. Why not "SpiPort"?
Cheers
Thanks for this info Mario and thanks for helping me with my problem.
#17429 Help with Serial LCD displaying gobbly-de-gop!
Posted by
on 02 September 2011 - 06:17 AM
in
General Discussion
Just for completness here is my code now which fully works! Thanks again.
using System;
using System.Net;
using System.Net.Sockets;
using System.Threading;
using Microsoft.SPOT;
using Microsoft.SPOT.Hardware;
using SecretLabs.NETMF.Hardware;
using SecretLabs.NETMF.Hardware.NetduinoPlus;
using System.IO.Ports;
using System.Text;

namespace NetduinoPlusApplicationLCDTest4
{
    public class Program
    {
        public static void Main()
        {
            // write your code here
            SerialPort sPort = new SerialPort(SerialPorts.COM1, 9600, Parity.None, 8, StopBits.One);
            sPort.Open();

            byte[] buffer = null;

            string text = "Starting Up!";
            buffer = Encoding.UTF8.GetBytes(text);
            sPort.Write(buffer, 0, buffer.Length); // Write to LCD

            Thread.Sleep(3000);

            // Now lets clear display!
            sPort.Write(new byte[] { 0x00FE, 0x01 }, 0, 2); // Write to LCD

            while (true)
            {
                text = "hello ";
                buffer = Encoding.UTF8.GetBytes(text);
                sPort.Write(buffer, 0, buffer.Length); // Write to LCD

                Thread.Sleep(500);

                text = "Netduino";
                buffer = Encoding.UTF8.GetBytes(text);
                sPort.Write(buffer, 0, buffer.Length); // Write to LCD

                Thread.Sleep(500);

                // Now lets clear display!
                sPort.Write(new byte[] { 0x00FE, 0x01 }, 0, 2); // Write to LCD

                Thread.Sleep(500);

            }

            Thread.Sleep(Timeout.Infinite);


        }

    }
}
#17435 Help with Serial LCD displaying gobbly-de-gop!
Posted by
on 02 September 2011 - 09:20 AM
in
General Discussion
Hello waxie! I am happy that you resolved your problem.
Just for curiosity and completeness, what do you see if you try to write a text containing "special" characters, like the extended alphabet, for instance?
You may try to write the following string:
Cheers
Hi Mario.
I am at work at the moment but when I get back home tonight I will test your sample chracters and see what is displayed on the LCD and report back.
#17511 Help with Serial LCD displaying gobbly-de-gop!
Posted by
on 04 September 2011 - 06:45 AM
in
General Discussion
Hi there.
Okay so I tried your special characters using this code:
and it produces klingon!!!! It doesnt like those special characters.
Here is a screenshot
Okay so I tried your special characters using this code:
string text = "àèìòù€äöüñ"; // "Starting Up!";
buffer = Encoding.UTF8.GetBytes(text);
sPort.Write(buffer, 0, buffer.Length); // Write to LCD
and it produces klingon!!!!
It doesnt like those special characters.Here is a screenshot


