Black Rose's Content
There have been 6 items by Black Rose (Search limited from 26-April 23)
#11267 NETMF 4.2 Alpha Available
 Posted by
on 25 March 2011 - 12:23 AM
in
General Discussion
Posted by
on 25 March 2011 - 12:23 AM
in
General Discussion
#10738 Keypad driver and scheme
Posted by
on 09 March 2011 - 11:50 PM
in
Netduino 2 (and Netduino 1)
First, I reassigned the rows and cols pins to match the Sparkfun model as following:
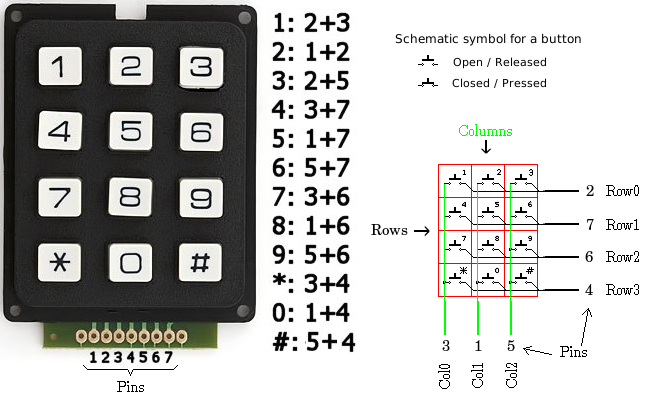
// Row pins. The keypad exists out of 4 rows.
Cpu.Pin[] RowPins = { Pins.GPIO_PIN_D2, Pins.GPIO_PIN_D7, Pins.GPIO_PIN_D6, Pins.GPIO_PIN_D4 };
// Col pins. The keypad exists out of 3 columns.
Cpu.Pin[] ColPins = { Pins.GPIO_PIN_D3, Pins.GPIO_PIN_D1, Pins.GPIO_PIN_D5 };
Second, I matched the values I got from the event handler with the corresponding key:
        public enum Sparkfun12ButtonsKeypad : uint
        {
            One = 0x00, // Button 1 on the keypad
            Two = 0x01, // Button 2 on the keypad
            Three = 0x02, // Button 3 on the keypad
            Four = 0x03, // Button 4 on the keypad
            Five = 0x04, // Button 5 on the keypad
            Six = 0x05, // Button 6 on the keypad
            Seven = 0x06, // Button 7 on the keypad
            Eight = 0x07, // Button 8 on the keypad
            Nine = 0x08, // Button 9 on the keypad
            Star = 0x09, // Button * on the keypad
            Zero = 0x0A, // Button 0 on the keypad
            Hash = 0x0B, // Button # on the keypad
        };

        // Too bad that .NET MF don't have Enum.GetName() Method ):
        public static string GetKeyName(uint value)
        {
            Sparkfun12ButtonsKeypad pressedKey = (Sparkfun12ButtonsKeypad)value;
            switch (pressedKey)
            {
                case Sparkfun12ButtonsKeypad.One:
                    return "1";
                case Sparkfun12ButtonsKeypad.Two:
                    return "2";
                case Sparkfun12ButtonsKeypad.Three:
                    return "3";
                case Sparkfun12ButtonsKeypad.Four:
                    return "4";
                case Sparkfun12ButtonsKeypad.Five:
                    return "5";
                case Sparkfun12ButtonsKeypad.Six:
                    return "6";
                case Sparkfun12ButtonsKeypad.Seven:
                    return "7";
                case Sparkfun12ButtonsKeypad.Eight:
                    return "8";
                case Sparkfun12ButtonsKeypad.Nine:
                    return "9";
                case Sparkfun12ButtonsKeypad.Star:
                    return "*";
                case Sparkfun12ButtonsKeypad.Zero:
                    return "0";
                case Sparkfun12ButtonsKeypad.Hash:
                    return "#";
                default:
                    throw new System.ArgumentOutOfRangeException("value", "There is no such key.");
            }
        }

        static void kb_OnKeyUp(uint data1, uint data2, DateTime time)
        {
            Debug.Print("Key released: " + GetKeyName(data1));
        }

        static void kb_OnKeyDown(uint data1, uint data2, DateTime time)
        {
            Debug.Print("Key pressed: " + GetKeyName(data1));
        }
Great work, Thanks for sharing (:
#10559 Error: No response from device (HELP!!!)
Posted by
on 04 March 2011 - 10:03 PM
in
General Discussion
Hi Black Rose,
When you power on your Netduino Plus, does the blue LED go out after a few seconds (indicating that it has booted)?
If so, try to erase your current Netduino app:
1. Unplug your Netduino Plus and all components
2. Open up MFDeploy on your computer, select USB transport
3. Hold down the pushbutton on your Netduino Plus. This will force it into bootloader mode.
4. Connect your Netduino Plus to your PC (and keep holding the button).
5. Within 2 seconds, press the ERASE button in MFDeploy.
Does that fix things for you?
Also...after that, I'd recommend upgrading to the lasest firmware (v4.1.0.6 or v4.1.1 alpha 7+).
Chris
Thanks it works (:
#10488 Error: No response from device (HELP!!!)
Posted by
on 02 March 2011 - 07:50 PM
in
General Discussion
#9554 EMF Detector
Posted by
on 14 February 2011 - 11:06 PM
in
Project Showcase
Can't check the hardware and code together as I've not got access to the N+ at the moment, but looking at the code made me wonder about the following lines:
I was wondering if you could remove the need for the these two lines (and the methods) by changing the range of the A/D conversion by adding the following line to your code just after you create the analog port:
analogInput.SetRange(0, 255);Unless I've misunderstood the method, this should make sure that your average value is always in the range you wanted. It would however change the meaning of the application slightly. The code as it stands is converting 90% of the range into one value (i.e. all values between 100 and 1023 inclusive) are converted to 100 by the constrain method.
Hope this helps,
Mark
I wasn't sure of what SetRange() function do exactly that's way I didn't use it.
Hopefully, I'll get my N+ soon and have a chance to test both of them on an actual device.
Thank you very much

#9472 EMF Detector
Posted by
on 14 February 2011 - 12:28 AM
in
Project Showcase
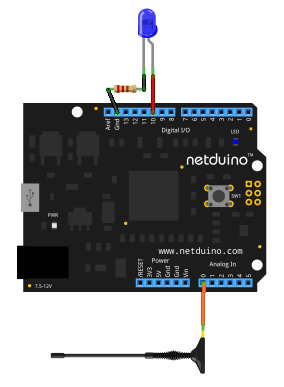
This is my first topic and project for Netduino platform. I still don't have mine yet, UPS bastards missed-up the shipment ):
I thought I could start programming and I tried to make EMF Detector similar to the one for Arduino by: Aaron ALAI’s EMF detector project.
I'm not sure if it's working correctly and I hope if anyone kindly could check it.
using System;
using System.Threading;
using Microsoft.SPOT;
using Microsoft.SPOT.Hardware;
using SecretLabs.NETMF.Hardware;
using SecretLabs.NETMF.Hardware.NetduinoPlus;
namespace NetduinoPlus_EMF_Detector
{
/// <summary>Original Project: Aaron ALAI’s EMF detector project for the Arduino.</summary>
/// <remarks> http://www.aaronalai.com/emf-detector </remarks>
public class Program
{
public static void Main()
{
const uint SAMPLES = 300; // No. of samples the device takes per reading.
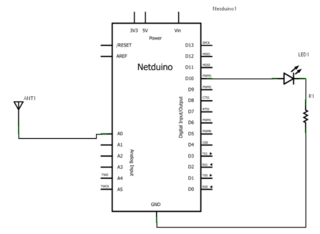
AnalogInput analogInput = new AnalogInput(Pins.GPIO_PIN_A0); // Assign analog PIN A0 as input port.
PWM led = new PWM(Pins.GPIO_PIN_D10); // Assign GPIO PIN D10 as LED output port.
uint dutyCycle = 0; // LED 8-bits output value: 0-255 (always off)-(always on). Default OFF.
float avarage = 0.00f; // var holding the avarage of all samples.
ulong sum = 0L; // var holding the sum of all samples.
int[] readings = new int[SAMPLES]; // array holding actual samples.
while (true) // loop infinitely
{
for (uint i = 0; i < SAMPLES; i++)
{
readings[i] = analogInput.Read(); // read data from the antenna wire.
Thread.Sleep(10); // allow system to complete proccessing.
sum += (ulong)readings[i]; // calculate sum.
}
avarage = sum / SAMPLES; // calculate the avarage of all samples.
dutyCycle = (uint)constrain((long)avarage, 0, 100); // constrains the avarage value to between two numbers 0 and 100
dutyCycle = (uint)map((long)avarage, 0, 100, 0, 255); // maps out 0-100 to 0-255, 255 is the threshold of analog to digital conversion.
led.SetDutyCycle(dutyCycle); // set the duty cycle value of LED.
Thread.Sleep(10); // allow system to complete proccessing.
// clean-up
dutyCycle = 0;
avarage = 0.00f;
sum = 0L;
}
}
/// <summary>
/// Constrains a number to be within a range.
/// </summary>
/// <param name="value">the number to constrain, long data types.</param>
/// <param name="low">the lower end of the range, long data types.</param>
/// <param name="high">the upper end of the range, long data types.</param>
/// <returns>
/// <para>value: if value is between low and high.</para>
/// <para>low: if value is less than low.</para>
/// <para>high: if value is greater than high.</para>
/// </returns>
/// <example>
/// <para>val = constrain(val, 0, 100);</para>
/// <para>// limits range of val to between 0 and 100.</para>
/// </example>
/// <remarks>
/// See: http://arduino.cc/en/Reference/Constrain
/// </remarks>
public static long constrain(long value, long low, long high)
{
return value >= high ? high : value <= low ? low : value;
}
/// <summary>
/// Re-maps a number from one range to another.
/// </summary>
/// <param name="value">x: the number to map, long data types.</param>
/// <param name="fromLow">the lower bound of the value's current range, long data types.</param>
/// <param name="fromHigh">the upper bound of the value's current range, long data types.</param>
/// <param name="toLow">the lower bound of the value's target range, long data types.</param>
/// <param name="toHigh">the upper bound of the value's target range, long data types.</param>
/// <returns>
/// The mapped value.
/// </returns>
/// <remarks>
/// See: http://arduino.cc/en/Reference/map
/// </remarks>
public static long map(long value, long fromLow, long fromHigh, long toLow, long toHigh)
{
try
{
return (value - fromLow) * (toHigh - toLow) / (fromHigh - fromLow) + toLow;
}
catch (Exception ex)
{
throw ex;
}
}
}
}
Attached Files
-
 NetduinoPlus_EMF Detector.zip 139.12KB
17 downloads
NetduinoPlus_EMF Detector.zip 139.12KB
17 downloads


