mcinnes01's Content - Netduino Forums - Page 2
   
Netduino home hardware projects downloads community

Jump to content


The Netduino forums have been replaced by new forums at community.wildernesslabs.co. This site has been preserved for archival purposes only and the ability to make new accounts or posts has been turned off.

mcinnes01's Content

There have been 82 items by mcinnes01 (Search limited from 14-May 23)


By content type

See this member's


Sort by                Order  

#56550 MIP tcp/ip stack running on Netduino mini !!

Posted by mcinnes01 on 01 March 2014 - 04:21 PM in Project Showcase

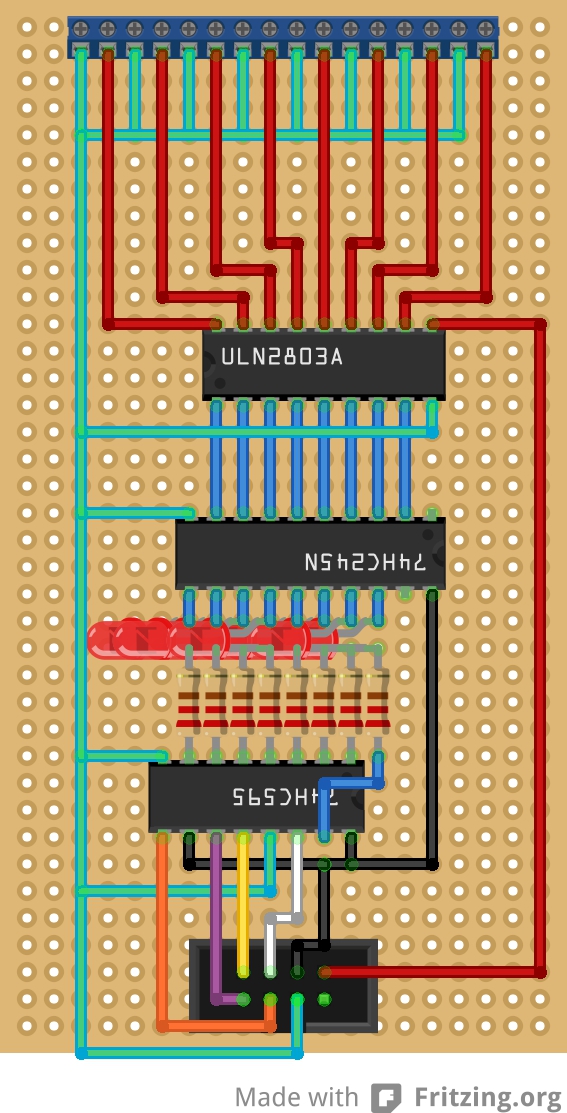
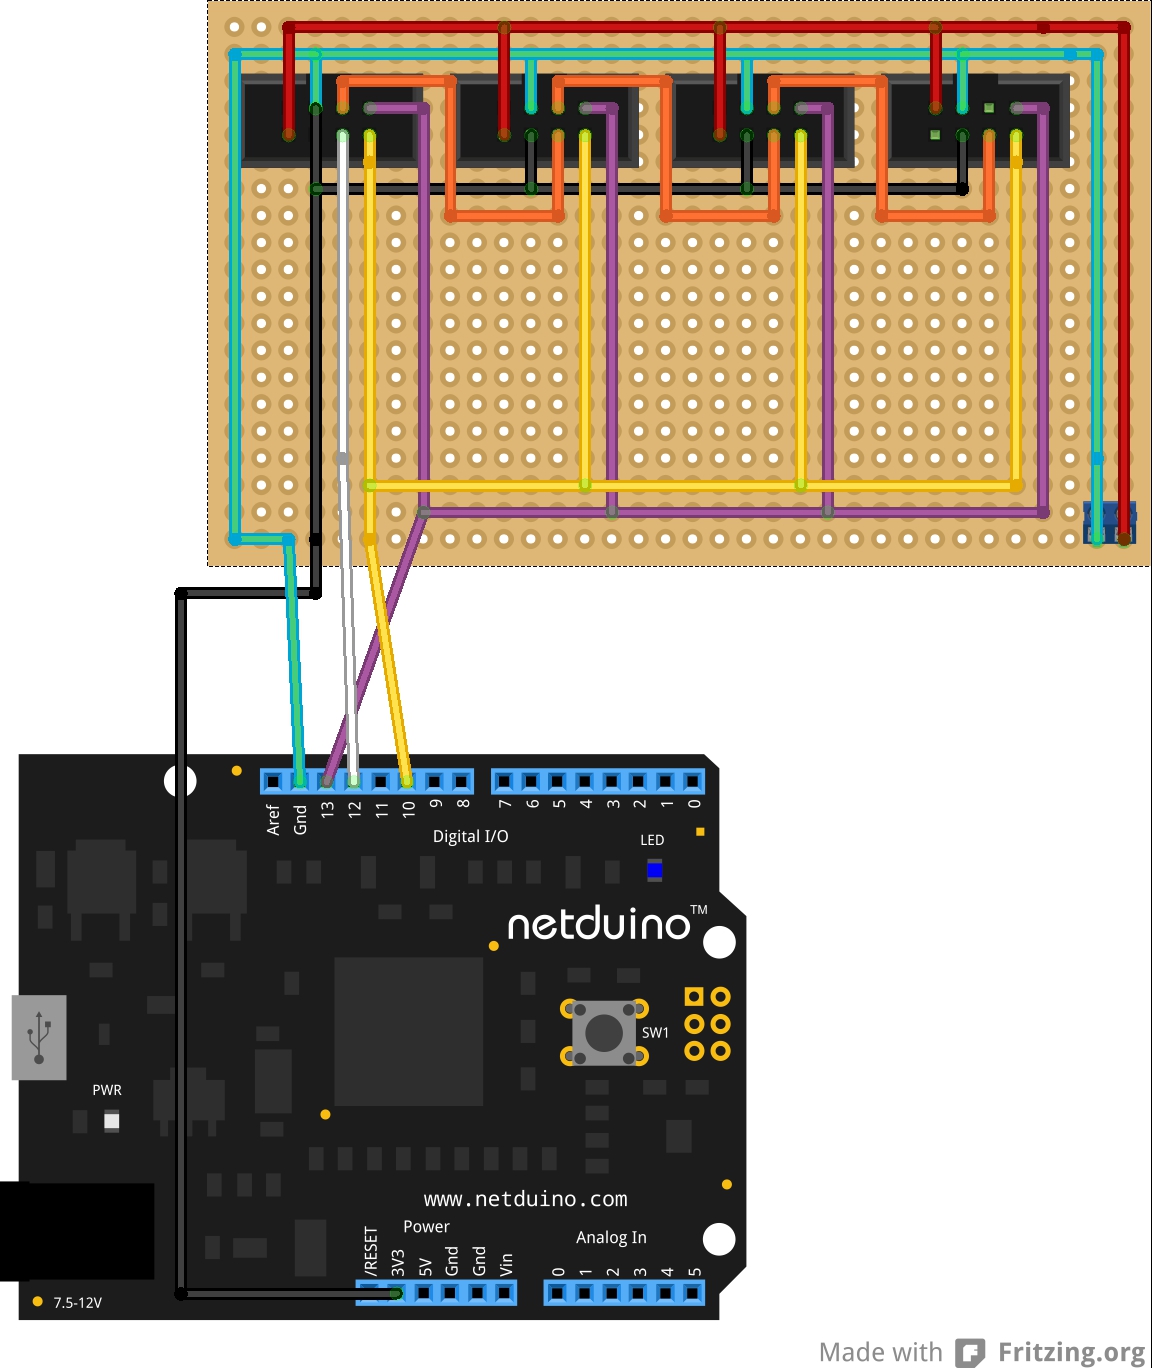
I am using a standard netduino 1. So am I correct in saying I need to change the method to be as follows:


irq = new InterruptPort(irqPin, true, Port.ResistorMode.Disabled, Port.InterruptMode.InterruptEdgeLevelLow);


And obviously put a 10k between D8 and ground on my N1?


Or do I also need to change the interruptmode to EdgeLow as well?]


Many thanks


Andy


#58881 MIP tcp/ip stack running on Netduino mini !!

Posted by mcinnes01 on 24 June 2014 - 08:59 PM in Project Showcase

Hi Hanz,


Just a quick update, I have confirmation from Paolo who wrote the M2Mqtt library that the network library in his project uses sockets over tcp. There is a TCP class in the mIP library but I wondered if you or anyone else has any ideas or examples of how to implement TCP sockets with mIP. There are great examples of http and UDP but any pointer as to TCP would be greatly appreciated.


I guess in regards to my previous post the questions still remain in terms of extending mIP to provide similar structure to System.Net.Sockets in terms of returning int for send, receive and data available?


Thanks as ever,


Andy


#59477 MIP tcp/ip stack running on Netduino mini !!

Posted by mcinnes01 on 30 July 2014 - 10:08 PM in Project Showcase

Hi Valkyrie


Sorry its took so long for me to get back and thanks for the TCP example!


The problem I am having is that the M2Mqtt library uses System.Net.Sockets and as I have a very limited understanding of how TCP works I am struggling to identify the parts of mIP I need to use to replace the TCP class (MqttNetworkChannel) in the M2Mqtt project and how to go about implementing them.


In your example you clearly show a way of creating a socket, but I don't understand how you achieved this or how it can be extended to cover the scenarios required in the Mqtt TCP class.


For example System.Net.Sockets provides:


.Send()

.Recieve()

.Available()

.Connect()

.Close()


Which are used in the MqttNetworkChannel or TCP class.


It also seems that the Send, Receive and Available methods return an int value of the number of bytes sent, left in the buffer or available to be received.


What I would like to know is, is there any way I can achieve this with mIP?


I would very much like to implement your mIP library with mqtt and appreciate any help you can provide :)


Thanks again for your help and I hope with your assistance I can give people using any type of netduino or other boards the ability to use pub sub messaging.


Andy


#56539 MIP tcp/ip stack running on Netduino mini !!

Posted by mcinnes01 on 01 March 2014 - 10:23 AM in Project Showcase

I've been having a little play and I set the profile as per the above but I get the following exception whilst deploying


'Microsoft.SPOT.Debugger.CorDebug.dll' (Managed): Loaded 'C:\Program Files (x86)\Microsoft .NET Micro Framework\v4.2\Assemblies\le\System.dll', Symbols loaded.
The thread '<No Name>' (0x2) has exited with code 0 (0x0).
A first chance exception of type 'System.ArgumentException' occurred in Microsoft.SPOT.Hardware.dll
An unhandled exception of type 'System.ArgumentException' occurred in Microsoft.SPOT.Hardware.dll
 
This occurs when using the dnslookup example with my new profile for netduino1 as per the above.
 
The error occurs on line:
 
irq = new InterruptPort(irqPin, true, Port.ResistorMode.PullDown, Port.InterruptMode.InterruptEdgeLevelLow);
 
From:
 
/// <summary>
/// Creates a new ENC28J60 driver object instance, the chip will be held
/// in reset until the Start method is called
/// </summary>
/// <param name="irqPin">Host pin to use for interrupt request</param>
/// <param name="csPin">Host pin to use for SPI chip select</param>
/// <param name="spiModule">Host SPI module to use</param>
public ENC28J60Driver(Cpu.Pin irqPin, Cpu.Pin csPin, SPI.SPI_module spiModule)
{
irq = new InterruptPort(irqPin, true, Port.ResistorMode.PullDown, Port.InterruptMode.InterruptEdgeLevelLow);
irq.OnInterrupt += new NativeEventHandler(irq_OnInterrupt);


            // http://www.mikroe.com/forum/viewtopic.php?f=91&p=192252
var cfg = new SPI.Configuration(csPin, false, 0, 0, false, true, 8000, spiModule);
spi = new MultiSPI(cfg);
}

Not sure what is wrong with Microsoft.SPOT.Hardware?


My netduino is running 4.2 and I am targeting the 4.2 framework?


Andy


#56545 MIP tcp/ip stack running on Netduino mini !!

Posted by mcinnes01 on 01 March 2014 - 01:34 PM in Project Showcase

Hi Chris,


According to the mip library:


        [Flags]
        public enum PinValidInterruptMode
        {
            NONE = 0,
            InterruptEdgeLow = 2,
            InterruptEdgeHigh = 4,
            InterruptEdgeBoth = 8,
            InterruptEdgeLevelHigh = 16,
            InterruptEdgeLevelLow = 32,
        }
 
The interrupt is set on EdgeLevelLow, I tried it with EdgeLow and got the same exception?
 
Many thanks
 
Andy


#57688 MIP tcp/ip stack running on Netduino mini !!

Posted by mcinnes01 on 22 April 2014 - 04:41 PM in Project Showcase

Hi Hanz,


I am trying to create an interface between mIP and M2Mqtt, as I understand I need to replace the MqttNetworkChannel with my own implementation that inherits IMqttNetworkChannel and reference my implementation in the MqttClient class. Also I need to replace the dnsLookup in the client class.


The IMqttNetworkChannel looks like this:

/// <summary>
    /// Interface for channel under MQTT library
    /// </summary>
    public interface IMqttNetworkChannel
    {
        /// <summary>
        /// Data available on channel
        /// </summary>
        bool DataAvailable { get; }

        /// <summary>
        /// Receive data from the network channel
        /// </summary>
        /// <param name="buffer">Data buffer for receiving data</param>
        /// <returns>Number of bytes received</returns>
        int Receive(byte[] buffer);

        /// <summary>
        /// Send data on the network channel to the broker
        /// </summary>
        /// <param name="buffer">Data buffer to send</param>
        /// <returns>Number of byte sent</returns>
        int Send(byte[] buffer);

        /// <summary>
        /// Close the network channel
        /// </summary>
        void Close();

        /// <summary>
        /// Connect to remote server
        /// </summary>
        void Connect();
    }

Would I be correct in saying that the connect and close methods would come from mIP's Networking class?


And Send and Receive from the HttpRequest and HttpResponse classes?


I remember reading in the mIP class that it tries to stay away from sockets to make things simpler, would I be right in saying that the mqtt library is using sockets?


If so would there be some particular methods I should use instead of the Http ones?


Also would you say that Start() in mIP is Connect in M2Mqtt? Stop() relates to Close() ?


I have no idea in terms of DataAvailable?


Any help would be much appreciated :)


Andy


#57441 MIP tcp/ip stack running on Netduino mini !!

Posted by mcinnes01 on 08 April 2014 - 10:51 PM in Project Showcase

Hi Hanz,


Good news, with no amendments to mIp bar the fix in the dhcp.cs and just tweaking your MCP23S17 library to run on the MultiSPI manager, I have been able to get both devices working together.


I am still playing with the web server on the netduino in terms of creating input fields and handling the requests as this is my first attempt. If I get something up and running I will post a video.


I may see if I can get the neonmika web server running on a standard netduino, any way thanks again for the help.


Andy


#56533 MIP tcp/ip stack running on Netduino mini !!

Posted by mcinnes01 on 01 March 2014 - 12:19 AM in Project Showcase

Hi,


I am looking at the profiles to add my own, but I am a little confused about the pin references...


case InterfaceProfile.NetduinoPlus2:
                    // MOSI(PA7), SCK(PA5), MISO(PB4), INT(PA4), CS(PC8) 
                    Start(MacAddress, name, SPI.SPI_module.SPI1, (Cpu.Pin)4, (Cpu.Pin)38);
                    break;
 
I am a little confused not only about the references in the comments, but also over what pin 38 would relate to?
 
So I have my board (which is pretty much the same as yours) connected as follows:
 
Vcc = 3.3v
Gnd = Gnd
Reset = Reset
Sck = D13
MISO = D12
MOSI = D11
CS = D10
Int = D8
 
Hopefully this is correct?
 
Cheers,
 
Andy


#56414 MIP tcp/ip stack running on Netduino mini !!

Posted by mcinnes01 on 25 February 2014 - 11:44 PM in Project Showcase

Hi,


I wonder if you can help, I am trying to get mip up and working on my standard netduino 1 with 4.2 running on it.


First of all what pins do I need to connect to the nic?


Also do I need to add another interface profile enum for the netduino 1?


Many thanks,


Andy


#58871 MIP tcp/ip stack running on Netduino mini !!

Posted by mcinnes01 on 23 June 2014 - 10:09 PM in Project Showcase

Hi Hanz,


Just wondered if you could give me a few pointers...


I am trying to determine what the equivalent mIP method of the following would be:

public int Send(byte[] buffer)
        {
            return this.socket.Send(buffer, 0, buffer.Length, SocketFlags.None);
        } 

And

        public int Receive(byte[] buffer)
        {
            // read all data needed (until the buffer is full)
            int idx = 0;
            while (idx < buffer.Length)
            {
                idx += this.socket.Receive(buffer, idx, buffer.Length - idx, SocketFlags.None);
            }
            return buffer.Length;
        } 

 this.socket.Send is derived from the System.Net.Sockets method:

public int Send(byte[] buffer, int offset, int size, SocketFlags socketFlags);

and this.socket.Receive is from:

public int Receive(byte[] buffer, int offset, int size, SocketFlags socketFlags);

From what I can tell nothing seems to expose a send or receive method that returns a int, my only conclusion would be that this response is returned until the buffer is empty. I guess this would need some adaptation or extension of the mIP methods?


And finally the only other method I can't work out the mIP equivalent of is as follows, however it may require some extension if its possible:

public bool DataAvailable
{
   get
   {
      return (this.socket.Available > 0);
   }
}

Again drawing from System.Net.Sockets:

public int Available { get; }
 Your guidance would be greatly appreciated :)
 
Many thanks
 
Andy


#56761 MIP tcp/ip stack running on Netduino mini !!

Posted by mcinnes01 on 12 March 2014 - 12:01 AM in Project Showcase

Sorry post to wrong thread.


#56551 MIP tcp/ip stack running on Netduino mini !!

Posted by mcinnes01 on 01 March 2014 - 04:57 PM in Project Showcase

Ok, that seemed to get me a little further but now I get the following exception in the Start() method:


The thread '<No Name>' (0x2) has exited with code 0 (0x0).
A first chance exception of type 'System.Exception' occurred in NetworkingService.dll
An unhandled exception of type 'System.Exception' occurred in NetworkingService.dll
Additional information: Unable to Communicate to the Ethernet Controller.  Check the InterfaceProfile in your Adapter.Start()
 

Which breaks on line:

if (loopMax <= 0) throw new Exception("Unable to Communicate to the Ethernet Controller.  Check the InterfaceProfile in your Adapter.Start()");

From the code:

/// <summary>
/// Starts up the driver and establishes a link
/// </summary>
public void Start()
{
byte i;


var loopMax = 100;  // about 10 seconds with a 100 ms sleep


// Wait for CLKRDY to become set.
// Bit 3 in ESTAT is an unimplemented bit.  If it reads out as '1' that
// means the part is in RESET or there is something wrong with the SPI 
// connection.  This loop makes sure that we can communicate with the 
// ENC28J60 before proceeding.
// 2.2 -- After a Power-on Reset, or the ENC28J60 is removed from Power-Down mode, the
//        CLKRDY bit must be polled before transmitting packets
do
{
i = ReadCommonReg(ESTAT);
loopMax--;
Thread.Sleep(100);
} while(((i & 0x08) != 0 || (~i & ESTAT_CLKRDY) != 0) && loopMax > 0);


            if (Adapter.VerboseDebugging) Debug.WriteLine("ESTAT: " + ReadCommonReg(ESTAT).ToString());


if (loopMax <= 0) throw new Exception("Unable to Communicate to the Ethernet Controller.  Check the InterfaceProfile in your Adapter.Start()");


            regCheckTimer = new Timer(new TimerCallback(CheckRegisters), null, checkDelay, checkDelay);
            watchdog = new Timer(new TimerCallback(WatchDogCheck), null, 10000, 3000);


Restart();
            //Init();
}


#56552 MIP tcp/ip stack running on Netduino mini !!

Posted by mcinnes01 on 01 March 2014 - 05:24 PM in Project Showcase

I'm pretty sure, the answer is in the error... "Check the interface profile"


I think it comes back to my confusion over the values in other profiles of the (Cpu.Pin).


I guess that D8 does not equal (Cpu.Pin)8 in reference to a standard netduino 1?


Would this be 62 at a guess?


And D10 would be 64?


Many thanks


Andy


#56555 MIP tcp/ip stack running on Netduino mini !!

Posted by mcinnes01 on 01 March 2014 - 05:48 PM in Project Showcase

I have the boards connected as follows:


(left netduino / right ENC28)


Gnd = gnd

3.3v = vcc

Reset = reset

D13 = SCK

D12 = MISO

D11 = MOSI

D10 = CS

D8 = INT (D8 also has a 10K resistor going to ground)


The board is from ebay... http://www.ebay.co.u...=item35c89fc698


I have added in SecretLabs.NETMF.Hardward.Netduino, so my profile is as follows:


case InterfaceProfile.Netduino1:
                    // MOSI(D12), SCK(D13), MISO(D11), INT(D8), CS(D10) 
                    Start(MacAddress, name, SPI.SPI_module.SPI1, SecretLabs.NETMF.Hardware.Netduino.Pins.GPIO_PIN_D8, SecretLabs.NETMF.Hardware.Netduino.Pins.GPIO_PIN_D10);
                    break;

My interrupt method is as follows:

irq = new InterruptPort(irqPin, true, Port.ResistorMode.Disabled, Port.InterruptMode.InterruptEdgeLevelLow);

I now get the error:


Error: a3000000
 
Waiting for debug commands...
 
The program '[19] Micro Framework application: Managed' has exited with code 0 (0x0).


#56629 MIP tcp/ip stack running on Netduino mini !!

Posted by mcinnes01 on 04 March 2014 - 05:53 PM in Project Showcase

I've managed to get all the examples working except the UDP one, do you know what is meant to happen with this one? Does it receive UDP messages and if so how do I test it?


My next step is to incorporate MQTT, not sure if anyone has managed this with mIp yet?


Many thanks


Andy


#58370 I Think I Found a bug in SPI

Posted by mcinnes01 on 23 May 2014 - 09:15 PM in Netduino 2 (and Netduino 1)

Hi Chris,


Is this a hint towards a beta 4.3 for netduino 1?


Cheers,


Andy


#54169 Home Automation

Posted by mcinnes01 on 19 November 2013 - 10:10 AM in General Discussion

Yes all the automation will be hardwired back to my 2 main distribution boards. It uses a fair amount more cable than usual but just provides a much more maintainable approach when its all in. Sadly my once nicely plastered walls which I was hoping to not need to do, now all need replastering. That being said I wouldn't recommend this approach unless you are building a house from scratch or are doing a full on refurb.


On top of all the electrical cable I am also running a kilometre of network cable in. Again I have 2 racks, one by each distribution board that will house a 96 bay patch panel each and a 48 port POE switch. The plan is to run CAT5 every where for sensors and any distributed intelligence. For example some of the CAT5 although terminated to the patch panel will then split off to my own control boards to carry signals from sensors like PIRs, temperature sensors and perhaps even carry control voltages for things like actuators. One idea I've had is to either get electronic Radiator valves that I can retro fit or the slightly more invasive approach which is to fit valves inline with each radiator. This way I can use ternperature sensors and motion detectors as well as my own granular time patterns to control my central heating. 


What I am doing is running a lot of CAT5 everywhere, some in the ceilings some in the floors etc, a lot will be unterminated but there for when I want to use it. Also I have 2 gang RJ45 faceplates everywhere as I will be using CAT5 for phones, web connections etc etc.


#54162 Home Automation

Posted by mcinnes01 on 19 November 2013 - 03:45 AM in General Discussion

I have posted an update on my blog...


#52621 Home Automation

Posted by mcinnes01 on 06 September 2013 - 10:47 PM in General Discussion

Cool thanks Mike, I will give it a whirl. Just getting to grips with server 2012 and hyper V.


#52559 Home Automation

Posted by mcinnes01 on 04 September 2013 - 10:25 PM in General Discussion

Hi Mike,


What would you recommend in terms of hosting MQTT? I have played on my laptop with RSMB and Mosquitto. I ideally want to have MQTT running on my home server so I can access it from any of my home automation devices as this will be the central point where all messages are handled.


Many thanks,


Andy


#52379 Home Automation

Posted by mcinnes01 on 26 August 2013 - 10:29 PM in General Discussion

Ok so a little time has passed but there have been some major advances in my home automation project...


Since my last posts I have played a little with mqtt in various flavours including mosquitto and rsmb...


I have also been on a Windows Azure and Web Services course...


And employed an electrician to start work at the end of september...


After reviewing many different technologies for home automation, as well as getting an estimate for the cost of my rewire I have made some key decisions...


Taking a lot of inspiration from super house  I have decided to go for a wired approach, using cat5e to carry pretty much all signals and low voltage around my house. Not only is cat5e relative cheap ~£36 for 305m, it provides shielding, twisted pairs and can carry low voltages happily upto the POE standard of 48v, which covers me for just about every eventuality.


Another key decision is that I have taking a radial wiring approach, otherwise known by "node-zero" or "star" wiring. Basically this means having a central point where all wiring comes back to, or in my case 2 points where all wiring comes back to. As my house is over 4 floors (basement, ground floor, first floor and attic) I am having 2 node-zeros; one in the attic and the other in the basement. What this means is the maximum run is only between 2 floors.


Essentially the idea is that everything has its own circuit which goes back to a distribution board; located in either the attic or basement. The wiring side of things is a little different than a convensional house; other than a standard consumer board with some RCDs etc, there is very little that reprisents a typical wiring system. From the consumer board 2 circuits (an 80amp for the basement and ground floor and 65amp for the first floor and attic) will come out going to 2 distribution boards. Here this supply will be split up in to functional circuits such as light for each floor, sockets for each floor, boiler, shower, cooker, garden from the relvant distribution board.


Each circuit then splits down to granularise the control, so the circuits will all have an RCD, but each component (socket, light etc) will have in most case a relay. And this is where my next decision comes in to play, I have decided to go for a complete home brew approach rather than paying the extortionate prices charged by HAL supplies which invoke some benefits and serveral contstraints each. Not only does price play a key role, but the ability to interface and control things the way I want. One downside to my home brew route is that this technology is untested and has not gurantees or support.


To combat this issue I am building a fallback in; there is a requirement in the UK to have a controlable light in each room, and so I am going to keep controls on the walls that are "dumb" controls. Rather than carrying 240v these will however be cat5e carrying 24v, this will have the ability to override my control boards should any software or electronic issues arrise. Some benefits of my approach include using wired control, this removes issues related to wireless and other signals over power. Also using cat5 provides a nice shielded delivery method. Also having my intelligence centrallised (be it centralised to 2 locations) means that I have 2 points of failure, which may sound bad, but is certainly less invasive when distributed intelligence goes wrong and you have to start ripping up floor board or plaster. I will easily be able to replace and identify any broken hardware and my hardware is cheaper as less intelligence (netduinos) are needed. Also having the manual, logic free, electronic overides will provide a failsafe.


My control boards are going to be din mounted using something like Cambden Boss enclosures and  will use a din mounted 24v supply and cat5e to connect the control boards to a centralise netduino module. See my other post for more details.


I have decided to go for mqtt as my message protocol as inspired by Mike. The Azure and web services course I went on last week gave me some great inspiration for having a service oriented architecture and using queues.


I have also built a low power server that runs flat out at around 36 Watts and is completely solid state with no fans or moving parts. This is running server 2012 datacentre core edition, which I am enjoying a steep learning curve on how to configure my first domain and Hyper-V environment. I plan to run several virtual servers on this to create my own Azure like distributed environment, all be it without the ability to automatically scale out across more VMs.


Over the coming months I plan to share my project exploits and actively welcome anyones input, ideas, opinions and support. Once I get my server up and running I plan to get mqtt running. I am still to find any detailed information on how to host mqtt and would appreciate any guidance on how to do this or configure the Hyper-V role on server 2012 datecentre core edition.


Thanks again,


Andy


#52368 High power multiplexing help

Posted by mcinnes01 on 26 August 2013 - 03:59 PM in General Discussion

Hi,


I am just in the process of rewiring my house using a radial system or in fact 2 seperate radial systems (one for the basement/ground floor and one for the first floor/loft). By radial system I mean each socket and light goes back to the distribution board.


The idea is that I can control each socket or light separately and so each of these will terminate on its own solid state 25 amp relay that will be din rail mounted in the distribution board. Each light switch will run on a low power system using cat5 cabling and so all the switching will be done using solid state relays. This not only allows me to manually control the lights using manual switches, a 24v din mounted power supply and CAT5 cable to the relays. But it also allows me to centralised control that I can interface with via the netduino. The reason for this is that you must ensure that there is a switchable light per room and it acts as a backup in case I have a software or electronics issues, most importantly this also avoids the Mrs getting annoyed if she can't switch the light on etc. ;)


What I am trying to do is create some din rail mounted modules that will provide the switching control for the relays. Each module will use CAT5 connections to connect it back to a central module that will house the netduino and will split the SPI which will be used to multiplex the control logic and distribute the switching voltage from the 24v 3.2A 85W din mounted power supply.


Each module will switch 8x 25amp relays using 24v, will have 8 LEDs to indicate what is on, will contain a 74HC595 shift register, a 74HC245N CMOS and a ULN2803 transitor array, plus some resistors or resitor array.


The relays have approximately a 2.5v 30ma voltage and current drop respectively.


The 4 twisted pairs in the CAT5 will carry the 3 connections for the SPI, 1 connection to return QH from the 595s so they can be daisy chained, common Gnd, 3.3v and 24v.


What I need a little help with is as follows:

  • Am I missing any connections on the 74HC245Ns, there is a direction pin (pin 1) and a QE pin (pin 19). I am not sure what to do with these?
  • Can you see any errors in the circuit or see any problems that it might face, and can you offer any solutions if so?
  • As I will have a fair few of these boards and each will have 8 small 3mm leds 30ma 2.5v, would I be better moving the leds to the 24v side of the circuit and if so what will I have to change? Would I need any extra resistors, diodes, caps etc?
  • The resistors I haven't even calculated and this is something I am terrible at, if I leave the LEDs where they are now what resistors would I need? I was thinking of using a resisor array from my inspiration for the circuit (see below). However linked to the previous question what if I moved the LEDs up to the 24v circuit so they aren't running off the netduinos power? Posted Image
  • Would the circuit benefit from any caps to level things out and if so what size and where?
  • Final question do I need any additional protection diodes for the netduino or chips?

Here is a fritzing (see Din Mount Relay_bb.jpg) of what I was thinking for the Din Modules and there is also the netduino shield which distributes the 24v and SPI (see Din Shield_bb), any help moving the LEDs to the 24v side would be much appreciated!


As a key:

Red = 24v

Black = 3.3v (from netduino)

Green = Common Gnd

Orange = Returned QH

White = MOSI

Purple = SCLK

Yellow = SS


Andy

Attached Thumbnails

  • Din Mount Relay_bb.jpg
  • Din Shield_bb.jpg


#52383 Help bypass switch with reverse current protection

Posted by mcinnes01 on 27 August 2013 - 02:17 AM in General Discussion

Hi Chuck


Thanks for the reply, I should elaborate a little further, the switches are the standard wall plates you have in your house to switch the lights on/off. My lights are going to be physically switched with a relay, this will be done using the netduino and my own boards, but I want a manual overide using the standard wall switch. This will have the same 24v power supply that the neduino uses to switch the relay.


This will allow me to overide what ever the netduino is doing in terms of switching on the lights, so when the wall switch is in the off position, the netduino is in control, but when I switch the wall switch on this will overide the netduino and turn the lights on.


Do you have any thoughts and sorry for not being clearer :)


Thanks again,


Andy


#52381 Help bypass switch with reverse current protection

Posted by mcinnes01 on 26 August 2013 - 11:48 PM in General Discussion

Hi,


I am trying to find a way to manually override the control of some relays.


The netduino uses mux to control 24v which switches the coil voltage of some relays. I want to manually control the relays in case something goes wrong on my control board or with my software.


The manual switches will carry 24v from the same supply that switches the relays on my control boards. Things that I am unsure about include, if the switch is closed supplying 24v to the the relay coil, but the control board is not is closed, how can I ensure current from the switch doesn't travel backward in to the control board mux circuit?


I guess this would be an easy answer with something like diode right? Any help on which one and where would be much appreciated?


Finally, what would happen in the switch was close supplying 24v and the control board was supplying 24v to the relay? Would this be fine as it is the same source or could this create some form of over voltage/over current?


Could this be resolved with a transistor and if so how would I wire it in.


Basically the ciruit has a common ground and the 24v is common to both the ULN2802 which will be used to switch the relay coil and to the switch which will directly supply the same 24v?


There is one final consideration, the relays have a 2.5v voltage drop and a 30ma current drop. How would I handle this in terms of resistors and the 2 possible sources of current (ULN2803 or Switch)?


I would also like a status LED to show which relays are on again 2.5v voltage drop, 30ma current drop.


Many thanks,


Andy


#56914 Gainspan WiFi module

Posted by mcinnes01 on 19 March 2014 - 02:11 PM in General Discussion

Hi Hanz,


I wonder if you have made any progress with your RAK410/411 wifi module class library?


The problem I have with writing drivers is I don't really know where to start, and although I have been through the datasheets and command guides a few times I'm a little unsure as to where to approach it from.


I wonder if you have perhaps started the lib for your module, if I could see the code so far I can try to follow your approach to and see if I can do the same for my module?


Thanks again for all your help,


Andy


home    hardware    projects    downloads    community    where to buy    contact Copyright © 2016 Wilderness Labs Inc.  |  Legal   |   CC BY-SA
This webpage is licensed under a Creative Commons Attribution-ShareAlike License.