 I am looking at building a copter where I will need an accelerometer and gyro. Someone suggested I look at the "6 degrees of freedom". My questions are:
1) Will this work with the netduino, or is there a better sensor to use for this?
2) As far as I understand it, unless someone has converted the drivers to .net, I would need to do that. Does anyone know if someone has posted drivers for this?
I have searched the forums with little success. I am extremely new to the world of hardware, but am experienced in .net.
Thanks alot!
I am looking at building a copter where I will need an accelerometer and gyro. Someone suggested I look at the "6 degrees of freedom". My questions are:
1) Will this work with the netduino, or is there a better sensor to use for this?
2) As far as I understand it, unless someone has converted the drivers to .net, I would need to do that. Does anyone know if someone has posted drivers for this?
I have searched the forums with little success. I am extremely new to the world of hardware, but am experienced in .net.
Thanks alot!

6 degrees of freedom
Started by roguemat, Jan 31 2012 10:11 PM
9 replies to this topic
#1

roguemat
-
- Members
-

- 54 posts
Advanced Member
- LocationSouth Africa
Posted 31 January 2012 - 10:11 PM
Hi there!
I just got a netduino today, and am having fun so far
I am looking at building a copter where I will need an accelerometer and gyro. Someone suggested I look at the "6 degrees of freedom". My questions are:
1) Will this work with the netduino, or is there a better sensor to use for this?
2) As far as I understand it, unless someone has converted the drivers to .net, I would need to do that. Does anyone know if someone has posted drivers for this?
I have searched the forums with little success. I am extremely new to the world of hardware, but am experienced in .net.
Thanks alot!
I make Windows Phone stuff for beer money and rent (in order of priority). I've got a blog and am on the Twitter machine.
#2
mutsop
-

- Members
-
- 30 posts
Advanced Member
Posted 01 February 2012 - 10:08 AM
I'm also curious for the answer... Although I'm not going to create a copter, it would be for a self balancing robot.
#3
CharlesTucker
-

- Members
-
- 19 posts
Member
Posted 02 February 2012 - 06:43 AM
This is on my list of "things to do in the future", with the ultimate goal of making a quadcopter that serves as platform for a small camera. However, I am far from that for several reasons, so I don't have the answers you are looking for, but I might offer a hint for starters. These 6 degrees-of-freedom things are essentially a combination of 3 gyros and 3 accelerometers.
The example mentioned in the other thread contained a ADXL345 as the set of accelerometers. I succesfully connected one of those on its own to my Netduino, using information and code from https://www.loveelec...how-to-use-them. My project did not do anything useful, it just indicated accelerations by means of a 3 rows of leds:), I am very much a beginner in the field of electronics. So I do not have the final answer, but I hope it serves as a start.
With best regards, Peter
#4
Jacques B
-

- Members
-
- 8 posts
New Member
Posted 02 February 2012 - 08:20 AM
Hi @CharlesTucker
Any information for connecting this(http://www.sparkfun.com/products/10121)breakout board to the netduino plus?
Regards
Jacques
#5
CharlesTucker
-
- Members
-
- 19 posts
Member
Posted 02 February 2012 - 09:05 AM
Hi Jacques, unfortunately I don't own one of those, just de ADXL345. I sincerely do hope you get some more useful answers then mine. But if not, from the info at Sparkfun (it is basically an ADXL345 accelerometer + ITG3200 gyro on the same breakout-board), it appears like you could start by using the info on the Loveelectronics site and get at least the accelerometer part working with your Netduino plus. From there hopefully you can extend their code to include the gyro output.
#6
roguemat
-
- Members
-
- 54 posts
Advanced Member
- LocationSouth Africa
Posted 02 February 2012 - 03:17 PM
Thanks for the input everyone.Hi Jacques, unfortunately I don't own one of those, just de ADXL345. I sincerely do hope you get some more useful answers then mine. But if not, from the info at Sparkfun (it is basically an ADXL345 accelerometer + ITG3200 gyro on the same breakout-board), it appears like you could start by using the info on the Loveelectronics site and get at least the accelerometer part working with your Netduino plus. From there hopefully you can extend their code to include the gyro output.
I went ahead and bout this today (the one with ADXL345 and ITG3200) along with an LLC.
I found that loveelectronics page too and was hoping I could start with that and worry about the gyro later.
I will let you guys know how it goes with regards to the ADXL345.
p.s. This is coming from a guy who is about to solder for the first time

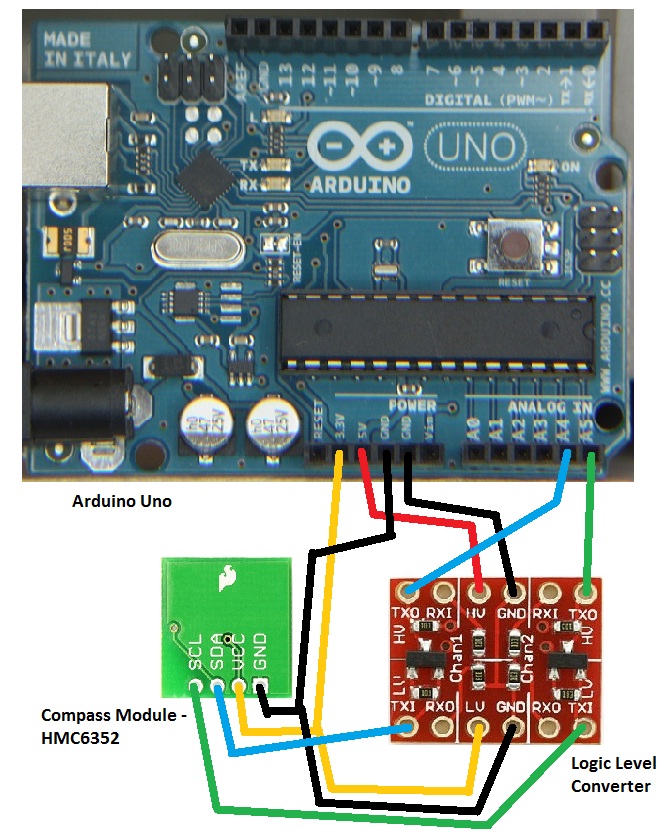
EDIT: The place I bought it from sent me this link to show how to wire it:
I make Windows Phone stuff for beer money and rent (in order of priority). I've got a blog and am on the Twitter machine.
#7
DanA
-

- Members
-
- 26 posts
Member
Posted 02 February 2012 - 05:00 PM
Hi,
Just curious, but I'm not sure why you'd need the logic level convertor. (neither for Arduino?)
Anyone have insight into this?
Can't you just skip the 5v input and run the 2 data lines straight in to the AIO's?
Not a huge deal - $1.95, but the part is listed as "2.7 to 5.2V supply range"
Thanks
Dan
#8
Bendage
-

- Members
-
- 153 posts
Advanced Member
- LocationIrvine, CA
Posted 03 February 2012 - 12:01 AM
Hi Jacques, unfortunately I don't own one of those, just de ADXL345. I sincerely do hope you get some more useful answers then mine. But if not, from the info at Sparkfun (it is basically an ADXL345 accelerometer + ITG3200 gyro on the same breakout-board), it appears like you could start by using the info on the Loveelectronics site and get at least the accelerometer part working with your Netduino plus. From there hopefully you can extend their code to include the gyro output.
using System;
using System.Threading;
using Microsoft.SPOT;
using Microsoft.SPOT.Hardware;
using SecretLabs.NETMF.Hardware;
using SecretLabs.NETMF.Hardware.Netduino;
namespace accelerometer
{
public class Program
{
// Define our accelerometer inputs
static AnalogInput accX;
static AnalogInput accY;
static AnalogInput accZ;
public static void Main()
{
// Create the Inputs
accX = new AnalogInput(Pins.GPIO_PIN_A0);
accY = new AnalogInput(Pins.GPIO_PIN_A1);
accZ = new AnalogInput(Pins.GPIO_PIN_A2);
while (true)
{
Debug.Print("accX: " + accX.Read().ToString());
Debug.Print("accY: " + accY.Read().ToString());
Debug.Print("accZ: " + accZ.Read().ToString());
}
}
}
}
- martinlee556 likes this
#9
roguemat
-
- Members
-
- 54 posts
Advanced Member
- LocationSouth Africa
Posted 03 February 2012 - 01:37 PM
Hmmm, I wired mine up like in the picture and can get no response from it.Hi,
Just curious, but I'm not sure why you'd need the logic level convertor. (neither for Arduino?)
Anyone have insight into this?
Can't you just skip the 5v input and run the 2 data lines straight in to the AIO's?
Not a huge deal - $1.95, but the part is listed as "2.7 to 5.2V supply range"
Thanks
Dan
Surely someone here can recommend the best way to wire the 6DOF? I can't seem to find any info on the net

EDIT: Ok, I think it's actually working. I run this:
I2CDevice adxl = new I2CDevice(new I2CDevice.Configuration(0x53, 100));

            byte[] devid = new byte[1] { 1 };

            I2CDevice.I2CWriteTransaction write = I2CDevice.CreateWriteTransaction(new byte[] { 0 });
            I2CDevice.I2CReadTransaction read = I2CDevice.CreateReadTransaction(devid);

            I2CDevice.I2CTransaction[] actions = new I2CDevice.I2CTransaction[] { write, read };
            adxl.Execute(actions, 1000);

            Debug.Print(devid[0].ToString());
And get a result of 192. I have absolutely no idea what the significance of that is though EDIT2: Ok, from the data sheet(pg 15) that 192 is:
The DEVID register holds a fixed device ID code of 0xE5 (345 octal).
EDIT3: YAY! I have it working! The range is a bit weird, but will read through the datasheet some more.
http://www.youtube.com/watch?v=hE4trZpbVEc
EDIT4: Now have it completely working, and giving me proper signed degrees via some very basic math. Guess it's onto the gyro next.
I make Windows Phone stuff for beer money and rent (in order of priority). I've got a blog and am on the Twitter machine.
#10
Jack Chidley
-

- Members
-
- 99 posts
Advanced Member
Posted 07 October 2012 - 05:34 PM
I am on this journey with the ITG3200. Do you have any working code that you can share?
Jack


0 user(s) are reading this topic
0 members, 0 guests, 0 anonymous users


