The Netduino forums have been replaced by new forums at community.wildernesslabs.co.
This site has been preserved for archival purposes only
and the ability to make new accounts or posts has been turned off.
There's a Netduino Plus in the picture above, but it really doesn't need to. It's just that my Netduino Classic is otherwise occupied
The above picture shows a Netduino, XBee Shield and RN-XV WiFly Module. This module is in simple terms, a serial-to-tcp-bridge. It can handle one tcp socket at the same time, but for many applications this is exactly enough!
So I wrote two classes, one in generic to drive the module, and one as socket wrapper. The outcome is that the code below works. Keep in mind, it's not actually ment as IP stack, but it works. Some things are a bit hackish though.
// Declares the WiFly module, configures the IP address and joins a wireless network
WiFlyGSX WifiModule = new WiFlyGSX();
WifiModule.EnableDHCP();
WifiModule.JoinNetwork("Mynetwork", 0, WiFlyGSX.AuthMode.MixedWPA1_WPA2, "MyTopSecretPassword");

// Showing some interesting output
Debug.Print("Local IP: " + WifiModule.LocalIP);
Debug.Print("MAC address: " + WifiModule.MacAddress);

// Creates a socket
SimpleSocket Socket = new WiFlySocket("www.netduino.com", 80, WifiModule);

// Connects to the socket
Socket.Connect();

// Does a plain HTTP request
Socket.Send("GET / HTTP/1.1\r\n");
Socket.Send("Host: " + Socket.Hostname + "\r\n");
Socket.Send("Connection: Close\r\n");
Socket.Send("\r\n");

// Prints all received data to the debug window, until the connection is terminated and there's no data left anymore
while (Socket.IsConnected || Socket.BytesAvailable > 0)
{
    string Text = Socket.Receive();
    if (Text != "")
        Debug.Print(Text);
}

// Closes down the socket
Socket.Close();
Oh hey, that's pretty awesome!
I know that WiFi is something people really want to do with their Netduinos...hopefully this helps more people build wirelessly-connected devices!
Chris
P.S. You might consider changing your WPA2 password
Stefan,
I was in the middle of writing drivers myself for this module for work and after chatting with Walker telling me about the drivers. Well I tried them out today. OMG frigging awesome. way less complex than i was making mine and well quite incredible. I have found a few minor bugs but they might be related to some timing issues. Mostly when adding in my own command Mode settings such as Scan and Sleep. I see that there are times your ignoring some of the garbage that comes back. so it might just be an issue with me debugging. but occasionally I expect my code to get a value back and you have ignored something like DHCP=on coming back.
Here is a few methods I have implemented you could add to the WiFlyGSX class and an additional class I implemented.
public void GoToSleep()
{
CommandModeStart();
WriteBuffer("sleep\r");
}
public WirelessNetwork[] Scan()
{
CommandModeStart();
WriteBuffer("set sys printlvl 0x4000\r");
CommandModeRead(true);
WriteBuffer("scan\r");
Thread.Sleep(3000);
CommandModeRead();
string found = CommandModeRead(true);
short count = Convert.ToInt16(found.Split("SCAN:Found ".ToCharArray())[11]);
var retVal = new WirelessNetwork[count];
for (short x = 0; x < count;x++ )
{
string s = CommandModeRead();
string[] cols=s.Split(",".ToCharArray());
var w = new WirelessNetwork
{
Id = Convert.ToInt16(cols[0]),
Channel = Convert.ToInt16(cols[1]),
Rssi = Convert.ToInt32(cols[2]),
Security = (AuthMode) Convert.ToInt32(cols[3]),
Capibilities = cols[4], //This is not documented well at least that I can find and can be more than on comma delimited Field
MacAddress = cols[cols.Length-2],
Ssid = cols[cols.Length-1]
};
retVal[x] = w;
}
WriteBuffer("set sys printlvl 0\r");
CommandModeRead(true);
CommandModeStop();
return retVal;
}
public class WirelessNetwork
{
public short Id;
public short Channel;
public int Rssi;
public AuthMode Security;
public string Capibilities;
public string MacAddress;
public string Ssid;
}
I got the netduino classic and WiFlyGSX module attached to the XBee Shield same as the picture you have posted except the netduino us a classic one. Have added the .NET Micro Framework Toolbox references so I can have access to the WiFlyGSX class but when I try run the program the code hangs when creating an instance and nothing happens. Any advise
The code I have is just creating an instance and getting tryint o get the mac address
Debug.Print("Starting wifi config...");
WiFlyGSX WifiModule = new WiFlyGSX();
Debug.Print("Mac Address"+WifiModule.MacAddress);
It print "Starting wifi config..." and is hanging in the debugger. Any advise
netduino hardware
Pinging... TinyCLR
HalSystemInfo.halVersion: 4.1.2821.0
HalSystemInfo.halVendorInfo: Netduino by Secret Labs LLC
HalSystemInfo.oemCode: 34
HalSystemInfo.modelCode: 177
HalSystemInfo.skuCode: 4096
ClrInfo.clrVendorInfo: Netduino by Secret Labs LLC
ClrInfo.targetFrameworkVersion: 4.1.2821.0
SolutionReleaseInfo.solutionVersion: 4.1.0.6
SolutionReleaseInfo.solutionVendorInfo: Netduino by Secret Labs LLC
SoftwareVersion.BuildDate: Feb 14 2011
SoftwareVersion.CompilerVersion: 400902
Hi tranceash,
Have you added the reference as DLLs or from source? At the top of the wifly code there's a #define debug (see http://netmftoolbox....ew/13101#197130)
If you enable it, it'll output some more details which might help.
Have you added the reference as DLLs or from source? At the top of the wifly code there's a #define debug (see http://netmftoolbox....ew/13101#197130)
If you enable it, it'll output some more details which might help.
I have added references as dlls. It seems like the board is not seen by netduino but the lights are flashing on the board, d1 an d3 leds flash on the module and d105 on xigbee are flashing .
I also enabled WIFLY_DEBUG nothing gets printed same thing.
How does netduino communicate to the wifi module ? anything else I need to do ? . If I remove the wifi module from the xigbee board its the same behavior ?
Also I see that the contructor connects to com1 how does that work does it not connect to com1 from netduino board ?
It uses a serial port, COM1 = pins 0 & 1, COM2 = pins 2 & 3.
You could change it in the constructor and change the switch on the XBee shield (it has a switch on it that can switch between those two)
As final step you could wire the module directly to your Netduino without any shield at all. I can guide you through that if you dont know how to.
On the xbee there is a switch that says uart and dline. It is set to dline.
I did a step through the code and it hangs at this line.
this._Port = new SerialPort(PortName, BaudRate, Parity.None, 8, StopBits.One);
Also how do you connect the wire the module directly to the netduino . I am new to electronics so any guide?
Do you think the xbee is the problem ?
On the xbee there is a switch that says uart and dline. It is set to dline.
I did a step through the code and it hangs at this line.
this._Port = new SerialPort(PortName, BaudRate, Parity.None, 8, StopBits.One);
DLine is COM2 if I'm correct, with that shield. You could try that.
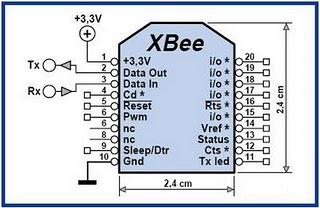
If that doesn't help, try connecting it directly: Same pin-out counts for the WiFly module
Connect pin 1 of the WiFly module to 3V3 on your Netduino
Connect pin 10 of the WiFly module to Gnd on your Netduino
Connect pin 2 of the WiFly module to digital pin 0 on your Netduino
Connect pin 3 of the WiFly module to digital pin 1 on your Netduino
DLine is COM2 if I'm correct, with that shield. You could try that.
If that doesn't help, try connecting it directly: Same pin-out counts for the WiFly module
Connect pin 1 of the WiFly module to 3V3 on your Netduino
Connect pin 10 of the WiFly module to Gnd on your Netduino
Connect pin 2 of the WiFly module to digital pin 0 on your Netduino
Connect pin 3 of the WiFly module to digital pin 1 on your Netduino
That should link it to COM1.
I will require some jumper wires to do that will order some tomorrow and will let you know how it goes .
to netduino board . The idea is the pir sensor detects movement and sends a signal to a web server with the help of the WiFly module. How do I interface all this if I connect the wiFly module using jumper wires ?
DLine is COM2 if I'm correct, with that shield. You could try that.
If that doesn't help, try connecting it directly: Same pin-out counts for the WiFly module
Connect pin 1 of the WiFly module to 3V3 on your Netduino
Connect pin 10 of the WiFly module to Gnd on your Netduino
Connect pin 2 of the WiFly module to digital pin 0 on your Netduino
Connect pin 3 of the WiFly module to digital pin 1 on your Netduino
to netduino board . The idea is the pir sensor detects movement and sends a signal to a web server with the help of the WiFly module. How do I interface all this if I connect the wiFly module using jumper wires ?
to netduino board . The idea is the pir sensor detects movement and sends a signal to a web server with the help of the WiFly module. How do I interface all this if I connect the wiFly module using jumper wires ?
You could do the same for the PIR sensor, also with jumper wires
You could do the same for the PIR sensor, also with jumper wires
Sorry Stefan can you show me a diagram how I will connect the classic netduino + Wifly + pir sensor ? As the power is connected to wifly so should I connect the pir to the wifly pin ?
Sorry Stefan can show me a diagram how I will connect the classic netduino + Wifly + pir sensor ? As the power is connected to wifly so should I connect the pir to the wifly pin ?
Hi Tranceash,
It all depends on the kind of pir sensor, but you could connect multiple devices to power pins. For this you could use a breadboard. Just connect the PIR sensor to the Netduino with a breadboard, then connect the RN-XV module to the breadboard. Should work.
Hello,
if i debug the method
private void _CommandMode_Start()
of the WiFlyGSX class i only get in Teststring the message:
"Auto-Assoc roving1 chan=0 mode=NONE FAILED"
and the module stucks in the while loop.
So i think the module can't get into command mode.
Has anyone an idea ?
Hello Stefan,
i used the WiFly_Socket Example Project with
th adaption of
WifiModule.JoinNetwork("<<my access point>>", 0, WiFlyGSX.AuthMode.WPA2_PSK, "<<my very secret pass>>", 1);
but before that the call of
Constructor: WiFlyGSX WifiModule = new WiFlyGSX();
hangs in the mentioned loop.
Could it be you're suffering the same problem as described here?
http://forums.netdui...dpost__p__25848
Appairently that shield (or at least one version) has some issues.